How to create disk image with free DiskInternals software on Windows
A Disk Image is a mirror of your logical drive that is stored in one file. This article is fully dedicated to this theme and here you will find out:
- what is a disk image
- how to use it
- how to create disk image free
Are you ready? Let's read!
How can you use a disk image
The disk image is a very useful thing.
Firstly, you can use it to have a duplicate of your hard drive, especially if you already have some problems with it. This will protect you from the inevitable loss of any data, OS parameters, etc.
Secondly, the disk image is also very useful for network administrators when they need to work with multiple PCs. For example, one of the computers used may have a hard disk that is out of order and not to configure new configurations, applications, etc. for a long time. You can just do a system image recovery on Windows 10.
Disk images can be a good idea
There are two main situations when it will be good to use an image created by DiskInternals VMFS Recovery:
- If the disk has started to “die”: when bad blocks appear, the process progresses quite quickly. Creating an image preserves data that is still being read.
- If you want to accelerate data recovery from a damaged disk. Because of bad sectors, the “reading” of data can be performed only once, not twice, like with healthy disks, when scanning happens and then saves (preview and re-scanning are also included).
How to create a disk image for free
Create a disk image easily with DiskInternals software! DiskInternals software has a free feature that can create a disk image in Windows (all versions), in all file systems and storage devices. This free feature has no competition, so do not waste time and get disk image software for free.
You can install DiskInternals Uneraser, Partition Recovery, VMFS Recovery, RAID Recovery, NTFS Recovery, EFS Recovery, Linux Recovery or Linux Reader. Any of these programs can be used as free imaging software.
A detailed guide for disk image creation
Using DiskInternals software, you can create a disk image in Windows 10, 7, 8 or any other versions.
This brief guide will help you:
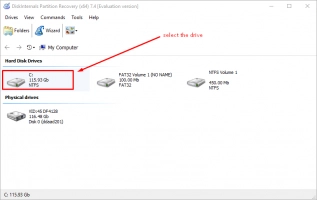
- 1. Open the DiskInternals program.
- 2. Close the Recovery Wizard (it will automatically load).
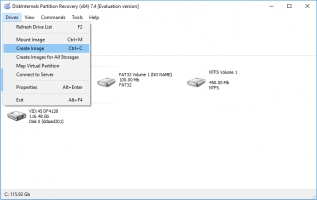
- 3. Left-click on the disk (the one you want to make an image of). Then, left-click again on the Drives tab and select Create Image.
- 4. Click the "Browse ..." button to specify where the file to go. Now select one of the following options:
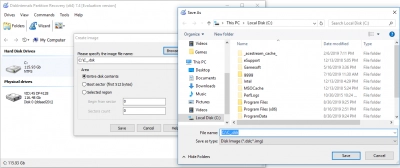
- Entire disk contents: Save the entire contents of the disk to a file. Due to FAT32 restrictions, files larger than 4.3 GB should only be saved to NTFS partitions or to network drives.
- Boot sector (first 512 bytes): The image will contain only the first sector (512 bytes).
- Selected region: The image file will contain the selected region.
The inscriptions below mean the following:
Start with the sector: the sector from which you want to start copying.
A number of sectors: the number of sectors to be saved.
* Using the Boot sector and Selected region you can select the start point of the disk image and its length.
- 5. Click the Save button. Next, the disk image in Windows 10 will be created. This is the last point; now just wait for the creation of the Windows disk image to complete.
How to use disk image:
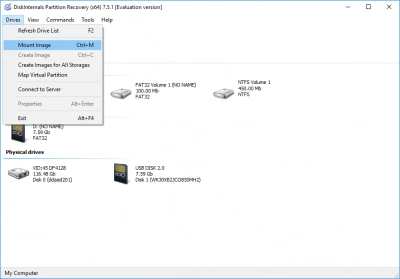
- 1. Skip Recovery Wizard. Click on the Drives tab and choose Mount Image.
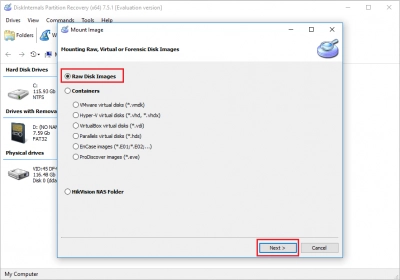
- 2. A new window will give you the opportunity to choose among RAW Disk Image, Containers and Hikvision NAS Folder. Choose RAW Disk Image and click on the Next button.
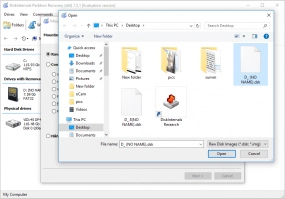
- 3. Browse for the disk image and click the Open button. The mounted disk image will appear on a hard drives list.
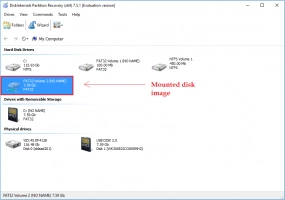
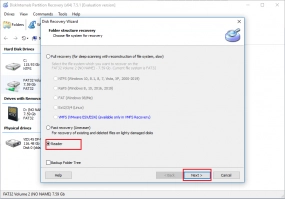
- 4. Double-click on the mounted disk image and select Reader mode.
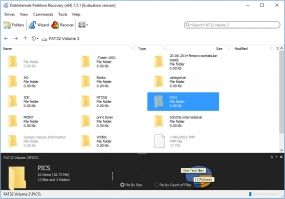
- 5. In the new window, you will be able to get access to your data.
