0x80070002 Windows Update Error
This article is dedicated to the 0x80070002 error. Here you will find out:
- what is 0x80070002?
- how to fix a 0x80070002 error with Time&Data setting
- how Windows Troubleshooter may help you
- how software Distribution Folder related to 0x80070002 error
- how to cope with the consequences of 0x80070002 error
Are you ready? Let's read!
What is 0x80070002?
During or after a Windows update, something may go wrong and a message like this will appear on your screen:
“An error occurred while checking for new updates for your computer. Errors detected: Code 0x80070002 Windows Update has detected an unknown problem.”
The operating system stops working correctly; it can reboot, but again it will fail. The error code itself may differ in different versions of Windows; for example, for Windows XP, the error code is 0x80070002, and for Windows 10, 8, 7, the error code is 80070002. And if you have never encountered this, such a situation can be scary.
How do you fix the 0x80070002 error?
You can use one of the following methods to fix the 0x80070002 error.
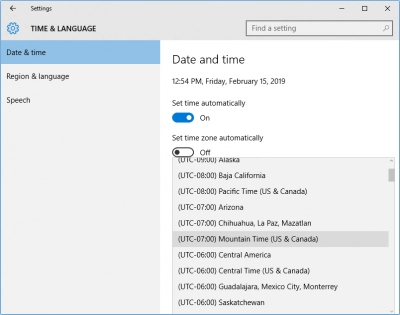
1. Fix a 0x80070002 error with Time&Data setting
It may seem to you that this method is too simple and even ridiculous, but it is not so. Often, it really helps you get rid of code 0x80070002.
In the lower right-hand corner, find and click on Date and Time. In the new window, click on "Change date and time settings". Check if the date and time correspond to reality, then click OK.

Then click on the “Change Time Zone” tab to verify that the data is correct.
In the “Internet Time” tab, click on “Change Settings”. You definitely need to make sure that the “Synchronize with Internet Time Server” tab is checked. If not, correct the situation. Now click "Update Now", then OK. Reboot the computer. Windows Update should work correctly.
If you are running Windows 10, then you will need to change the date and time via the command line.
As you can see, even seemingly trivial things can cause serious problems in a PC.
2. Stop Windows Update Service
- Open File Explorer
- Open drive C where Windows is installed
- Click on the Windows folder
- Open Software Distribution folder
- Click the DataStore folder to open it
- Delete everything in the DataStore folder
- Insert password or give permissions if prompted to do so
- Click Back
- In the Software Distribution folder, click Download folder to open it then delete all its contents
- Insert password or give permissions if prompted to do so.
Work with update center
When the system update procedure fails and the Windows Update installation files are damaged or missing, the error 0x80070002 appears. To address the problem, consider deleting the installation files or renaming the installation folder.
You may need to pause the Windows Update service before we alter the files or folder. Otherwise, the files or folders will be open in applications and you won't be able to change them. So, here are the measures to take:
Step 1: Disable the Windows Update service
1) On your keyboard, press the Windows logo key + R at the same time to invoke the Run box.
2) Type services.msc, and click OK.
3) Double click Windows Update (if you are using Windows XP, double click Automatic Updates).
4) Change the Startup type to Automatic. Then, make sure the Service status is set to Stopped. If it’s Running, click Stop then click Apply, and OK to save the changes.
Step 2: Delete the Software Distribution Folder
1) Double click the drive where your Windows is installed, generally in C drive.
2) Go to folders: Windows > SoftwareDistribution.
3) Delete the folder named SoftwareDistribution. (If you’re prompted for an administrator password or confirmation, type your password or provide confirmation.)
If you don’t want to delete this folder, you can also rename it with SoftwareDistributionOld.
4) Close all the panes.
Step 3: Re-enable the Windows Update service
1) On your keyboard, press the Windows logo key + R at the same time to invoke the Run box.
2) Type services.msc, and click OK.
3) Right click Windows Update (if you are using Windows XP, right click Automatic Updates), and click Start.
4) Restart your Windows and try Windows Update again to see if it solves the problem.
4. Restart Windows Update service
This step also necessitates admin rights, so if you have them, log in and proceed as follows:
- Right-click Start
- Select Control Panel
- Type Administrative Tools in the search box of the Control panel box
- Click Services
- Insert password or give permissions if prompted to do so
- Click the Name column heading
- Sort names in reverse order
- Find Windows Update service
- Right click on it
- Click Start
- Close Services window and Administrative Tools window
5. Check the updates installed on the computer
When you erase temporary update files, you not only cure the issue 0x80070002, but you also destroy your Windows Update history.
You can still see the updates that have been installed on your computer.
This is how you do it:
- Right-click Start
- Select Control Panel
- Click Programs
- Under Programs and Features, click View Installed Updates
6. Use DISM or System Update Readiness Tool
Use the DISM tool, or Deployment Image Servicing and Management tool, if the problem 0x80070002 remains after executing steps 1-5 above.
To repair Windows Update corruption issues, you may also utilize the System Update Readiness utility.
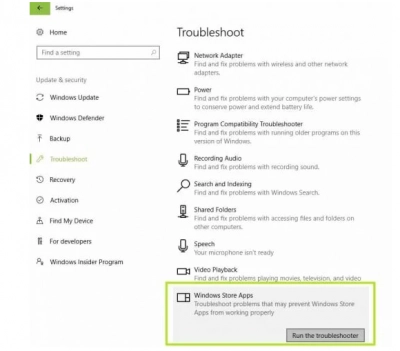
7. Run Windows Update Troubleshooter
- Right-click Start
- Select Control Panel
- Go to the top right corner and change View by option to Large icons
- Click Troubleshooting
- Click on View all option on the left panel
- Select Windows store Apps

- Follow the instructions to run the app troubleshooter
8. Perform a clean boot
Performing a clean boot for your computer lowers program conflicts, which can lead to the main reasons of sluggish game loading.
Applications and services that start up and operate in the background when you start Windows normally might cause these problems.
How do you do a clean boot?
To properly conduct a clean boot on Windows 10, you must first log in as an administrator, then follow the procedures below:
- Go to the search box
- Type msconfig
- Select System Configuration
- Find Services tab
- Select Hide all Microsoft services box
- Click Disable all
- Go to Startup tab
- Click Open Task Manager
- Close Task manager then click Ok
- Reboot your computer
After carefully following all of these instructions, you will have a clean boot environment, and you may check if error 0x80070002 is still present.
9. Disable Security Software Temporarily
Third-party software, such as computer cleaners and antivirus, can be uninstalled from your machines.
Note that you must temporarily disable antivirus to protect your machine from security risks. Re-enable your antivirus as soon as you've resolved the issue 0x80070002.
10. Disable proxy connection
In case you use proxy connections, here’s how to disable one:
- Launch Internet Explorer
- Go to the top right corner and click on the Gearbox
- Click Tools
- Click Internet Options
- Click Connections
- Click LAN settings then uncheck or deselect the Use a proxy server for your LAN box
- Click Ok/Press Enter
11. Sign in with Local Account
- Click Start
- Select Settings
- Click on Accounts
- Click Sign in with local account instead
- Follow the wizard instructions
- Log in again
- Try using the store to download an app
Hope this works to fix error 0x80070002 on your computer, as most users say this fixed the chop for them.
12. Run SFC (System File Checker) Scan
When a corrupted.dll file is the source of the problem, the SFC scan can help.
Here's how to make it right:
- Press Windows + X keys at the same time
- Click Command Prompt (Admin) to open a command prompt
- If prompted for permissions, click Yes
- In Command prompt, type sfc/scannow
- Press Enter
13. Cope with the consequences of 0x80070002!
Unfortunately, there are many reasons that can lead to a 0x80070002 error, which can also lead to file loss.
If you are faced with this, do not panic in advance. There is a good and proven data recovery option — special software designed for this purpose. DiskInternals Partition Recovery is a professional software tool that has proven itself through many years of scrupulous work by the company.
This software supports most file systems, including FAT12, ReFS, UFS, HFS, NTFS, ReiserFS, Reiser4, XFS Ext2, Ext3, and Ext4. In addition, DiskInternals Partition Recovery is equipped with a trio of helpers: Partition Recovery Wizard, NTFS Recovery Wizard and FAT Recovery Wizard. Therefore, do not worry if you are recovering data for the first time and do not have any skills for this.
With the free preview function, you will be assured of the quality of the recovered photos, videos, documents, etc. You can also use the free trial version of the program and test its performance. If you suddenly have a difficult problem to be solved or other situation, you can easily contact the DiskInternals support service and be sure you will receive high-quality advice as soon as possible.
There is no doubt that DiskInternals Partition Recovery will recover any information correctly and in the shortest possible period of time.
