Detailed guide on how to format a write-protected USB drive
If you asking yourself the question: "how do I remove write protection on a USB drive?", then you are in the right place.
Here you will find out:
- 2 great methods to remove write-protection on the USB drive
- how to format the USB drive
Are you ready to learn how to fix corrupted flash drive without losing data? Let's read!
Step 1. Get your files first
With formatting, you can get a new file system on your USB drive. It will be faster and will work smoothly, but formatting will also delete all your files.
How do you avoid that? Use DiskInternals Partition Recovery!
This software gives you to access files by opening them in reader mode, or you can restore deleted files in recovery mode.
This application has a nice interface, equipped with a recovery wizard. It, in turn, allows both professionals and ordinary users to recover inaccessible data. The program has a wide range of additional functions, which you can work with yourself by downloading the free trial version of DiskInternals Partition Recovery tool.
You can get back all types of files using this software.
In addition, before recovering data, you can preview files for free and make sure that they can be returned quickly and correctly. After the data is safe and sound, it's time to learn how to remove write-protection on USB drives.
Step 2. Use Regedit to remove write-protection from the USB drive
How do you remove write-protection from a USB drive in Windows 10 with Regedit.exe? Follow the instructions and you will understand how to conduct USB disk partition repair.
Right-click Start and select Command Prompt (Administrator).
In the new window, enter the “regedit” command. Then press Enter. Now go to the directory
Computer\HKEY_LOCAL_MACHINE\SYSTEM\CurrentControlSet\Control\StorageDevicePolicies. In the right pane, left-click WriteProtect. If you see the number 1, change it to 0 and click on OK. Restart the computer and reconnect then open the USB drive. Problems should no longer arise.
It is possible that you did not find a StorageDevicePolicies file. But do not worry; you can create it yourself. Go to the folder "Control" and right-click on the empty space. Now select the “New -> Key” tab, then enter “StorageDevicePolicies”. Then change the value from 1 to 0, as described above.
If this method did not help to remove the write protection, proceed to the next step.
Step 2 (Alternative). Use Diskpart to clear write-protection from the USB drive
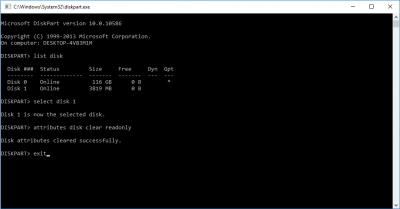
Right-click Start and select Command Prompt from Administrator. Type DISKPART and press Enter. Then enter the following commands; after each of them, press Enter.
LIST DISK
SELECT DISK 1 (1 - is as an example of your USB drive number)
ATTRIBUTES DISK (you will see a message stating that the disk is write-protected and that you need to enter the following command to cancel it)
ATTRIBUTES DISK CLEAR READONLY

Restart the computer and try to perform any actions (copying, saving, etc.) on the USB drive.
Now you know how to remove write-protection on a USB drive. It's time to learn how to format a write-protected USB drive.
Step 3. Format write-protected USB
As long as there is no write-protection, you can easily format a USB drive.

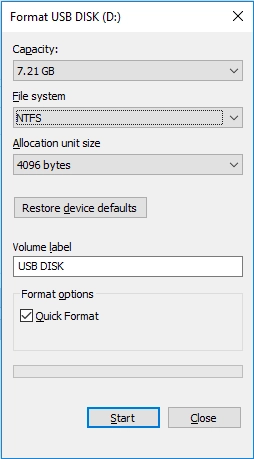
To do this, follow these steps: left-click This PC -> select your USB-drive and right-click on it. From the list, select and click Format.
Wait for the process to be completed.
