Here is How to Partition SSD Without Harming Your Data

In this article you will find out:
- how to Partition SSD Without Harming Your Data
- how to protect your data
Are you ready? Let's read!
About Partition SSD on Windows
You are probably already familiar with Solid-State Drive (SSD), which uses flash memory for the best performance. SSD combines higher speed and reliability compared to other hard drives and surpasses them in many other respects, so most device manufacturers combine their uses, although such devices in the modern market are becoming more and more problematic in the separation of solid-state drives for their full use.
This is especially true if dividing the SSD into partitions for both Windows 10 and computer games. There are many benefits to this.
The main ones are: simplicity in creating backups, restoring the OS, simplicity in managing the OS and personal files, their effective use, as well as protecting the stored information from errors in the system. Summarizing the above, it can be noted that separate storage of system files and additional programs in one section and your valuable files in another section are feasible.
As a rule, partitioning an SSD causes certain difficulties for a category of users, so let's figure out how it’s done.
1st Step: Examine the Solid-State Drive
To begin with, you need to set the state of your Solid-State Drive, since all separation methods depend on this factor. Follow the step-by-step instructions below to assess the condition.
- Connect the SSD to your device in the correct order using a connecting cable.
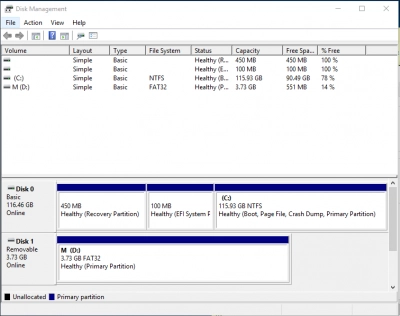
- Reboot your PC, at the end of the process, click on This Computer or My Computer icon with the right mouse button and select the Manage section.
- Click on the Disk Management subsection and assess the status of your SSD.

If the SSD is not initialized, you need to initialize your SSD first before starting to create partitions. Consider the following case. If the SSD is unallocated, you can safely create partitions on your SSD since it was initialized. If there is partitioning, it means that there are already partitions on the SSD. You just need to resize the SSD and reallocate it.
2nd Step: Partitioning
Not Initialized SSD
So let's deal with the case when the SSD shows Not Initialized in the Disk Management section. First you need to initialize the SSD.
- Right-click on This Computer or My Computer and go to Manage, then go to Disk Management.
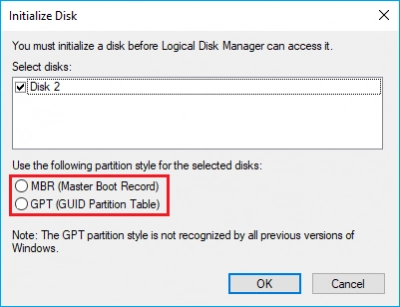
- Right-click the uninitialized disk and select Initialize SSD.
- Click on MBR or GPT for your SSD and press Enter for the changes to take effect.

What's the difference between MBR and GPT? It depends directly on what style of partitions the SSD will be. When creating one or two partitions, it is better to choose MBR. However, when creating more than two partitions or when installing the most recent version of Windows 10 OS on a Solid-State Drive, use GPT. For more information, you can read more about MBR and GPT.
Partitioned SSD
Using the Windows tool, you can partition the SSD into the number of partitions you need. This is done by shrinking the partition and using the freed space to create new partitions. If the SSD was not previously partitioned into partitions, create them directly using the following instructions.
- Go to the above path in Disk Management.
- Right-click on one SSD partition and click Shrink Volume from the list.
You will need to enter a value for the size of the space to shrink and then click Shrink. This will create free unallocated space.
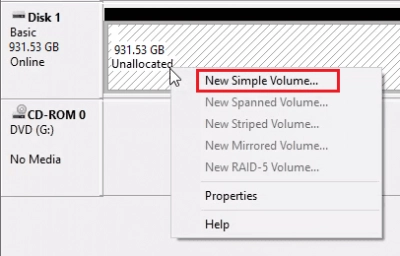
- Now, right-click on the free space and select New Simple Volume.

- In the window for creating a new volume, click Next, then Next again to continue the process. Eventually, the free space on the SSD will be added to the new partition on your SSD.
- Select the drive name (letter designation) or path, then change the file system to NTFS and click Finish.
- Wait a little while for the end of the action. As a result, you will have a new partition on the SSD.
Protect Your Data
Even on the most modern and sophisticated devices, users are not insured against loss or damage to files. Of course, this situation is very unpleasant, but you cannot hesitate and postpone the recovery in the long box. Remember that the longer you postpone the recovery process, the less likely you are to get your valuable data back intact.
Another equally important point is to keep the disk partition intact before starting the recovery. Since any copying, deleting, moving, or creating new files in such a section will lead to overwriting and will eventually to the loss of data forever. Therefore, you are faced with a difficult choice of data recovery software.
One of the most popular and highly efficient programs is DiskInternals Partition Recovery. This program combines the speed of the process with high efficiency confirmed by the long-term existence of the program on the market. The program allows you to perform recovery both on internal data drives and on external ones, for example HDD, SSD, flash drive, external hard drive, memory cards, IDE disk, SATA disk, SCSI disk, etc. The program works with many file systems such as FAT, ReFS, UFS, HFS, NTFS, ReiserFS, APFS (reader mode), RomFS (reader mode), Reiser4, XFS, Ext2, Ext3, and Ext4. To make it easier to work with the program, there is a built-in recovery wizard that starts automatically with the opening of the program.
The program interface is simple and straightforward to use. Believe it or not, even the trial version available for free on the official website has a preview tool. With it, you can try to recover files in the section of your choice and make sure of the program's capabilities. For full utilization of DiskInternals Partition Recovery, you just need to purchase a license key. Then select a location on the storage medium and save the recovered files. With DiskInternals Partition Recovery, you never have to worry about safety of your information on devices!
