New hard drive not showing up in Windows 10, 11? The best solutions are here!
This article is fully dedicated to the problem of second hard drive: why and when it is not showing up. Here you will find out:
- reasons, why a new internal hard drive does not shower up
- 5 methods to fix the problem
- how DiskInternals Partition Recovery can help you
Are you ready? Let's read!
Why is my new hard drive not showing up?
Buying a hard drive, whether online or at a brick-and-mortar store, can be tricky. Of course, if you confident in the manufacturer and there are no doubts as to the drive’s quality, then it is a perfect investment.
But what if your hard drive is brand new, it wasn’t cheap and the manufacturer is great, but it is not being detected?
Here, you will find out what to do in this case.
After you have attached a second hard drive, there are several reasons why the new HDD may not be not showing up. And here they are:
- Windows do not recognize a new hard disk or recognizes it as a foreign disk
- Damaged SATA cable or port
- A second hard drive is included in the Windows storage space
- Damaged or obsolete SATA drivers
- Physical damage to the disk
Here are five great methods to solve the problem of an HDD not showing up in Windows 10,11 or previous versions.
Method 1. Is new hard drive not showing up because of a bad connection?
Enter the BIOS and see if the disk is detected there.
If you see the hard drive in the BIOS and at the same time the internal hard drive is not showing up in Disk Management, turn off the computer and check the cable connection. Most likely, the whole problem is there. Try another SATA cable or different SATA port.
If this method did not help, do not despair. Try the following method.
Method 2. Re-install ATA channel drivers
This method is quite effective since after removing all ATA channel drivers using the Device Manager, the next time the OS boots, Windows automatically searches for all connected ATA devices and reconfigures them.

To remove ATA channel drivers, follow these steps:
Simultaneously press the Windows + R hotkey combination. The Run dialog box opens, where you will need to enter "devmgmt.msc" and then press Enter. The Device Manager will open.
Startup Dialog: devmgmt.msc
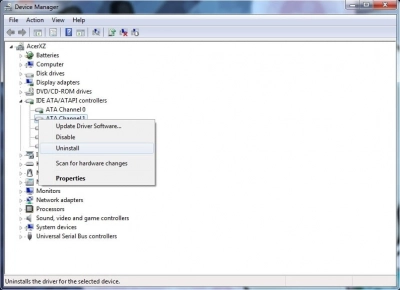
In Device Manager, find the IDE ATA / ATAPI controllers and click on it to see the dropdown menu.
Now you need to select the first ATA channel by clicking on it with the right mouse button. From the list, select Uninstall Device. Delete all ATA channels under the IDE ATA / ATAPI controllers.
Restart the computer. Windows will automatically find all connected ATA devices and re-install the drivers. Check Device Manager to find out if the new hard disk is visible.
If this method did not help, go to the next method.
Method 3. Try Partition Recovery
You can try to restore data from an internal hard drive not showing up using the professional software tool DiskInternals Partition Recovery. This method is probably the most effective and reliable. You just need to download and install this software. Then the built-in recovery wizard will help you open (read mode) or retrieve (fast and full recovery mode) a second hard drive in a fairly short period of time.
DiskInternals Partition Recovery works with all versions of the Windows operating system.
Recovers all file types up to 1 PB. The software supports the following file systems: UFS, HFS, NTFS, XFS, Ext2 / 3/4, ReiserFS, FAT12, ReFS, and Reiser4.
The recommended software runs on each partition of the new hard disk. At the same time, the file system remains unchanged; rebuilding only occurs for deep data scanning.
You can use the trial version of the program right now and test its performance for free. A great bonus: Preview of the files found before recovery is also free. This way, you can make sure that the data will be restored correctly.
Method 4. Is internal hard drive not showing up? Try Troubleshooter
A troubleshooter is a utility tool from Windows that checks the device and fixes all the errors found. It is not built-in though, so you need to download it from the official website.
After installation, use the guide below.
- 1. In the lower left-hand corner, find the Start tab and right-click on it. From the list provided, select Settings and then select “Update and Security.”
- 2. In the left pane, find and click Troubleshooting -> “Equipment and devices” -> “Run troubleshooter”.
- 3. Select the wizard icon to help you complete the process.
If, after restarting the operating system, the internal hard drive is not showing up in Windows 10, go to method 5.
Method 5. Try deleting the storage spaces from the HDD
If the HDD not showing up in Disk Management, you can solve this problem by removing it from the storage pool.
In order to do this, follow these detailed instructions:

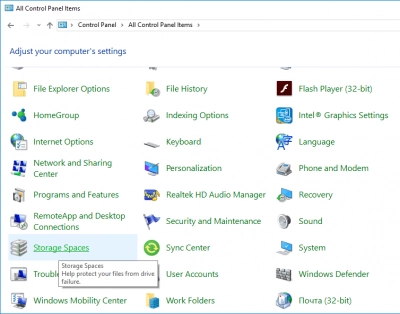
Open the Run dialog. This is easily done by simultaneously pressing Windows + R. Now type in “control” and press Enter. The Control Panel opens. Launch Dialog: Manage, then click "System and Security" -> "Storage Spaces". From the list of storage pool options, select and click Delete, then OK. You will need to restart the computer and check if the problem has disappeared.
All of the above methods are quite effective for dealing with a second hard drive not showing up in Windows 10. You just need to choose the most suitable one.

