What should you do if USB drive not recognized?

In this article you will find out:
- about this error
- how to deal with the problem
- how to protect your data
Are you ready? Let's read!
About this error
USB devices not being recognized is a common error for Windows 11/10/8/7/XP/Vista that occurs when you connect a USB device to your computer. In this case, a USB device means any external device that uses a USB port for a connection (mouse, keyboard, smartphone, camera, printer, etc.). If you get the error “USB device not recognized on Windows 10, 11”, the USB device will not show up on your computer and you will not be able to open your device or access your data. This is a trap you need to get out of as soon as possible, so let's get started!
USB drive not recognized fix
1. Disconnect your computer from the network
Turning off your computer can solve the problem with your external device and give you access to data. However, shutting down the computer should restart the motherboard, and this is possible only if you unplug the computer from the outlet and wait a few minutes. Thus, rebooting the motherboard usually helps to resolve the temporary power supply shortage of external devices.
2. Change cable or port
Your USB port may be out of order, damaged, or dirty, as a result of which the connection cannot be made successfully. Therefore, carefully inspect all of your USB ports to make sure they do not require replacement. This also applies to all USB cables. Many users, after a thorough and proper inspection of the cable or port, find the cause of the problem in their malfunction.
3. Work with drivers
First, try updating the device driver using the Device Manager. In the Start menu search box, type “open device manager” and double-click the result.
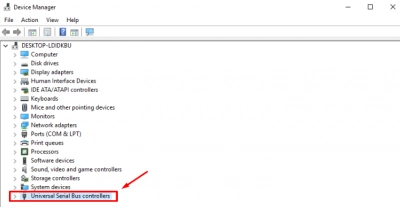
Then select “Universal Serial Bus Controllers”, right-click the first USB Universal Hub and select “Properties”. In the "Driver" tab, select "Update driver ..." and choose one of two options:
- 1. Automatic search (recommended)
- 2. Manual search, which is longer and more laborious. In this case, in the pop-up window, select “Generic USB hub” from the list, click "Next", and Windows will install the driver for you.
Also, you can try to roll back to the previous driver until the time when the "USB drive not recognized" error did not occur. To do this, on the "Driver" tab, select "Roll back driver". Alternatively, you can try uninstalling the USB device driver so that the USB is recognized.
Right-click the Windows logo and select Device Manager. In the new window, locate and expand the Universal Serial Bus Controllers and right-click the USB Drivers; select Remove from the list. Follow the same procedure for all USB drivers one at a time and restart the computer. During system reboot, all remote USB drivers are automatically reinstalled and fix the problem with damaged USB devices.
4. Check Root Hub
Open Device Manager as described in Method 3 and find the parameter "Universal Serial Bus Controllers". Expand them and find the USB Root Hub option in that category.
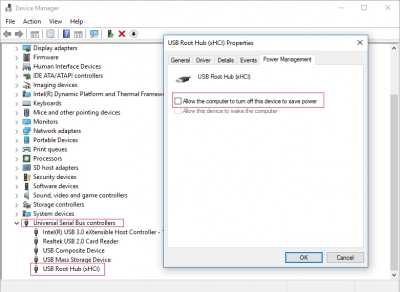
Right-click it and select Properties, then go to the Power Management tab. Here, uncheck "Allow the computer to turn off this device to save power," then click OK to save your changes.
5. USB Selective Suspend Settings
Open Power Options by right-clicking on the Windows icon. Next, click “Change plan settings” and in the window “Change plan settings”, click “Change advanced power settings”.
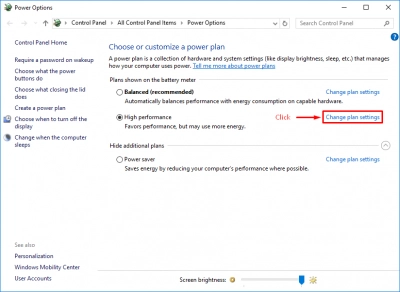
Next, under “Power Options”, select “USB Options”, select “Disable as Battery, Selective Suspend”, then click Apply and OK to save the settings.
Use DiskInternals Partition Recovery to access files with the guarantee of their preservation
You can use this professional application if any of your files (photo, video, documents, music, video, etc.) was accidentally deleted, reformatted, not saved before exiting the program, or erased by some system errors. There is also a free trial version of DiskInternals Partition Recovery letting you preview found files. You can download it right now and use the instructions below to quickly recover your data from disk partitions.
- 1. Download and install DiskInternals Partition Recovery to recover data of any size.
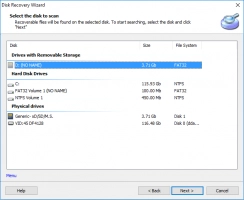
- 2. The Recovery Wizard will start automatically and offer to select the location of the lost file: it can be a hard drive, external hard drive, flash drive, memory card, SD card, etc.
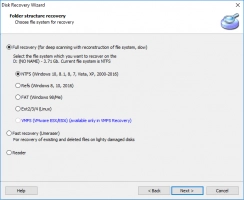
- 3. Scan a disk or disk partition. Select a scan mode: fast or full (recommended). Then wait for the process to complete.
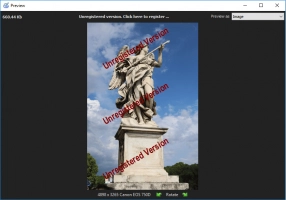
- 4. Free preview and recovery. After scanning, you should see files that can be recovered; right-click on the file and select "Preview in New Window".
- 5. Saving documents. To do this, you just need to purchase a license for this product and enter the license key (do not save the recovered data on the same device to avoid data overwriting).


