How To Fix 0x80070005 Windows 10 Error Code
Here you will find out:
- what is the update error code 0x80070005
- methods of how to fix it
- when DiskInternals can help you
Are you ready? Let's read!
Has the Windows 0x80070005 error stopped your work on its track? Do not worry. The 0x80070005 error is related to access permissions in Windows, sometimes encountered by users when they are trying to update their Windows or installing a new program, and they don't possess full access permission for certain files.
Windows update errors include the "Access Denied" issue, usually known as error code 0x80070005. When a user or the system lacks the necessary files or rights to modify settings during a Windows update, it happens.
Reasons behind the 0x80070005 error
Here is a list of the main reasons for the error 0x80070005:
- No access to a Windows application that is trying to read or write a key file. That is, Windows permissions are incorrectly configured.
- Damage to the system and other files by viruses and malware.
- Incorrect Windows update due to incorrect settings.
- Lack of administrator rights.
Usually, fixing the problems that have arisen is not difficult if you choose the right solution. So let's get down to it.
Fix Windows Error Code 0x80070005
1. Grant yourself complete permission
As was already indicated, the first step in attempting to fix problem code 0x80070005 is to grant yourself full administrator access from the Settings. This is because Windows programs cannot be utilized as a result of error number 0x80070005.
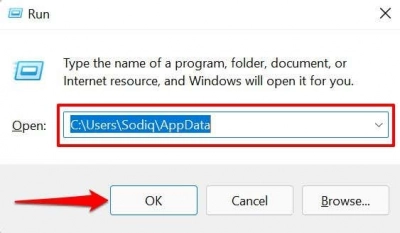
1. When the Windows Run window appears, press the Windows key and R to launch it. Type "C: Users USERNAME AppData" and click OK. USERNAME should be changed to your username, and C: should be changed to the disk where Windows is stored.
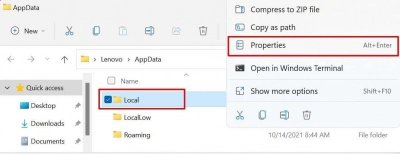
2. By selecting App Data with the right click, you may see the Properties.
3. Click Edit under the following box's security tab.
4. Select Add.
5. Click OK after typing Select Check Names Again for Everyone.
You may provide Full Control to everyone by selecting Everyone under Permissions. Select OK.
Your computer has to be restarted right away for the changes to take effect. There won't be another instance of the 0x80070005 Windows update issue.
2. Scan for Malware and Viruses
Important system files and registry entries that are necessary to run programs and update Windows are routinely deleted by malware and viruses. Use third-party software or enable real-time protection through the Windows Security application to scan your computer for viruses and malware.
Open Windows Security > Virus & threat protection > Settings > Privacy & security > Windows Security > Open Windows Security > Virus & threat protection > Toggle on Real-time protection in the settings.
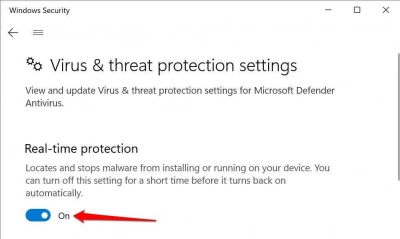
In Windows 10, head to Settings > Update & Security > Windows Security > Virus & threat protection > Manage settings and turn on Real-time protection.
3. Perform a Clean Boot
A clean boot in Windows can assist in identifying the source of startup failures, software crashes, and Windows Update issues. Non-essential services are momentarily disabled when you do a clean boot. When upgrading Windows or using Office programs, this will assist pinpoint and diagnose a software conflict that is creating the error code 0x80070005.
Before doing a clean boot, make sure you're logged in as an administrator on your computer.
- 1. Run System Configuration as an administrator by typing msconfig into the Windows Search box.
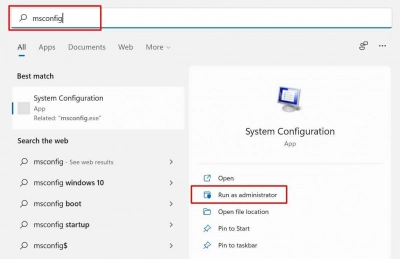
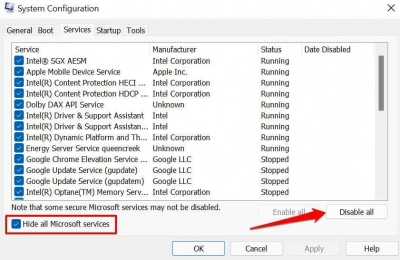
- 2. Head to the Services tab, check the Hide all Microsoft services box and select Disable all.
- 3. Afterward, go to the Start-up tab and select Open Task Manager.
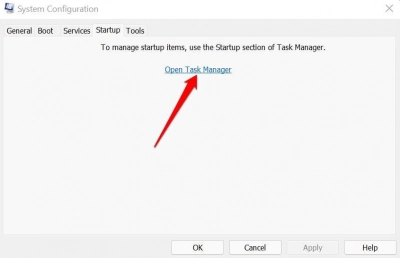
- 4. Right-click a program in the list and select Disable. Do this for all apps in the Startup tab.
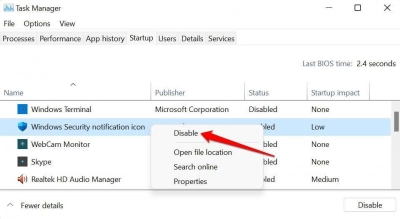
To boot into a "clean" environment, close Task Manager and restart your computer. If the 0x80070005 problem does not appear following the clean boot procedure, it is likely that one of the deactivated programs is to blame.
4. Run the Windows Update Troubleshooter
If you get the 0x80070005 error number while trying to install a Windows update, do this. Other issues during an update can also be fixed with the Windows Update troubleshooter.
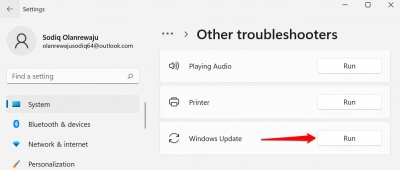
Select the Run button next to Windows Update in Windows 11's Settings > System > Troubleshoot > Other troubleshooters.
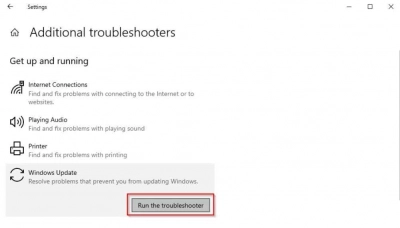
If you have a Windows 10 computer, head to Settings > Update & Security > Troubleshoot > Additional troubleshooter > Windows Update and select Run the troubleshooter.
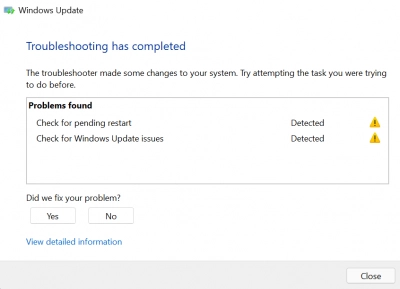
Wait for the troubleshooter to detect any issues that could be generating the error number 0x80070005, then follow the on-screen instructions.
5. Run SFC (System File Checker)
SFC (System File Checker) is a command-line utility that scans Windows for corrupt, damaged, and missing system files. If any are found, the utility replaces them with a new copy.
If you're experiencing the 0x80070005 error because a critical system file is missing or corrupted, the easiest way to fix it is to run SFC. Connect your computer to the internet and proceed as directed.
- 1. In the Windows Search box, type command prompt and choose Run as administrator.
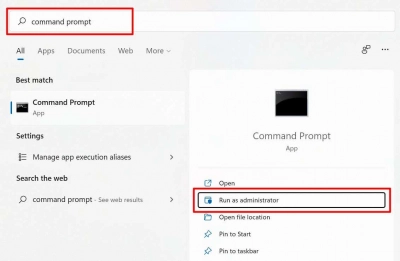
Before performing the System File Checker, Microsoft suggests running the Deployment Image Servicing and Management (DISM) program if your PC is running Windows 8 or newer. If you have a Windows 7 computer, skip to Step #3.
- 2. Type or paste DISM.exe /Online /Cleanup-image /Restorehealth in the terminal and press Enter.
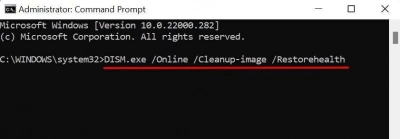
When you see the notice "The restoration procedure completed successfully," run the System File Checker (see next step).
- 3. Type or paste sfc /scannow in the terminal and press Enter.

Wait for a success message, then shut the Command Prompt window and reinstall the app/OS to fix the 0x80070005 issue. You may need to restart your computer to complete any pending repairs.

So, pay attention to the on-screen message when running the System File Checker.
6. Update the Windows Registry
If the error code 0x80070005 appears in an Office program after upgrading Windows, Microsoft suggests changing the registry. Any entry in the registry that is deleted or damaged might create additional issues in Windows. As a result, make a backup of the Windows Registry before proceeding with the upgrade.
Close all Microsoft Office programs and perform the following steps:
- 1. Select OK after pressing Windows key + R and typing regedit in the Run box.
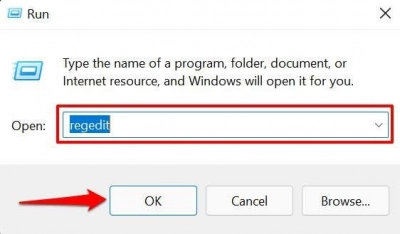
- 2. Expand the HKEY_USERS folder, right-click the S-1-5-20 folder, and select Permissions in the context menu.
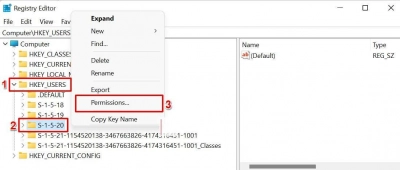
- 3. Select Add.
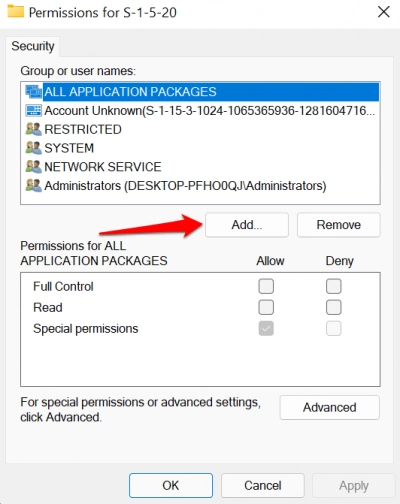
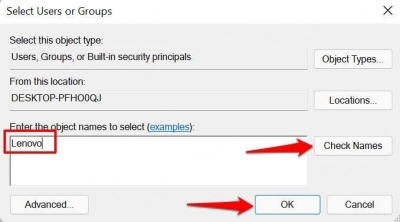
- 4. Type your name of the current user in the dialog box, select Check Names, and select OK.
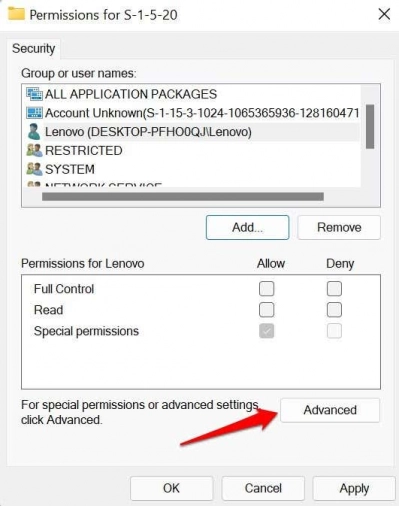
- 5. Next, select Advanced. That’ll open the Advanced Security Settings menu for the registry folder.
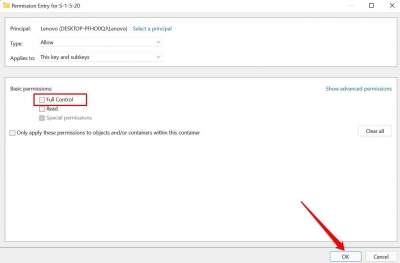
- 6. In the “Permissions” tab, select the newly-created user, and choose Edit.
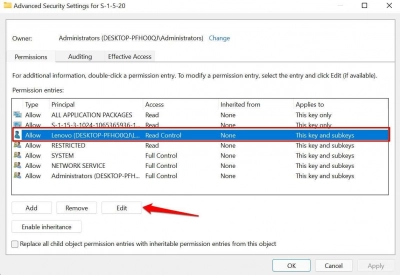
- 7. Check the Full Control box and select OK.
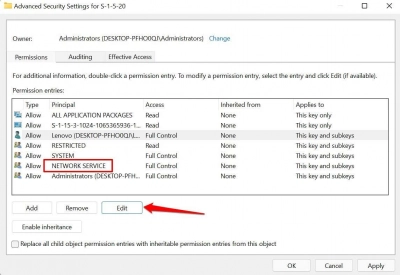
- 8. Select NETWORK SERVICE and select Edit.
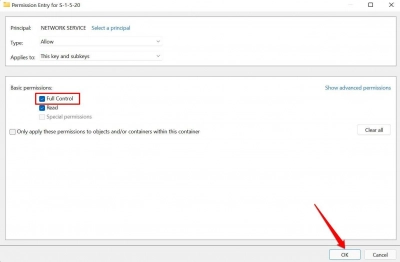
- 9. Check the Full Control box and select OK.
- 10. Finally, check the Replace all child object permission entries with inheritable permission entries from this object and select OK.
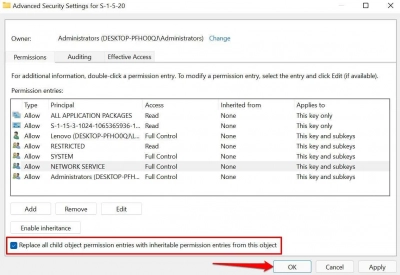
- 11. Select Yes on the confirmation prompt.
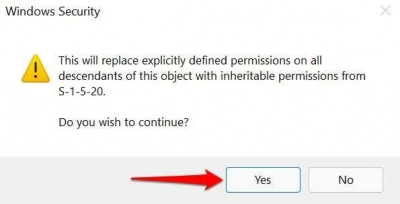
- 12. Select Apply and then OK.
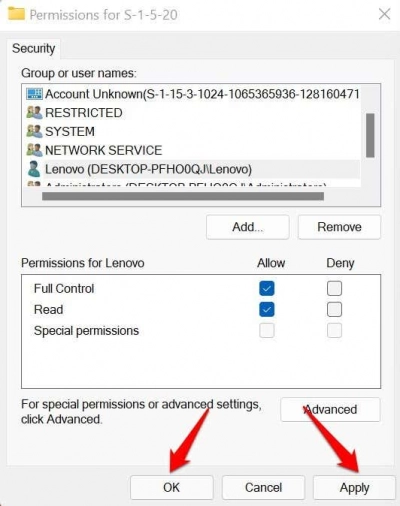
Close the Registry Editor and restart the Office program to see if the 0x80070005 problem number is gone.
- 1. To launch the Windows Run box, press Windows + R.
- 2. In the dialog box, type C:UsersUSERNAMEAppData and click OK.
Replace C: with the drive letter of the drive where Windows is installed. Replace USERNAME with the username of your computer.
- 3. Right-click the Local folder and select Properties in the context menu.
- 4. Head to the Security tab and select Edit.
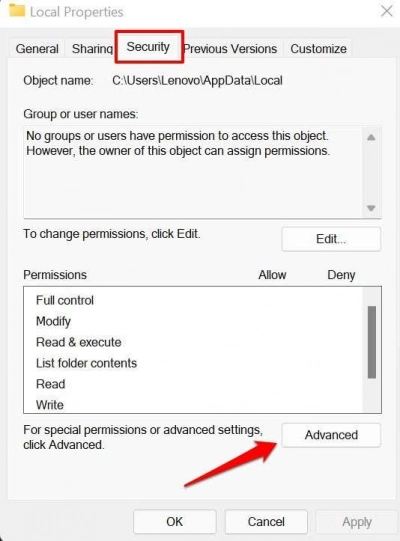
- 5. Select Add.
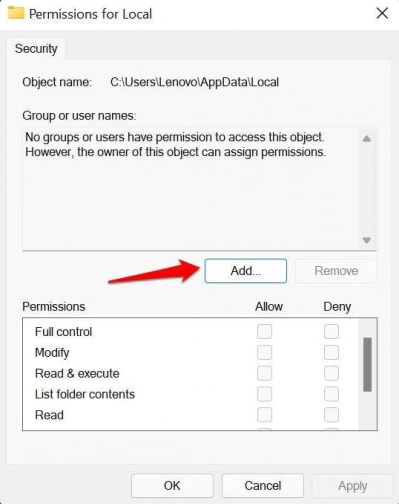
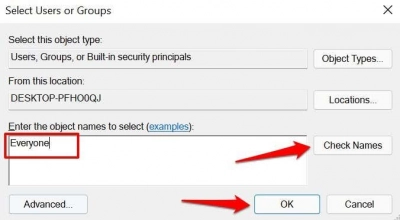
- 6. Type Everyone in the dialog box, select Check Names, and choose OK afterward.
- 7. Select Everyone, check the Allow box in the “Full control” column.
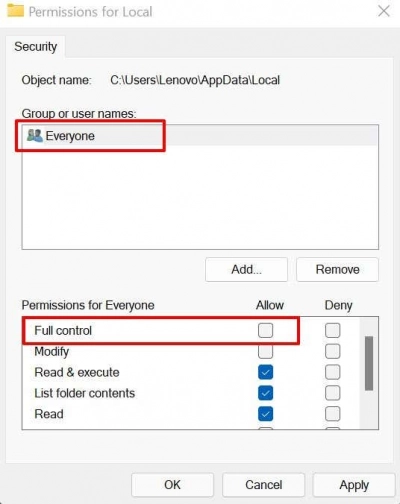
- 8. Select Apply and then OK.
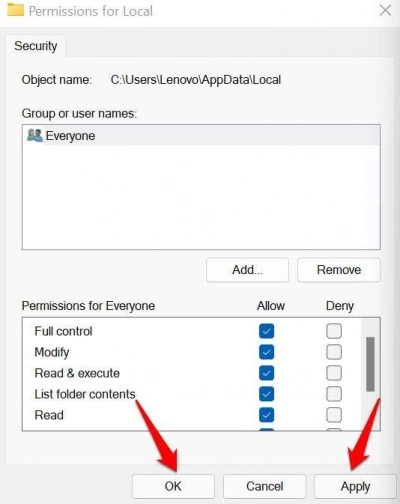
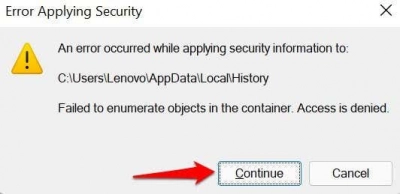
- 9. While Windows sets the permissions, you can get a "Error Applying Security" a few times. Continue picking Continue until the procedure is completed.
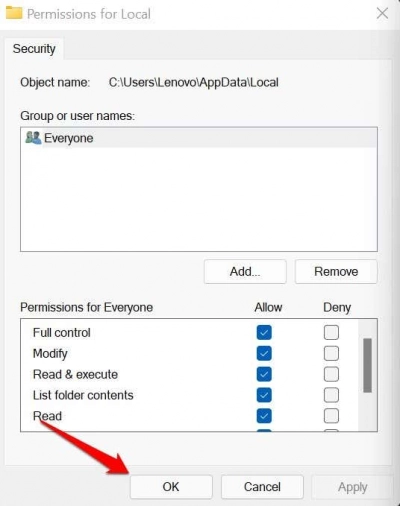
- 10. Select OK to close the Local Permissions for the Local window and reinstall the Windows update.
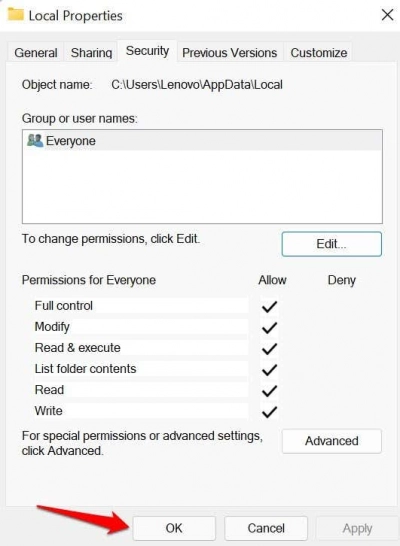
- 11. Select OK again to save the changes.
7. Reset Permissions with SubInACL
The free command-line utility SubInACL allows you to change the rights for files, directories, registries, and other objects. This strategy could be effective in some situations. Follow the steps provided below to completely remove trouble number 0x80070005.
Install the SubInACL after downloading it. You need to type the following into a brand-new Notepad document:
Set OSBIT=32
IF exist "%ProgramFiles(x86)%" set OSBIT=64
set RUNNINGDIR=%ProgramFiles%
IF %OSBIT% == 64 set RUNNINGDIR=%ProgramFiles(x86)%
subinacl /subkeyreg "HKEY_LOCAL_MACHINE\SOFTWARE\Microsoft\Windows\CurrentVersion\Component Based Servicing" /grant="nt service\trustedinstaller"=f
Under All Files, save the files as reset.cmd. Run as Administrator may be selected from the context menu that displays when you right-click a file. After that, delete the.cmd file, and then update the software.
8. Windows 10 Manual Update
If a Windows update encountered the error code 0x80070005, a manual update may be your best option. To manually update Windows, utilize the Windows Update Catalog. Automatically downloaded and installed Windows updates might cause issues. In this case, the Windows Update Catalog is used. This free Microsoft website offers updates for every version of Windows.
Even if Windows' auto-updates aren't working, you may manually download cumulative updates from there, similar to bug code 0x80070005.
Follow the following advice to get started:
Go to Settings > Update & Security to access Windows Update.
Select View Update History to see or copy the Windows update version code. KB1234567 will be the format.
Next, type the Windows update version code into the Windows Updates Catalogue's search box. A popup window will display on your screen as soon as you click the Download button.
Please choose the link in the pop-up window to download the.msu file. When the download is complete, click the.msu file to manually install the Windows update. Then, restart your computer. Windows may now be used without issue. In this way, you may manually upgrade and get rid of the 0x80070005 issue.
9. Check Your Firewall Settings
By enabling the SVCHOST (the host process for Windows services) to circumvent your firewall settings, you can fix the 0x80070005 issue.
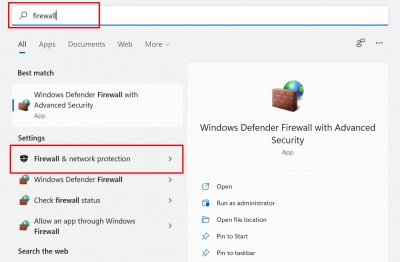
- 1. In the Windows Search box, type firewall, then on the results page, choose Firewall & Network Protection.
- 2. Scroll to the bottom of the page and select Allow an app through firewall.
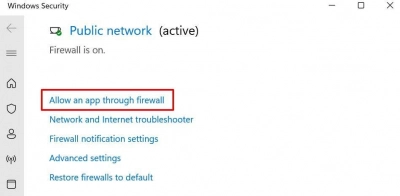
That’ll redirect you to the Windows Defender Firewall window in the Control Panel.
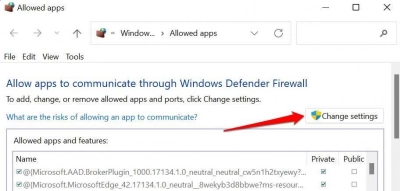
- 3. Select Change settings.
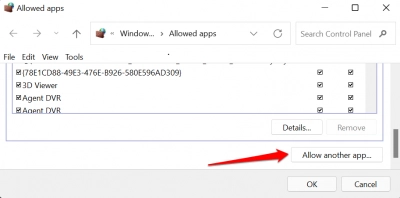
- 4. Select Allow another app.
- 5. Select Browse.
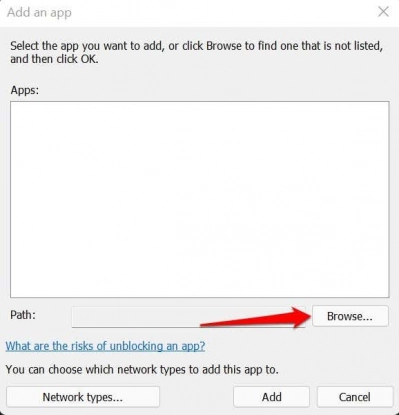
- 6. Select svchost and select Open.
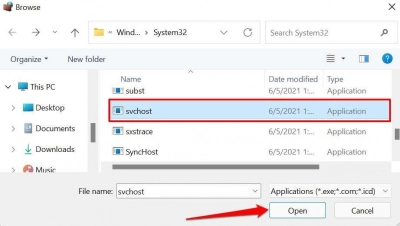
- 7. Select Add to continue.
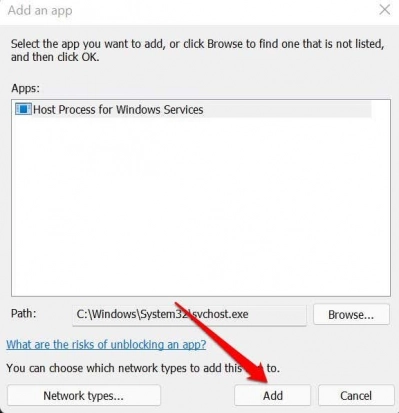
- 8. Ensure you check the “Private and “Public” columns for the Host Process for Windows Services.
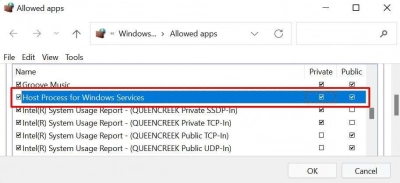
- 9. Select OK and try updating your PC again.
10. Reset Windows Update Components
If the issue remains after performing the troubleshooting steps above, reset all components of the Windows Update agent.
- 1. In the Windows Search box, type command prompt and choose Run as administrator.
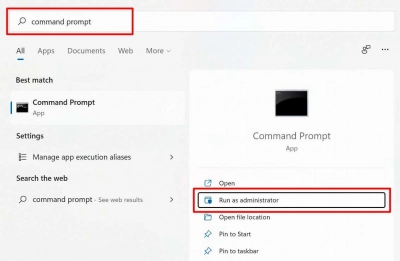
- 2. Type or paste net stop wuauserv in the terminal and press Enter. This command will stop the Windows Update service.

- 3. Next, type or paste rd /s /q %systemroot%\SoftwareDistribution and press Enter.

- 4. Finally, type or paste net start wuauserv and press Enter to restart the Windows Update service.

Close the Command Prompt window and check if you can now install Windows Updates without the 0x80070005 error code.
11. Reset Windows
Reset Windows to factory settings if you still can’t install Windows updates or run Office apps due to the 0x80070005 error.
Save your files from Windows
If something goes wrong, if your Windows has many errors, you can reinstall the operating system.
You understand that all data from the disk will be erased forever. Therefore, use the DiskInternals Partition Recovery before doing this in order to recover data or create a disk image. The program has high potential and provides a deep scan of each partition of the disk, so as not to miss a single file. It is also possible to convert any selected file system for a detailed analysis of the contents of disk partitions. Don't worry about recovery limitations - here, you can recover up to 1 PB of data. This is almost infinity, everyone knows about it. Also, after any scan, you can see each file found in the reading mode for free. Purchasing a license directly on the company's website and then storing data in the required place can be done at any convenient time.
