How to Recover Data from a Broken RAID 1 Set
Losing critical information can be devastating, especially if it involves a RAID 1 setup, famed for its redundancy and reliability. But what happens when your RAID 1 array breaks down? Knowing how to recover data from a broken RAID 1 set becomes essential. This comprehensive guide aims to demystify the process, offering you a clear, step-by-step approach to recover your valuable data. Whether you're up against a hardware failure, software hiccups, or considering professional recovery options, we delve into each aspect to ensure your data is back in safe hands.
Understanding RAID 1: How It Works and Why It Fails

RAID 1, short for Redundant Array of Independent Disks Level 1, is a popular choice for those prioritizing data integrity and redundancy. This configuration involves mirroring, where identical data is stored concurrently on two or more drives. While RAID 1 offers significant peace of mind, understanding its operational dynamics and potential failure points is crucial to maintaining its effectiveness. Here is more on what is a RAID hard drive.
RAID 1 Overview: Mirrored Data Protection
RAID 1's core principle is simple yet powerful: every piece of data written to one drive is simultaneously written to its mirror. This setup provides:
- Redundancy: In the event of a single drive failure, the other drive contains an exact copy of the data, allowing seamless operation.
- Fault Tolerance: This attribute minimizes the risk of data loss, as the array can sustain one drive's failure without hampering data access.
However, this redundancy comes at a cost: reduced total storage capacity, as two mirrored drives provide the same storage as a single drive. Learn more about how to set up a RAID properly!
Common Causes of RAID 1 Failure
Despite RAID 1's reliability, several factors could lead to array failure:
- Drive Failure: As hard drives age, they face an increased risk of mechanical or electronic failure. If both drives fail simultaneously, data recovery becomes challenging.
- RAID Controller Failure or Corruption: The RAID controller coordinates data mirroring and can sometimes fail due to hardware glitches or firmware corruption, disrupting the whole array's functionality.
- Accidental Reconfiguration: Human error can lead to accidental changes in the RAID settings, causing misalignment in how the data is read or written.
- Power Surges or Physical Damage: Power fluctuations can harm the drives or controller, while physical impacts can compromise the drive's mechanical components.
Signs of a Broken RAID 1 Array
Detecting RAID 1 issues early can prevent data loss or further damage. Symptoms of a compromised RAID 1 array include:
- System Fails to Boot: Often the first sign of trouble, failure to boot suggests deeper issues within the RAID configuration.
- One Drive Is Missing or Degraded in RAID BIOS: During startup, the BIOS may report a missing or degraded drive, indicating a mirrored pair's potential breakdown.
- Inaccessible or Corrupted Files: If files become inaccessible or show signs of corruption, it may signify an underlying RAID failure, necessitating immediate action to salvage data.
Step-by-Step Guide to Recover Data from a Broken RAID 1 Set

Step 1: Assess the Damage
The first step in recovering data from a broken RAID 1 set is to thoroughly assess the extent of the damage. Begin by checking whether the issue affects one or both drives:
- Examine Drive Health: Determine if one drive is operational or if both have encountered issues. If one drive is still functional, the recovery process may be simplified.
- Verify BIOS/RAID Controller Status: Access the BIOS settings or the RAID controller interface to check if it recognizes the drives and whether any error messages are present. This can provide crucial insights into the array's current state.
Step 2: Attempt Manual Recovery (If One Drive is Healthy)
If you discover that one drive remains healthy, you can attempt a manual data recovery:
- Connect the Working Drive: Remove the functioning drive from the RAID array and connect it to a standalone system via an external drive enclosure or directly to the motherboard.
- Operating System Access: Use an operating system like Linux or Windows to access the drive. These systems can often recognize the drive as a regular storage device.
- Clone or Back Up Files Immediately: Once you gain access to the files, prioritize cloning the drive or backing up the data to another storage medium. This precaution ensures you have a secure copy of your data.
Step 3: Data Recovery From RAID 1
When both drives in the RAID 1 set are affected, you'll need to employ more advanced recovery methods:
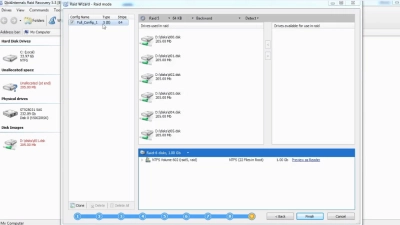
- 1. Use RAID-Aware Recovery Software: Specialized software can virtually reconstruct the RAID array and facilitate data extraction. One highly recommended tool is DiskInternals RAID Recovery™.
- 2. Using DiskInternals RAID Recovery™:
- Software Installation: Install the software on a system separate from the affected RAID array.
- Rebuild the RAID Array: The tool detects the RAID configuration and simulates the array, allowing access to stored files.
- Extract Data: Once the RAID structure is reconstructed, you can recover data from RAID, browse and extract the necessary files to a safe location.
Step 4: Rebuilding or Replacing the RAID 1 Set
After successfully recovering your data, the next step is to consider rebuilding or replacing the RAID array:
When to Replace a Faulty Drive: If a drive is beyond repair or nearing the end of its lifespan, replace it with a new, compatible drive to ensure long-term reliability.
Best Practices for RAID 1 Rebuilds:
- Data Protection: Always ensure data is securely backed up before initiating a rebuild.
- Follow Manufacturer Guidelines: Adhere to the RAID controller or motherboard manufacturer's instructions for rebuilding the array. Failure to do so might lead to data loss.
- Monitor Rebuild Process: Keep an eye on the RAID rebuild process, as it can provide early warnings of any emerging issues with the new setup. Here is how to rebuild RAID 1 without losing data.
By following these steps, you can effectively address a broken RAID 1 set and recover your critical data with minimal risk and downtime.
RAID 1 vs Other RAID Levels: What Makes Recovery Easier?

Understanding the differences in fault tolerance and data recovery complexity among various RAID levels can help you choose the best option for your needs. Here's a comparison:
| RAID Level | Fault Tolerance | Data Recovery Difficulty |
|---|---|---|
| RAID 0 | None | Complex, no redundancy |
| RAID 1 | High (mirrored) | Easier, recover from one disk |
| RAID 5 | Single-drive failure protection | Moderate, requires parity reconstruction |
| RAID 10 | High, striped + mirrored | Easier, but depends on drive pairs |
- RAID 0 provides no fault tolerance, as data is striped across multiple disks without redundancy. Recovery is complex if a drive fails, as there's no redundancy.
- RAID 1 offers high fault tolerance by mirroring data across drives, making recovery more straightforward. If one disk fails, data can be recovered from the other.
- RAID 5 includes single-drive failure protection through parity, making recovery moderately difficult. It requires reconstructing data using distributed parity information.
- RAID 10 combines the benefits of stripping and mirroring, providing high fault tolerance. Recovery is generally easier but depends on which specific drive pairs fail.
Preventing Future RAID 1 Failures

Ensuring the longevity and reliability of a RAID 1 setup involves proactive monitoring and protective measures. Here are some key strategies to prevent future failures:
- 1. Regular Health Checks: Routinely inspect the health of each drive using diagnostic tools provided by the drive manufacturer. This can help identify early signs of potential failures.
- 2. Use of DiskInternals RAID Recovery™ for Proactive Monitoring: Implement software like DiskInternals RAID Recovery™ not just for recovery, but also for ongoing monitoring of your RAID arrays. This can help detect anomalies and alert you to issues before they escalate.
- 3. Best Practices for Power Protection and Backups:
- Power Protection: Utilize surge protectors or uninterruptible power supplies (UPS) to safeguard against power surges and outages, which can damage your system.
- Regular Backups: Establish a routine backup schedule to additional external storage or cloud services. This practice ensures data redundancy beyond the mirroring provided by RAID 1.
Conclusion: Secure Your RAID 1 Data Before It's Too Late
To recap, recovering data from a broken RAID 1 set involves assessing the damage, attempting manual recovery, using RAID-aware software, and rebuilding or replacing faulty components. However, the key to minimizing downtime and ensuring data integrity lies in regular monitoring and comprehensive backup strategies.
