Adding a Disk to mdadm RAID 5: A Comprehensive Guide
Expanding your storage capacity while maintaining data redundancy is a key advantage of using RAID 5, and mdadm makes managing this configuration straightforward on Linux systems. In this step-by-step guide, we'll walk you through the process of adding a new disk to an existing mdadm RAID 5 array. Whether you're looking to enhance performance or simply need more space, this guide will ensure you can seamlessly integrate an additional disk, optimizing your storage setup without compromising the integrity of your data. Let's dive in and get started with expanding your RAID 5 array!
Introduction to mdadm and RAID 5
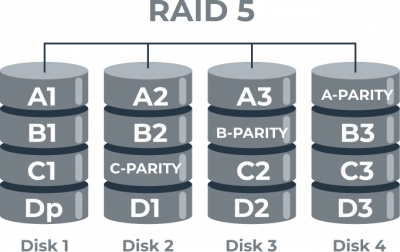
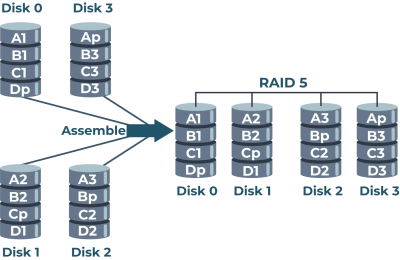
RAID (Redundant Array of Independent Disks) is a technology that combines multiple hard drives into a single logical unit to enhance data redundancy, performance, or both. Among the array configurations, RAID 5 stands out for its balance between data protection and efficient storage use. It achieves this by distributing parity information across all member disks, enabling the array to withstand the failure of a single drive without data loss.
The benefits of using RAID 5 include improved read speeds and fault tolerance while maximizing storage space since only one disk's worth of space is used for parity. This makes it an excellent choice for environments where data integrity and efficiency are paramount.
mdadm is a powerful Linux utility that simplifies the process of managing RAID arrays. It provides an array of tools to create, monitor, and maintain RAID configurations, ensuring robust data management. By using mdadm, administrators can easily handle the intricacies of RAID 5, including adding or removing disks, monitoring array performance, and recovering from disk failures, all while maintaining the integrity and reliability of the data stored within the array. Learn more about what is a RAID hard drive.
Preparing to Add a Disk to RAID 5

Assessing Current RAID 5 Configuration
Before modifying your RAID 5 array, it's crucial to evaluate its current state to ensure a smooth integration of the new disk.
- Checking Available Space: Examine the current capacity and utilization of your RAID 5 array. This will help you understand how much additional space you'll gain and anticipate future storage needs.
- Reviewing Disk Health: Verify the health and performance of the existing disks in the array. Utilize tools like
smartctlto check for any potential issues that might affect the performance or reliability of your RAID. Ensuring all current disks are functioning optimally is vital to avoid data loss during the expansion process.
Choosing the Right Disk
Selecting the appropriate disk is essential for maintaining the efficiency and reliability of your RAID 5 array.
- Recommended Disk Specifications: Opt for disks with similar capacity, speed, and technology as those currently used in the array. This consistency helps maintain balanced performance and maximize the benefits of the RAID configuration.
- Compatibility Considerations: Ensure the new disk is compatible with your RAID controller and meets the requirements of your operating environment. Check for any firmware updates or compatibility issues that might arise with different brands or models. By carefully choosing the right disk, you can prevent potential pitfalls and ensure a seamless integration into your RAID 5 setup. What is a RAID controller?
Steps to Add a Disk to RAID 5 Using mdadm

Step 1: Backup Data
Before making any changes to your RAID configuration, it's crucial to create a backup of your data. Data backups act as a safety net, protecting your information in the event of an unexpected failure or error during the modification process.
- Importance of Data Backups Before Modifying RAID: Modifying disk configurations inherently carries risks. A backup ensures data can be restored if something goes awry, preventing potential data loss.
- Tools for Creating Backups: Utilize reliable backup tools such as
rsyncfor Linux environments, or consider using external backup solutions or cloud services for additional redundancy.
Step 2: Physically Install the New Disk
Before proceeding with software configurations, you need to physically install the new disk into your system.
- Installation Instructions for Different Server Types: Depending on your server type, this might involve mounting the drive in an available bay, connecting it via the appropriate interface, or securing it within a disk enclosure. Refer to your server's manual for specific instructions on installing new hardware.
Step 3: Identifying the New Disk
Once the disk is physically installed, you must identify it to configure the RAID.
- Using Command Line Tools to Recognize the New Disk: Use tools like
lsblkorfdisk -lto list all connected disks and locate the new addition. Note the device name, such as/dev/sdX, to use in subsequent steps.
Step 4: Adding the Disk to the RAID 5 Array
Now that the new disk is installed and identified, proceed to integrate it into your existing RAID 5 setup using mdadm.
- Command Syntax for
mdadm add disk to RAID 5: Utilizemdadm --addto include the new disk in the RAID array. - Example Commands:
sudo mdadm --add /dev/md0 /dev/sdXReplace /dev/md0 with your array identifier and /dev/sdX with your new disk's identifier.
- Monitoring the Process with cat /proc/mdstat: After adding the disk, monitor the re-syncing process to ensure everything is proceeding smoothly. Execute:
cat /proc/mdstatThis command provides real-time feedback on the RAID's status, helping you track the integration and rebalancing of data across the expanded array.
Verifying RAID 5 Status After Disk Addition

Checking Array Status
Once the new disk has been added to your RAID 5 array, it's essential to ensure the RAID is functioning properly and to verify that the integration process has been successful.
- Commands to Verify RAID Status: Use
mdadm --detail /dev/md0orcat /proc/mdstatto check the status of the RAID array. These commands provide detailed information on the array configuration, including active devices, spares, and the overall health. - Understanding Output Messages: Look for indications that the array is "clean" or "resyncing." A "clean" status confirms that the array is operating normally without any issues. If the array is still resyncing, you'll see a progress indicator that shows how far along the process is, which reassures you that everything is on track.
Performance Considerations
Adding a disk to your RAID 5 array can influence both its performance and the overall system operation, especially during the initial integration period.
- Expected Performance Post Addition: With an additional disk, you may observe improved read and write speeds due to the increased number of drives contributing to the array's operations. However, these enhancements are contingent on the workload and the specific drive characteristics.
- Resilvering Process and Impact on System Performance: The rebalancing, or "resilvering," of data across the array can temporarily affect system performance. During this process, the RAID redistributes data on the newly added disk, which might lead to reduced system responsiveness. This is normal and temporary; regular performance should resume once the process completes, leaving you with a fully operational and more capacious RAID 5 array.
File Recovery Considerations in RAID 5
Common Issues During Disk Addition
While expanding a RAID 5 array can be a straightforward process, several issues may arise that require attention.
Potential Errors and How to Resolve Them: During disk addition, common errors include incorrect disk identification, which can lead to adding the wrong disk to the array. Double-check disk labels and utilize commands like lsblk to prevent this. If a disk fails to integrate, re-examine hardware connections or review dmesg logs for diagnostic messages. If the array does not resync properly, ensure software versions are updated and re-run mdadm commands with correct syntax.
Utilizing DiskInternals RAID Recovery™ Software
For more robust data protection or in scenarios where issues arise, specialized recovery software can be invaluable.
Features and Benefits of DiskInternals Software: DiskInternals RAID Recovery™ offers comprehensive solutions to recover data from RAID drive. Its advanced algorithms can handle complex recovery scenarios, ensuring the integrity and safety of your data.
How It Assists in Recovering Data from RAID 5 Arrays: The software provides a user-friendly interface to recover data even when regular access fails. It automatically identifies array configurations, reconstructs the virtual file system, and facilitates smooth data recovery. This tool is particularly beneficial when hardware failures or array corruption jeopardize your RAID 5 setup, providing a reliable means to recover and preserve critical data.
Ready to get your data back?
To start RAID 5 recovery (recovering your data, documents, databases, images, videos, and other files), press the FREE DOWNLOAD button to get the latest version of DiskInternals RAID Recovery® and begin the step-by-step recovery process. You can preview all recovered files absolutely for free. To check the current prices, please press the Get Prices button. If you need any assistance, please feel free to contact Technical Support. The team is here to help you to rebuild RAID array without losing data!
Conclusion
Adding a disk to an mdadm RAID 5 array is a strategic method to expand storage capacity while maintaining data redundancy. This process involves several key steps: assessing your current RAID configuration, choosing a compatible new disk, physically installing it, and smoothly integrating it with the existing setup using mdadm. Each step requires careful execution to ensure system integrity and optimal performance.
After modifying your RAID array, monitoring becomes crucial. Regularly checking the array status and addressing any potential issues promptly helps maintain system health and performance. Monitoring tools and periodic maintenance, including verifying disk health, are essential practices to ensure the array continues to operate efficiently. By following these guidelines, you can effectively manage your RAID 5 array, enhancing your storage infrastructure's resilience and capacity for the long term.
FAQ
How to create RAID 5 with Mdadm?
- Use the lsblk command to view the available disks:
lsblk.
- Use the mdadm command to create a RAID 5 array:
sudo mdadm --create --verbose /dev/md0 --level=5 --raid-devices=3 /dev/sda /dev/sdb /dev/sdc. ...
- Format the RAID 5 array:
sudo mkfs.ext4 /dev/md0.
- Mount the RAID 5 array:
sudo mkdir /mnt/raid5.
How do I add a hard drive to a RAID?
To add a hard drive to a RAID setup, first back up all important data to safeguard against potential mishaps during the process. Identify the new hard drive using command-line tools like
lsblkorfdisk -lto ensure it's recognized by the system. Physically install the drive into your setup, ensuring it's properly connected and seated. Use the appropriate command (such asmdadm --addfor RAID arrays managed with mdadm on Linux) to integrate the drive into the existing array. Finally, monitor the array's status with tools likecat /proc/mdstatto ensure the expansion process completes without errors.
