How to Rebuild RAID 1 Without Losing Data
RAID 1 is a type of RAID setup that supports data mirroring across devices. This RAID setup is best when you’re all about redundancy, which is lacking in RAID 0. But just like every other RAID setup, this array configuration is not infallible to corruption or failures. Companies that handle accounting data are the most common adopters of RAID 1 array. This article explains how to rebuild RAID 1 when it fails, and that, without losing any of your files.
Introduction to RAID 1: A Quick Overview
There are many types of RAID setups out there, and each has its own unique benefits and, then of course, demerits too. RAID 1 is a type of Redundant Array of Independent Disks that supports data mirroring. This means that if you choose to build a RAID 1 setup, your saved data will be mirrored to every disk in the array.
Here is how it works. You need a minimum of two SSDs or HDDs to configure a RAID 1 setup. After the array has been built, any data saved to the primary disk will be mirrored (exactly) to the second drive; if there are more than four other drives in the array, the data will be mirrored to all of them. This creates high redundancy in the case of fatal disk errors or file corruption.
Benefits:
- RAID 1 is relatively easy to configure and can be done with just two drives.
- Supports data redundancy, if one or two drives fail in the array, you can still access your data because it is mirrored to the rest of the drives in the array.
- RAID 1 is the best alternative if you want high data redundancy without spending much.
Demerits:
- Slower performance speeds compared to RAID 0 and other RAID setups.
- The total capacity of the array is relative to the total capacity of the “smallest” drive in the setup (if you used storage drives of different capacities).
Note: Although RAID 1 offers high redundancy even with multiple failed drives, it is not a replacement for regular backups. Always ensure to export your important data to another storage.
Why Might You Need to Rebuild RAID 1?
Companies and individuals rebuild their RAID arrays for quite many reasons, but mainly for these three reasons:
1. Increase Storage Capacity
In RAID 1, you won’t get much storage space; the total storage capacity of the array remains static, even if you use up to six (6) different drives. Thus, when the storage space is almost exhausted, the only way to extend it is by rebuilding the array with higher-capacity drives.
2. Drive Failures
RAID 1 can handle multiple drive failures and still allow you to access your files. However, at some point, you need to rebuild the array and replace the damaged drives. So, multiple disk failures will cause you to rebuild your RAID 1 setup.
3. Corruption
If the source gets corrupted in Drive A, the rest of the drives will also contain the corrupted data. Similarly, if your drive’s file system corrupts, it can affect data storage in the array. Rebuilding the array can help to fix this problem.
More so, it is important to rebuild your RAID 1 on time to ensure that your crucial files don’t get corrupted or become inaccessible if peradventure, the remaining drives fail at a go. Rebuilding RAID 1 isn’t so much of a difficult task and hereunder are some precautionary measures you should adhere to.
Note: RAID rebuild time.Key Considerations Before Rebuilding RAID 1
Risks of Rebuilding Without Proper Preparation
Rebuilding a RAID 1 array without thorough preparation can pose significant risks to data integrity. If the surviving drive in the array contains undetected errors or bad sectors, these issues could be replicated onto the new drive, leading to further data corruption. Additionally, performing a rebuild without verifying full backups may result in permanent data loss if unexpected failures occur during the process. It is essential to assess the health of the remaining drives, ensure that all data is backed up, and confirm system stability before initiating the rebuild to mitigate such risks.
When to Use Software-Based Recovery vs. Hardware Replacement
Deciding between software-based recovery and hardware replacement depends on the specific circumstances of the RAID 1 degradation. Software-based recovery is typically suitable when the RAID configuration is intact, but data access is hindered due to logical errors or file system corruption. Tools like DiskInternals RAID Recovery™ can efficiently resolve these issues. In contrast, hardware replacement is necessary when there is a physical failure of a drive or other hardware components. Evaluating the nature of the failure and the condition of your existing components will guide you in choosing the appropriate recovery strategy.
How to Rebuild RAID 1 Without Losing Data in Different Scenarios
Rebuilding RAID 1 After a Single Drive Failure
In scenarios where a single drive fails in a RAID 1 array, the mirroring feature preserves data integrity, allowing for a relatively straightforward rebuild process. Start by confirming the health and integrity of the surviving drive. Next, replace the failed drive with a compatible replacement. Once installed, initiate the rebuild process through the RAID management utility to duplicate the surviving data onto the new drive. Regularly monitor the rebuild progress to ensure its successful completion.
Rebuilding RAID 1 When Both Drives Fail
If both drives in a RAID 1 array fail, data recovery becomes more complex, necessitating the use of professional recovery software or services. First, assess if either drive can be temporarily accessed to extract data using specialized tools like DiskInternals RAID Recovery™. If successful, back up any salvageable data immediately. Replace both drives with new ones and recreate the RAID configuration. Finally, restore data from backups or the recovered files to the newly recreated array.
Rebuilding RAID 1 After a Controller Failure
In the event of a RAID controller failure, the drives themselves might still contain intact data. Begin by replacing or repairing the controller and ensuring that the firmware is updated. Reattach the drives to the new or repaired controller, and verify that they are recognized correctly. If the controller software supports automatic configuration detection, it should recognize the pre-existing RAID array; otherwise, manual configuration based on the original RAID settings may be necessary. Once the controller successfully imports the array, verify data integrity and functionality.
RAID 1 Rebuild in Windows vs. Linux Environments
Rebuilding a RAID 1 array can differ between Windows and Linux environments due to variations in management tools and system architecture. In Windows, Disk Management or third-party software often facilitates RAID management, providing a user-friendly interface to initiate rebuilds and monitor their status. Alternatively, Linux environments utilize command-line tools like mdadm for RAID management. This tool requires users to manually execute commands to assemble, rebuild, and manage arrays. While both systems offer effective methods, familiarity with the respective tools will enhance the reliability and efficiency of the rebuild process.
Preliminary Steps: Before You Begin the Rebuild
Before you rebuild a RAID, it is important that you perform these preliminary actions to ensure a 100 percent success rate with zero loss of file or data.
1. Make a Full Backup
Most people feel RAID 1 offers data backup in its mirroring pattern, but that’s not true. Setting up RAID 1 does not guarantee your data is being backed up. So, if you’re planning to rebuild the array, you should back up every accessible data from the remaining active drives. A complete backup is recommended before any further actions should be taken.
There are quite many RAID data backup solutions out there, particularly, DiskInternals RAID Recovery can help to create “Disk Images,” which serve as a complete backup copy of the selected hard drive. You can also back up to a cloud storage service if you’ve got enough space on your package.
2. Check the RAID’s Health Status
Knowing the health status of your RAID is important before proceeding with any advanced actions. Otherwise, the rebuilding may stop halfway and never will be completed. Tools like OpManager help you do the health status test; also, you can monitor your RAID’s health through the controller’s software.
RAID health status helps to notify you earlier when your RAID setup is on the verge of a fatal failure, so you can start getting out your important files and backing up them to another storage. Windows’ built-in CHKDSK utility can also be used to carry out HDD health checks to ascertain the status of your drive(s) but don’t use this utility.
Step-by-Step Guide to Rebuilding RAID 1
Now it’s time to rebuild your RAID 1 and you should follow the processes keenly, one after another so you don’t lose any data afterwards.
1. Shut Down the System and Replace Drives
The first step is to shut down the system powering the RAID drives. Once the system is shut down completely, you should head on and remove the failed drives in the array (note: you should have identified the failed drives after running a health status check on all of them from the previous step). Once the failed drives have been removed and replaced with the new ones, you can proceed further.
2. RAID Management
Power back the computer after the bad disks have been replaced. Now it’s time to access your RAID management menu via BIOS/UEFI settings or the third-party software you’re using to configure the RAID setup. From the UEFI menu or your third-party software, launch the RAID rebuild process; how to do this differs depending on the exact tool you’re using to rebuild the RAID.
3. Monitoring the Rebuild
RAID rebuilding may take up to 12 hours or more depending on many factors like the size and speed of the disks, the RAID controller used, the total amount of data to copy, and the system’s current workload. Apparently, the larger and slower the disks, the more time it would take for the rebuild process to complete.
During the rebuild process, you should not attempt to interrupt the system or experience a shutdown. Any of such that occurs could lead to permanent loss of files and RAID rebuild failure. Also, while the RAID is being rebuilt, never write new data to the existing “good” disks in the array – just let everything run out smoothly.
Important Tips to Know:
- Don’t run the CHKDSK command to check the RAID disks, it’ll make data recovery more difficult if you need to recover files from the drives.
- You should not proceed to rebuild an array using drives with bad sectors or drives that have previously failed in a RAID array.
- It is important to note that RAID rebuilding may not always go smoothly, so make a backup prior.
Using DiskInternals RAID Recovery for Safe RAID 1 Rebuild
Why Use Software for RAID 1 Recovery?
Using software for RAID 1 recovery offers several advantages, especially in scenarios where data integrity is compromised or when hardware issues prevent access to the array. Recovery software like DiskInternals RAID Recovery™ can automatically detect RAID configurations, making it easier to address logical errors and data corruption without risking further damage. It's particularly useful when a hardware replacement is unwarranted, as the software can provide access to otherwise inaccessible data and facilitate a seamless rebuild process. Additionally, software solutions often provide a cost-effective and faster alternative to professional recovery services.
Step-by-Step Guide to Using DiskInternals RAID Recovery
- 1. Install and Launch the Software: Begin by downloading and installing DiskInternals RAID Recovery™ on a computer that can access the affected RAID 1 array.
- 2. Select the RAID Array: Open the application and select the degraded RAID 1 array from the list of detected drives.
- 3. Automatic RAID Detection: Utilize the software's feature to automatically detect the RAID parameters. If it fails, manually input known RAID settings.
- 4. Initiate a Complete Scan: Start a thorough scan of the array to identify recoverable data. The software will analyze disk sectors for potential recovery.
- 5. Preview and Verify Files: Review the list of recoverable files and use the preview option to verify data integrity.
- 6. Recover and Save Data: Select the files you wish to recover and save them to a secure location, making sure not to overwrite any data on the array.
By following these steps, DiskInternals RAID Recovery™ facilitates a safe and efficient RAID 1 rebuild, ensuring data integrity throughout the process.
Comparing Software-Based vs. Manual RAID Rebuild Methods
Software-based RAID rebuild methods, such as those offered by DiskInternals, provide a guided experience that minimizes user error and simplifies complex recovery tasks. These solutions are particularly advantageous in cases of logical failures or when quick access to data is required. Software can automatically detect configurations, streamline the recovery process, and offer intuitive interfaces.
In contrast, manual RAID rebuild methods involve direct interaction with hardware and RAID settings, often requiring an in-depth understanding of both the system and RAID architecture. While this approach can be necessary for severe hardware failures, it carries a higher risk of data loss if not executed correctly. Manual methods are typically more time-consuming and require careful documentation of the original RAID setup to ensure successful reconfiguration.
Recover Lost Data With DiskInternals RAID Recovery
Got missing files in your RAID 1 array? You can still get them back, irrespective of whether the files went missing before or after the RAID rebuilding. DiskInternals RAID Recovery is a go-to RAID recovery solution for IT professionals and enterprise businesses. The software is designed to be very easy to use, featuring a built-in “Recovery Wizard” that simplifies the entire process.
DiskInternals RAID Recovery will help you get back all the files you have lost from your RAID drives (as long as the files are still recoverable). This professional solution runs on all Windows OS and Windows Server versions (all editions). Also, if the recovery doesn’t work when you try it yourself, you can request DiskInternals’ Guided Recovery Service and a data recovery expert will take it up from you.
Features:
- Recognizes and repairs all popular RAID types
- Simple interface, easy to navigate and use by anyone
- Supports both manual and automated recovery options with a built-in recovery wizard.
- Dedicated RAID controllers from Adaptec, HP, Dell, MegaRAID, Silicon RAID Controllers, and many other companies are supported.
- Create multiple disk images for free to clone your drives and backup your data
- Up to 99 percent success rate
- 19 years of regular updates, trusted by world-renowned IT specialists, globally.
DiskInternals RAID Recovery checks all the boxes for a professional RAID data recovery solution for individuals and businesses. More so, you don’t have to pay any money until you can verify that your lost data has been successfully recovered.
Guide:
- Step One: Download and install DiskInternals RAID Recovery on your Windows 7-11 computer, and launch it. If your system is running on Windows Server OS 2003-2019, this program supports that too.
- Step Two: Choose your RAID array type (in this case, RAID 1) and proceed to select a recovery mode: Fast Recovery and Full Recovery. DiskInternals RAID Recovery will launch a deep scan into your drives to check the status, file system, controller, and disks, and also restore lost files.
- Step Three: After the scan is completed, you’ll see all your files (including lost and deleted ones). However, they will be available as “Read-Only,” and you can preview most of the files.
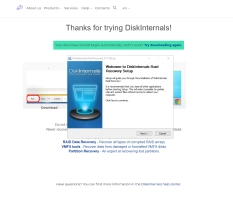
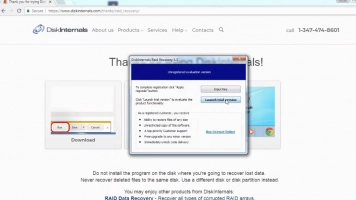
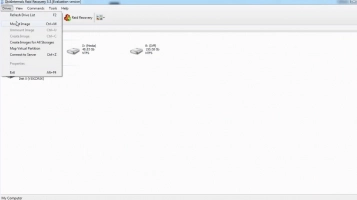
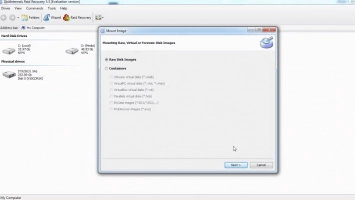
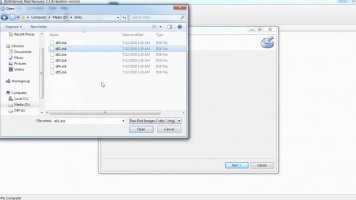
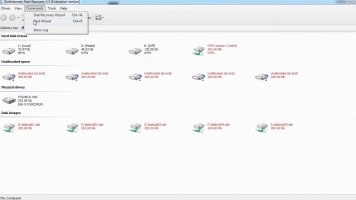
To save back the recovered files, you’ll need to purchase a license, and if your files were not recovered, you can request “Guided Repair Service” and have an expert take over your cause.
Troubleshooting Common RAID 1 Rebuild Issues
In most cases, you may face challenges trying to rebuild your RAID 1 array, but these are fixable following the tips below.
1. Drive Recognition Issues
If one or more of the drives in your array isn’t showing up in your BIOS/UEFI or rebuild software, that’s probably because the drive is not well connected to the system, or it is damaged. It is advisable to always use compatible drives throughout. For example, if you choose to use HDD, it all through, and if you’re using SSD, use it all through, to avoid drive compatibility issues.
2. Secondary Drive Failures
If your RAID 1 is built with two drives and then one fails, you should rebuild the array as soon as possible before the second drive follows suit. Waiting until both drives fail before attempting a rebuild can lead to a total loss of files.
3. Software Glitches & Solutions
When you use third-party software programs for rebuilding your RAID 1 array, you should be aware that there could be glitches during the process. Hence, you should ensure to best RAID rebuilding software out there from a developer that has active customer support. So when things go south, you can contact the developer of the RAID rebuild software and seek help.
Best Practices to Prevent Future RAID Failures
- Run Regular Health Checks: If possible, check the status of your RAID array disks every day. So you can know when it’s starting to fail and take timely actions.
- Drive Consistency: Your RAID arrays should be built using the same drive types, and if possible, the drives should come from the same manufacturer and should be of the same size (storage capacity).
- Optimal Operating Environment: Maintain the required cool operating temperature in your server rooms where the RAID drives are kept.
Conclusion
RAID 1 is cherished by most heavy data users due to its ability to survive multiple drive failures. But then, it’s slow in terms of performance and the maximum space you’re getting is equal to the total storage capacity of the smallest disk in the array; if all the disks are of the same size and capacity – you’re getting a static storage capacity, irrespective of the total number of disks used.
RAID is not a foolproof solution against data loss, so it is important to have a RAID recovery program around. Hopefully, this article has detailed everything you need to know about rebuilding your RAID 1, do you have any other concerns that need to be addressed? Contact a DiskInternals data expert.
