How to fix an audio lag problem in Windows 10, 11

Here you will find out:
- what to do if you get "audio lag" problem in Windows 10, 11
- how to fix this issue
- how DiskInternals can help you
Are you ready? Let's read!
Do you have an "audio lag" problem in Windows 10, 11?
If you are experiencing an audio lag issue when playing back a video on Windows 10, 11, this article will detail possible fixes you should try out. It is quite common to get one or two errors after updating or upgrading Windows; however, there seem to be more issues with Windows 10, 11 than its predecessors.
How to fix this issue
Method 1: Check Internet connection
First, if you are streaming the video from a streaming platform, it is important that you check your internet connection's strength. Sometimes, an unstable internet connection can be a great hindrance to experiencing seamless media streaming. Hence, the first step should be to check your internet connection. There are different ways to test your internet speed and stability.
Method 2: Run the Troubleshooter
Windows 10, 11 comes with a built-in troubleshooting tool for virtually all problems you may encounter using Windows. You can use the audio troubleshooting option to fix the “audio delay on Windows 10, 11” issue.
- Open Windows 10, 11 Settings page (Windows key + I)
- In the search bar on the top-right corner, type "Troubleshoot" and hit Enter
- From the search results, select "Troubleshooting" or "Troubleshoot"
- In the “Get Up and Running” section, you will see “Playing Audio"; expand this option and click on "Run the Troubleshooter"
If Windows 10, 11 is not activated:
- Search for “Troubleshoot” in the Settings pag
- Select Troubleshooting and click on “Troubleshoot audio playback” in the Hardware and Sound module
Method 3: Update Driver
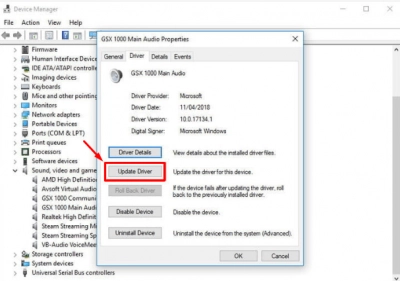
Outdated drivers can lead to different issues, including Windows 10, 11 audio sync issues. Thus, update your sound card and every other driver that handles sound on your PC. This can be done from the Windows Device Manager.
- Open Windows Device Manager page by pressing Windows key + R and type “devmgmt.msc”
- Scroll to “Sound, video, and game controllers” and expand it to view your sound drivers
- Double-click on a sound driver or your sound card and toggle to the “Driver” tab
- Click on “Update Driver”

After the update, restart your computer. The audio latency issue should be fixed by now.
Method 4: Restore Defaults in Speaker Properties
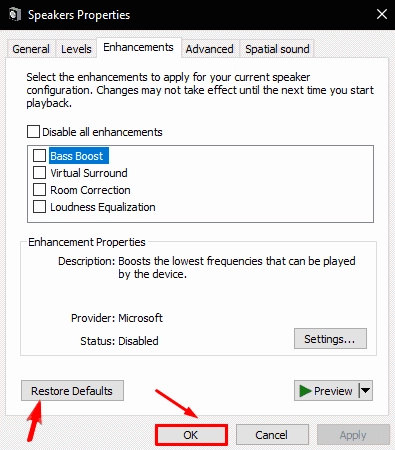
Maybe you made some changes to your sound settings, and that could be the cause of the audio delay on your Windows 10, 11 PC. If this is true, you should reset the settings to their default state and check if they have been fixed.
- Right-click on the "Sound icon" on your Windows taskbar
- Select "Playback devices"
- Click on your default speaker, then click on Properties
- Toggle to the "Enhancements" tab and choose "Restore Defaults"

Method 5: Clean Reinstallation
If the methods above do not work, this should work. However, this is an advanced method, and you are going to lose all data on your hard drive. Thus, create a disk image of your important data before continuing with this method.
Using DiskInternals Uneraser, you can easily create a disk image that saves all the data on your hard drive. This will also help to prevent data loss, so you won’t have to worry about your important files. DiskInternals Uneraser is a professional data recovery tool that is capable of recovering lost data from all storage drives, including SD cards, Flash drives, HDDs, SSDs, etc. It is a comprehensive software app with lots of features. Plus, it is intuitive and easy to use.
