
How to Recover Permanently Deleted Videos on PC
Is it possible to recover videos you had permanently deleted? The simple answer is YES, but it requires the use of a professional software app like DiskInternals Partition Recovery or any other reliable data recovery solution.
However, even if you’ve got a data recovery software, you need to know how to use it. So, this article explains – in detail – how to recover deleted videos from PCs and desktop computers. The programs mentioned here are verified to help in deleted video recovery, and they come along with other extensive features such as data backup and remote recovery.
In this article you will find out:
Are you ready? Let's read!
How to Recover Permanently Deleted Videos on a PC
A permanently deleted video means the video file was deleted using SHIFT + DELETE or cleared from the recycle bin, which means that’s no regular way to get it back. If the video file is not yet permanently deleted, you’d find it in the recycle bin folder and recover it from there, but once it is permanently deleted, you need to follow the tips shared here to get it back.
Common Causes of Video Loss
There are many possible reasons why your videos could be missing from your PC. Some of these reasons are avoidable while others are not.
For example, reasons like mistaken deletion and emptying the recycle bin are avoidable, but reasons like sudden power loss, hard disk crash, and OS failures are, to some extent, unavoidable.
But then, some data recovery apps can help you to recover your videos, regardless of how they go lost. Here’s a quick list of the common causes of video loss:
- OS crash
- Hard drive crash
- Sudden shutdown of the computer
- Virus attacks
- Mistaken deletion
- Using SHIFT + DELETE to delete the video file
How to Recover Permanently Deleted Videos
There are quite many methods you can try out to recover deleted videos on Windows OS computers. If you didn't permanently delete the file by emptying the Recycle Bin or using the Shift + Del shortcut when deleting the file, you might see the deleted videos in the Recycle Bin. Just go to the Recycle Bin, and if you find the video files, right-click on them and select Restore.
Method 1: Use a Video Recovery Software
Uneraser is a multi-format recovery solution developed by DiskInternals. This software can recover any kind of video file with ease, and also recover many other formats. It is a piece of intuitive utility for Windows computer users, and can run on any Windows OS version - starting from XP to Windows 11.

With Uneraser, you can recover up to 2TB files for free; you only pay when the recovery is done and you confirm it was successful using the built-in file preview function. DiskInternals also has a sister software – Partition Recovery – which comes in handy when Uneraser is unable to recover your lost files.
How to Recover Deleted Videos with DiskInternals
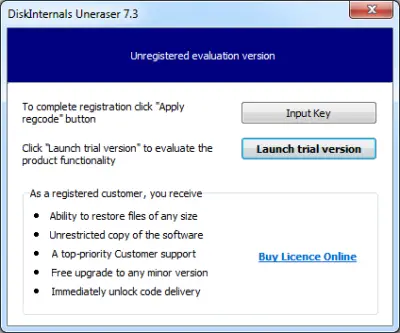
- Download and install the DiskInternals Uneraser or Partition Recovery software. After the installation, proceed to launch the app and ensure that the drive where the deleted video was previously stored is connected to the computer.
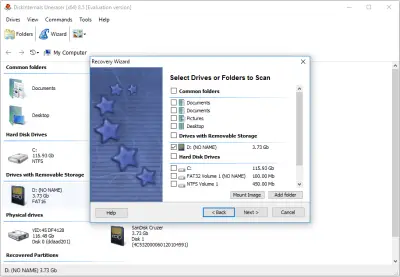
- Follow the Recovery Wizard prompts and select the drive where you once saved the lost video. Choose the drive’s file system and proceed to scan it in Full Recovery or Fast Recovery (Mode).
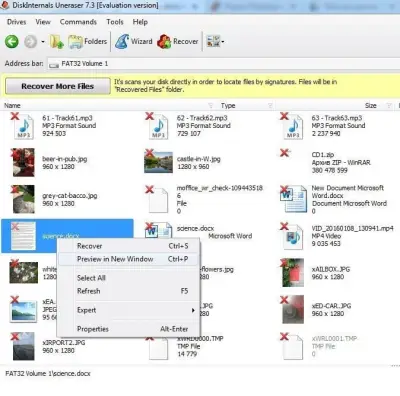
- Wait for the scanning to run completely; if you chose Full Recovery, it may take some time for the scan to complete, ensure to wait. Once the scan is complete, files you have deleted from the scanned hard drive will appear with a red asterisk – search for your lost video file(s).
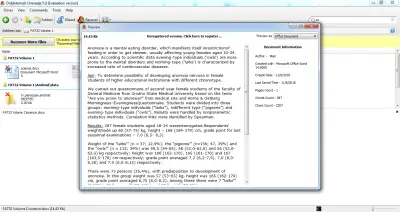
- You can filter out the scan results to find your video file faster. Once you found it, click on it to preview and confirm it is the file you’re looking for; afterward, purchase the DiskInternals Uneraser premium version and save back the file.
Note: If the Uneraser’s scan results didn’t show the lost video files, use Partition Recovery and repeat the steps above.
Method 2: Restore from File History Backup
A lot of people using Windows computers do not know there are hidden utility tools and features that can help them with advanced actions such as data recovery. File History is a crucial feature built into all Windows OS versions; so, for the fact that your PC runs on Windows OS, you have access to the File History utility.
If enabled, File History can help you to recover the “Previous Versions” of lost files. But as hinted just now, you must activate it prior to the file/data loss. Click on the Windows Search bar or icon on the taskbar (below your desktop) and search for File History; launch the corresponding settings option and restore your files from your “File History Drive.”
To set up a file history drive, go to Settings 🡺 Backup 🡺 Toggle the File History feature 🡺 Click on “More Options” to configure your file history drive.
Method 3: Download Windows File Recovery
Windows File Recovery is a freeware available on Microsoft Store for Windows 10 and 11 users. Sadly, this app is not available for people using older Windows versions. This tool actually runs through the command line, but it is quite intuitive and easy to use. Using the Windows File Recovery tool, you can possibly get your lost video files for free.
- Install the app from Microsoft Store
- Launch it to get started
- This tool scans for lost/deleted files in two different modes: Regular and Extensive.
- Now, use the following command to recover your files: winfr F: G: /regular or winfr F: G: /regular/n *.mp4
- Once the scanning is completed, go to the destination drive (Drive G) and search for a new folder called “Recovery_20221305_xxx” (note: the actual file name may differ from what’s shown here, but will be in the same format). Open the folder and you’d find the recovered files.
Method 4: Restore from your Backup
Some people have a local backup drive where they save a copy of their important files, if you’re one of such persons, simply connect the local drive to your computer and transfer back the file(s).
Similarly, if you use cloud storage services to back up your files and data, you can always get back the files if they get deleted from your local storage, you only need to log into the cloud service, look for a copy of the lost file and download it.
The exact procedure or steps to recover your files from a backup depends on the type of backup you did, and where you did it.
Method 5: Restore videos from Previous versions
Restoring videos from previous versions can be a useful method for recovering lost or deleted videos. This method works by accessing previous versions of the files that may have been saved by your computer's operating system or backup software. Here are the steps you can follow to restore videos from previous versions:
- Open the folder where the lost or deleted video was stored.
- Right-click on the folder and select "Properties."
- In the "Properties" window, select the "Previous Versions" tab.
- This will show you a list of previous versions of the folder that may have been saved by your computer's operating system or backup software. Select the version of the folder that contains the video you want to restore.
- Click on the "Restore" button to restore the selected version of the folder and its contents, including the video.
- If the previous versions option is not available, you may need to use data recovery software to recover the lost or deleted video. There are many data recovery tools available online that can help you recover lost videos from your computer's hard drive or external storage devices.
Note that the success of this method depends on whether your computer's operating system or backup software has saved a previous version of the video file. Additionally, this method may not work if the video file was deleted a long time ago or if the previous version of the file has been overwritten by newer versions. Therefore, it is important to always back up your important data to avoid losing it in the first place.
Method 4: How to Find Deleted Videos on Windows PCs
If you can’t find a particular video on your PC anymore, you can search for it using different methods – maybe you mistakenly moved it to a new folder and you couldn’t remember what folder it is. Here are the various ways to look up your video files on a Windows computer.
Method 1: Using Windows Search Feature
Windows OS comes with a search bar or icon located on the taskbar (below the desktop). This search feature searches the whole of your PC to find the file with the keyword you typed. It is a system-wide search function, and you can filter the results to quickly get to the files you’re looking for.
- Click on the search bar or icon below the desktop and start typing the video name.
- When the search results start showing, click on “More” and select “Videos” to show only video files with the name you searched.
If your video file didn’t show up, it is probably in the recycle bin folder, so you should go there and recover it.
Method 2: Using File Explorer
The File Explorer is Window’s finest utility; it has a lot of tools and features built into it, including a search function to look up files. This method also works on all Windows OS computers and it is easy. Hereunder are the steps to search for deleted videos using File Explorer.
- Open Windows File Explorer
- Click on the search bar
- Type the name of the video file you’re looking for
- In the search results, look out for the video and open the directory
Method 3: Search in Recycle Bin
The recycle bin stores deleted items for up to 30 days before deleting them permanently. What this means is that if you delete a video file, it gets recycled and would remain in the recycle bin until 30 days. So, if you think the video you’re searching for has not exceeded 30 days since it got missing, you could check for it in the recycle bin folder; this folder is available on all Windows computers.
What is Recycle Bin In Windows OS
This is a utility folder built into Windows OS to store deleted files for a limited number of days. The recycle bin folder is just like a regular folder in your computer system, but it only contains deleted files. You can manually move files into the recycle bin folder via drag and drop. Once a file is inside this folder, it won’t be read by File Explorer, and also, the file cannot be accessed until it is restored back. Restoring files from the recycle bin folder is not a big deal anyways – here’s how to do it.
How To Restore Deleted Videos From Recycle Bin
- Go to your desktop screen and double-click on the “Recycle Bin” icon
- Inside the recycle bin folder, check for the video file
- Once you spot the file, click on it and select “Restore Selected Item(s).” This will restore the video file to its original folder. So you can go back to the original folder and access your video again.
Method 4: Use Data Recovery Software for Windows
DiskInternals Partition Recovery and DiskInternals Uneraser are all-rounder data recovery software you can trust to recover any file type. These work on all Windows OS computers from XP to v11.0. Partition Recovery and Uneraser feature an intuitive interface that any PC user can easily understand and integrate a Wizards to guide users in using the apps for data recovery.
Best Free Video Recovery Software for PC
The free version of DiskInternals Uneraser offers several benefits to users who need to recover lost or deleted files:
- Easy to use: DiskInternals Uneraser has a user-friendly interface that makes it easy for users of all levels of technical expertise to use the software.
- Fast scanning: The software uses advanced scanning algorithms to quickly scan the storage device and locate deleted or lost files.
- Wide file format support: DiskInternals Uneraser can recover a wide range of file formats, including photos, videos, documents, music, and more.
- Preview feature: The software provides a preview feature that allows users to preview the recoverable files before restoring them.
- Free of charge: The free version of DiskInternals Uneraser allows users to recover lost or deleted files without having to pay for expensive data recovery services.
The recovery process with DiskInternals Uneraser is relatively straightforward:
- Download and install the software on your computer.
- Launch the program and select the storage device from which you want to recover the files.
- Choose the scanning method that you want to use (Fast Scan or Full Analysis).
- Wait for the software to complete the scanning process and display the recoverable files.
- Preview the files and select the ones you want to recover.
- Choose a destination folder to save the recovered files, and click the "Recover" button to start the recovery process.
- Wait for the software to complete the recovery process and verify that the recovered files are intact and usable.
Free Android Deleted Video Recovery Software
DiskInternals Video Recovery is a software tool designed to help users recover deleted or lost video files from various storage devices. It can be used to recover videos from a range of storage devices such as hard drives, memory cards, USB drives, and other removable media.
One of the advantages of DiskInternals Video Recovery is that it is available as a free recovery tool. This means that users can download and use the software without paying any fees. However, it should be noted that while the software is free, there may be certain limitations to its functionality or capabilities.
To use DiskInternals Video Recovery, users can download and install the software on their computer. Once installed, they can select the drive or storage device where the lost or deleted video files were originally located. The software will then scan the selected drive and display a list of recoverable video files. Users can then select the files they want to recover and save them to a new location on their computer.
Overall, DiskInternals Video Recovery is a useful free tool for recovering lost or deleted video files from various storage devices. However, it is important to note that the success of recovery largely depends on the condition of the storage device and the extent of the damage or corruption of the video files.
How to Avoid Losing Important Videos
Here are a few tips that can help you to stop losing your important files often. These are all safe practices – you need not to worry about trying them out.
- Always Backup: Always create a backup of your important videos; save them to another drive or your cloud service. Backups remain the safest way to have a place to fall back on when data loss occurs.
- Be Mindful About How You Use The Computer: You should not allow your PC to overheat, and if the battery is weak, get a new one, so the PC doesn’t go off immediately power goes off; such scenarios that lead to logical hard drive failure, and subsequently result in loss of files (your important videos could be among the lost files).
- Spread The Videos Across: Have your very important videos saved across multiple disks – maybe one or two other disks. Yes, this is similar to backups and it’d help you to easily recover the video when it gets lost from the main storage.
FAQ
-
Unfortunately, once a video is permanently deleted, it is typically not possible to recover it. When a file is deleted, it is usually moved to the recycle bin or trash folder, which can be recovered easily. However, when a file is permanently deleted, it is typically overwritten on the hard drive, making it difficult or impossible to retrieve.
Uneraser is a multi-format recovery solution developed by DiskInternals. This software can recover any kind of video file with ease, and also recover many other formats. It is a piece of intuitive utility for Windows computer users, and can run on any Windows OS version - starting from XP to Windows 11.
-
If you have permanently deleted a video from your laptop and you don't have a backup of it, there are still some things you can try to recover the file:
- Check the recycle bin/trash folder: If you haven't emptied your recycle bin/trash folder since deleting the video, there's a chance that it's still there. Open the recycle bin/trash folder and look for the video file. If you find it, right-click on it and select "Restore" to recover it.
- Use a data recovery software: There are various data recovery software programs available that can help you recover deleted files, including videos.
- Check your cloud storage: If you have uploaded the video to a cloud storage service like Google Drive, Dropbox, or iCloud, check if the video is still available there. If it is, you can download it back to your laptop.
- Contact a data recovery specialist: If you're unable to recover the video using the above methods, you may need to contact a professional data recovery specialist. These specialists have advanced tools and techniques to recover lost data, but they can be expensive.
-
If you've accidentally deleted a video from your Android phone, there are a few steps you can take to try to recover it:
- Check the "Recently Deleted" folder: If you have an Android phone with the Google Photos app, check the "Recently Deleted" folder in the app. This folder contains photos and videos that have been deleted within the past 60 days. To access it, open the Google Photos app, tap on the three horizontal lines in the top-left corner, and select "Trash."
- Check your phone's recycle bin/trash folder: Some Android phones have a recycle bin or trash folder that stores deleted files for a certain period of time. Check if your phone has this feature and if the deleted video is still there.
- Use a data recovery app.
- Use a computer: If your phone is connected to a computer, you can use data recovery software.
-
Recovering deleted video surveillance footage can be a complex process that requires specialized knowledge and equipment. However, here are some steps you can take to try to recover the deleted footage:
- Check your backup systems: If you have a backup system in place for your video surveillance footage, check if the deleted footage is available in the backup. If it is, you can easily restore it from the backup.
- Check the recycling bin/trash folder of your surveillance software: Many video surveillance systems have a recycling bin or trash folder where deleted footage is temporarily stored before being permanently deleted. Check this folder to see if the deleted footage is still there.
- Contact your surveillance system vendor: If your surveillance system has been provided by a vendor, contact them and ask for their assistance in recovering the deleted footage. They may have specialized tools and techniques that can help recover the footage.
- Use a data recovery service: If none of the above methods work, you can consider using a data recovery service. These services specialize in recovering data from damaged or corrupted storage media, including surveillance systems. However, these services can be expensive and may not always be successful.
-
Whether or not you can bring back a deleted video depends on several factors, such as the storage device it was saved on, how it was deleted, and how long ago it was deleted. Here are a few things to try if you want to bring back a deleted video:
- Check the recycle bin/trash folder: If you deleted the video recently, it may still be in your recycle bin/trash folder. To recover the video, simply right-click on it and select "Restore" or "Undelete."
- Use a data recovery software: If you've emptied your recycle bin/trash folder, you can try using a data recovery software program to scan your storage device and recover the deleted video.
- Check cloud storage: If you've uploaded the video to a cloud storage service like Google Drive, Dropbox, or iCloud, check if the video is still available there. If it is, you can download it back to your device.
-
If you have recently deleted a video file on your Windows 11 PC and you want to retrieve it, there are several methods you can try:
- Check the Recycle Bin: When you delete a file on Windows 11, it usually gets sent to the Recycle Bin, which acts as a temporary storage space for deleted files. To check if your deleted video is there, go to the Recycle Bin on your desktop and look for the video file. If you find it, right-click on it and select "Restore" to recover it.
- Use File History: If you have enabled File History on your Windows 11 PC, you can use it to restore deleted files. To do this, open the File History app, select the folder where your video file was stored, and look for a previous version of the file that was saved before it was deleted. Once you find it, you can restore it to its original location.
- Use a data recovery tool: If the above methods don't work, you can use a data recovery tool to search for and recover deleted video files on your Windows 11 PC. There are several third-party tools available online, such as Recuva, EaseUS Data Recovery Wizard, and Disk Drill. These tools work by scanning your hard drive for deleted files and allowing you to restore them if they are still recoverable.
It's important to note that the chances of recovering a deleted video file decrease the longer it has been since it was deleted, and if the space it occupied has been overwritten with new data, it may not be recoverable at all.
-
If you have a backup of your device or the videos in question, you may be able to restore them from the backup. You can check if you have any backups by connecting your device to your computer and opening the backup software that you use.
Alternatively, you can try using a data recovery tool to scan your device for deleted files.
To avoid permanently losing important videos in the future, it's a good idea to regularly back up your device or important files to an external hard drive or cloud storage service.
-
Recovering permanently deleted videos for free can be challenging, but there are a few things you can try:
- Check if your videos are synced with cloud storage: If you have uploaded your videos to a cloud storage service like Google Drive, Dropbox, or iCloud, check if you can find them there. Most cloud storage services keep deleted files in a trash or recycling bin for a limited period, so you might be able to recover your videos from there.
- Use a data recovery software.
- Contact the manufacturer or service provider: If you have lost videos due to a device malfunction or a service outage, you can try contacting the manufacturer or service provider to see if they can assist you in recovering your videos. Depending on the circumstances, they may be able to provide you with a solution or refer you to a data recovery service.
Remember, the best way to avoid permanently losing important videos is to regularly back up your files to a secure location, such as an external hard drive or cloud storage service.
-
Recovering permanently deleted videos from a phone can be challenging, but here are some steps you can take to try to recover them:
- Check if the video is in your backup: If you have backed up your phone to the cloud or to your computer, check if the video is in your backup. You can restore your phone to the most recent backup to recover your deleted videos.
- Check your phone's recycle bin or trash folder: Many phones have a recycle bin or trash folder where deleted files are stored temporarily. Check if your phone has this feature and see if the deleted video is in the recycle bin or trash folder. If it is, you can restore the video from there.
- Use a data recovery app.
- Connect your phone to a computer: You can connect your phone to a computer and use a data recovery tool such as Recuva or Disk Drill to scan your phone's storage and recover deleted videos.
-
When you permanently delete a file from your device, the file is usually not immediately erased from the storage media. Instead, the file system marks the space occupied by the file as available for reuse, and the file becomes invisible and inaccessible to the user. However, until that space is overwritten by new data, the deleted file may still be recoverable using specialized data recovery software.
In some cases, the deleted file may be moved to a "trash" or "recycling bin" folder, which is a temporary holding area for deleted files. These folders may be emptied manually, or they may automatically delete files after a certain amount of time.
It's important to note that different devices and operating systems may handle deleted files differently, so it's always a good idea to check your device's documentation or support resources to understand how deleted files are managed on your specific device. Additionally, the ability to recover permanently deleted files depends on a variety of factors, such as the age of the file, how it was deleted, and whether it has been overwritten by new data.