How to Recover Deleted Files From an SD Card
SD cards are frequently used to increase the storage capacity of digital cameras and mobile devices, and they may contain priceless photos that are quite sentimental to the owner. However, if crucial data was lost, these pictures or files could vanish or be mistakenly wiped from the SD card, creating a great deal of worry and despair. The purpose of this post is to investigate the best ways to retrieve deleted files from an SD card.
Best Methods on How to Recover Files from SD Cards on a Windows 10 / 11
1. Use SD Card Recovery Software
Uneraser is a professional data recovery solution that works to help you get back files from a corrupt SD card that still appears on File Explorer. It comes with different recovery modes and can recover multiple file formats. The Uneraser software also supports all known Windows file systems and features a built-in Recovery Wizard that guides you every step of the way to recover your files.
1. Download and install DiskInternals Uneraser
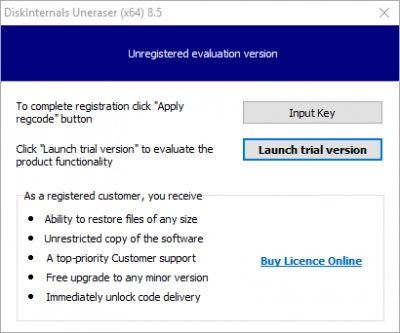
- 1. Go to the Uneraser Section: From the main menu, select the "Data Recovery" tab and then opt for "Uneraser" from the dropdown list.
- 2. Select Your Preferred Uneraser Version: DiskInternals Uneraser offers both a free trial version and a paid version with extra functionalities. Decide which version suits your needs and click the corresponding download button.
- 3. Initiate the Uneraser Download: Upon clicking the download button, the download of the Uneraser installer will commence. The duration and size of the download will vary based on your internet speed.
- 4. Execute the Uneraser Installer: After the download is finished, go to the folder where the installer is saved and double-click it to initiate the installation.
- 5. Proceed with the Installation Wizard: The Uneraser setup wizard will guide you through the installation steps. Follow the on-screen instructions to choose the install location, agree to the license terms, and select any additional components you wish to install.
- 6. Finish the Installation: Once you've navigated through the installation wizard, DiskInternals Uneraser will be installed on your system. You can access the software either by searching for it in the Start menu or by double-clicking its desktop icon, if one was created during the installation.
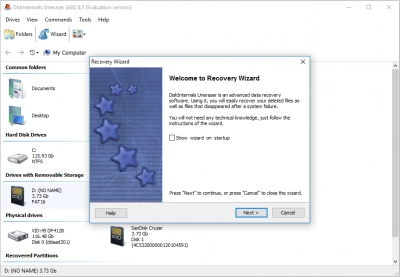
2. Select the file formats you want to recover
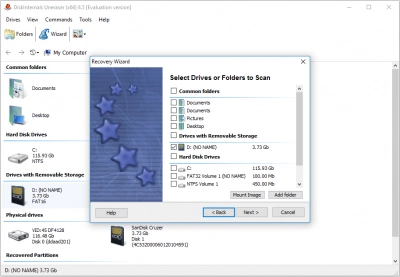
After launching DiskInternals SD Card Recovery, the main window will appear. Here, you will need to select the file formats that you want to recover from your SD card.
To do this, click on the "File Types" button in the lower left-hand corner of the window. A new window will appear, displaying a list of file types. Check the box next to the file formats that you want to recover, or select "All" to recover all file formats.
Once you have selected the file types, click "OK" to return to the main window.
Note that you can also use the "Advanced Recovery" option to perform a deeper scan of your SD card and recover more types of files. However, this may take longer than a quick scan and may not be necessary for all data loss situations.
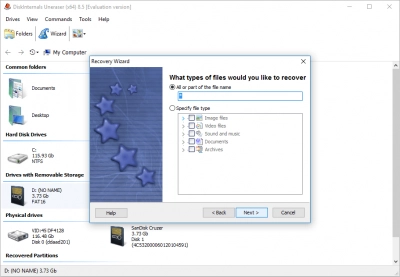
3. Wait for the scan to run completely
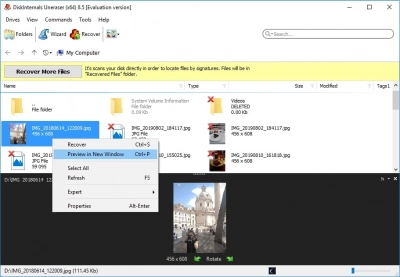
After selecting the file formats you want to recover, click on the "Next" button to start the scanning process. The scanning time will depend on the size of your SD card and the number of files it contains.
During the scanning process, DiskInternals SD Card Recovery will display the progress of the scan and the estimated time remaining. You can also pause or stop the scan at any time if necessary.
It is important to wait for the scan to complete fully before attempting to recover any files. Once the scan is complete, DiskInternals SD Card Recovery will display a list of all the recoverable files found on the SD card.
Note that if the quick scan does not find the files you are looking for, you can also try running an advanced scan, which may take longer but can find more recoverable files.
2. Check If Your Files Are Hidden
To check if your files are hidden on an SD card, you can follow these steps:
1. Insert the SD card into your computer's card reader or connect the device containing the SD card to your computer.
2. Open File Explorer (Windows) or Finder (Mac) and navigate to the SD card drive. It should appear as a removable storage device.
3. Make sure you have enabled the option to show hidden files on your operating system. Here's how to do it:
For Windows:
- In File Explorer, click on the "View" tab at the top.
- Check the "Hidden items" box in the "Show/hide" section.
For Mac:
- Open Finder and click on the "Go" menu at the top.
- Press and hold the "Option" key on your keyboard.
- You will see a new option called "Library" in the dropdown menu. Select it.
- Within the Library folder, navigate to "Preferences" and find the file named "com.apple.finder.plist."
- Move this file to the Trash and restart your computer.
4. After enabling the display of hidden files, browse through the SD card again. Look for any files or folders that appear faded or transparent. These could be hidden files.
5. If you find any hidden files or folders, right-click on them and select "Properties" (Windows) or "Get Info" (Mac) to access their properties.
6. In the properties or info window, uncheck the "Hidden" option, if available. This action should make the files visible again.
7. If the files were not hidden, or if you still cannot find the deleted files, there might be a need for file recovery software. There are various third-party tools available that specialize in recovering deleted files from storage devices like SD cards. You can search online for reputable software options and follow their instructions to perform a file recovery scan on your SD card.
Remember, the chances of recovering deleted files depend on various factors such as the amount of time that has passed since deletion, the usage of the SD card after deletion, and the effectiveness of the recovery software. It is always recommended to stop using the SD card immediately after realizing the files are deleted to improve the chances of successful recovery.
3. Use The Command Prompt To Recover Deleted Data From SD Card
Recovering deleted data from an SD card using the Command Prompt can be a complex process, but here is a general outline of the steps involved:
1. Insert the SD card into your computer's card reader.
2. Open the Command Prompt:
- On Windows: Press Win + R to open the Run dialog box. Type "cmd" and press Enter.
- On Mac: Open Terminal from the Applications > Utilities folder.
3. In the Command Prompt or Terminal, navigate to the location where the SD card is mounted. You can use the
cdcommand to change directories. For example, if the SD card is mounted as drive E, you would typeE:and press Enter (Windows). On Mac, the SD card may be mounted under the/Volumesdirectory.4. Once you are in the SD card directory, use the
attribcommand (Windows) or thels -alcommand (Mac) to list all the files and folders, including hidden ones. Look for the files you want to recover.5. To recover a deleted file, you can use the
copycommand (Windows) or thecpcommand (Mac). For example, if the deleted file is named "example.txt" and you want to recover it to your desktop, you would type:- Windows:
copy example.txt C:\Users\YourUsername\Desktop - Mac:
cp example.txt ~/Desktop
- Windows:
6. If you cannot find the deleted files using the
attriborls -alcommand, it means the file system has been damaged or the files have been overwritten. In such cases, you might need to use specialized data recovery software to attempt a deeper scan and recovery.
It's important to note that using the Command Prompt for data recovery can be risky, and there is no guarantee of success. It is always recommended to create a backup of the SD card before attempting any recovery process, and if possible, consult with a professional data recovery service for better chances of successful file retrieval.
4. Have A Backup To Fall Back On
Having a backup of your important files is essential to avoid data loss. If you have a backup, you can easily restore your files without going through the process of data recovery. Here are some backup options you can consider:
1. External Hard Drive: Connect an external hard drive to your computer and regularly back up your files by copying them to the external drive. This provides a convenient and offline backup solution.
2. Cloud Storage Services: Utilize cloud storage services such as Google Drive, Dropbox, Microsoft OneDrive, or iCloud. These services allow you to store your files securely in the cloud and access them from any device with an internet connection.
3. Network Attached Storage (NAS): Set up a NAS device on your home or office network. NAS devices provide storage that can be accessed by multiple computers, making it a convenient option for backing up files from multiple devices.
4. Online Backup Services: Consider using dedicated online backup services like Backblaze, Carbonite, or CrashPlan. These services automatically back up your files to remote servers over the internet, providing an offsite backup solution.
5. Synchronization and Backup Software: Use synchronization and backup software like GoodSync, SyncBack, or rsync to automate the backup process. These tools can sync files between different devices and create backups according to your defined schedule.
Remember to regularly update your backups to ensure they include the most recent versions of your files. It's also a good practice to store your backups in different physical locations to protect against events like theft, fire, or natural disasters.
By having a backup strategy in place, you can significantly reduce the risk of data loss and have a fallback option if your files are accidentally deleted or lost from your SD card or computer.
Try to Find Lost Files on SD Card
The files or folders you are seeking may still exist on your memory card and could have been overlooked for various reasons. Below are some common issues that may make it appear as if the files were deleted:
To start with, use the search function on the device to which the memory card was connected when the files went missing. Every digital device, such as a computer, smartphone, tablet, or digital camera, is capable of scanning its storage data. Carefully review the files stored on your device, as it's possible you missed the file before or searched for it under a different name. If you're fortunate, you'll find the missing data and won't have to go any further.
Another option is to display hidden files in your operating system. Sometimes, when you connect an SD card to your computer, the operating system may not be able to detect the files. Perhaps they were hidden by a virus and need to be made visible again. The specific instructions for revealing hidden files depend on your device and operating system.
Can Permanently Deleted Files be Recovered from an SD Card?
Recovering permanently deleted files from an SD card can be challenging, but it is sometimes possible depending on various factors. When a file is deleted from an SD card, the space it occupied is marked as available for reuse, but the actual data remains intact until it is overwritten by new data. If you act quickly and avoid using the SD card to write new files, there is a chance of recovering the deleted files. Here are a few methods you can try:
1. DiskInternals Uneraser is a data recovery software that specializes in recovering deleted files from various storage devices, including SD cards. It is a powerful tool that utilizes advanced algorithms to scan the storage media and locate deleted files that can potentially be recovered. Here is an overview of how DiskInternals Uneraser works:
1. Installation: Start by downloading and installing DiskInternals Uneraser on your computer. The software is compatible with Windows operating systems.
2. Launching the Software: Open DiskInternals Uneraser after installation. You'll be presented with a user-friendly interface that guides you through the recovery process.
3. Selecting the Drive: Choose the SD card from which you want to recover deleted files. The software will display a list of available drives and storage media. Select the SD card and click "Next" to proceed.
4. Scan for Deleted Files: DiskInternals Uneraser offers two scanning modes: fast and full. The fast scan is quicker but may not find all deleted files, while the full scan is more thorough and recommended for more reliable results. Choose the scan mode and click "Next" to start the scanning process.
5. Preview and Recovery: Once the scanning is complete, DiskInternals Uneraser will display a list of recoverable files. You can preview the files to ensure they are intact and recoverable. The software supports various file formats, including documents, photos, videos, audio files, and more.
6. Select Files for Recovery: Choose the files you want to recover from the list. You can select individual files or use the "Select All" option to recover all found files. Click "Next" to proceed.
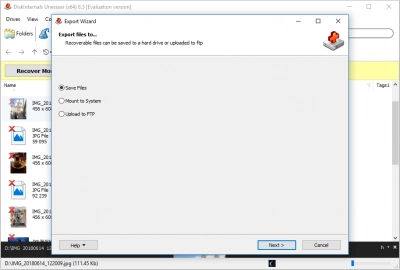
7. Specify Recovery Destination: Choose a location on your computer's hard drive or another storage device where you want to save the recovered files. It is recommended to select a different drive from the one being recovered to prevent overwriting data. Click "Next" to initiate the recovery process.
8. File Recovery: DiskInternals Uneraser will start recovering the selected files from the SD card and save them to the specified location. The duration of the recovery process depends on the size and number of files being recovered.
9. Access Recovered Files: Once the recovery process is complete, you can access the recovered files at the specified destination. It is advisable to check the recovered files to ensure their integrity.
Note that the effectiveness of recovery with DiskInternals Uneraser, or any data recovery software, depends on various factors like the condition of the SD card, the time elapsed since deletion, and the level of use after deletion. It is always recommended to act quickly, avoid using the SD card for further data storage, and follow the instructions provided by the software to maximize the chances of successful file recovery.
2. Consult a Professional Data Recovery Service: If the deleted files are highly important and cannot be recovered using software, you may consider seeking assistance from a professional data recovery service. These services have specialized equipment and expertise to recover data from damaged or corrupted storage devices, including SD cards. However, professional data recovery services can be costly.
It's important to note that the success of data recovery from an SD card depends on various factors, including the usage of the card after deletion, the file system used on the card, and the effectiveness of the recovery methods employed. To maximize the chances of recovery, it is crucial to immediately stop using the SD card once you realize the files are deleted and proceed with the recovery process as soon as possible.
Recover Deleted Files from an SD Card Trash
If you accidentally delete files on your Mac, don't worry because they are first moved to the Trash folder and can be easily recovered until you empty the Trash. Here's how:
1. Click on the Trash icon located on the right side of the Dock.
2. Select the files you want to recover.
3. Right-click on any of the selected files and select "Put Back."
If you cannot find your deleted files in the Trash, you can unhide the actual Trash folder located on your SD card:
1. Launch Finder and go to the root directory of your SD card.
2. Press Command + Shift + .
3. Open the .Trashes folder and access the Bin folder.
The Bin folder should contain all files that have been deleted from the SD card. You can recover them by moving them to any location.
Alternatively, you can use a Terminal command to display the contents of the .Trashes folder:
/Volumes/nameofSDcard/.Trashes
Please note that the Terminal.app must have Full Disk Access in the security settings to manipulate the content of the .Trashes folder.
Remember that deleted files remain in the .Trashes folder until you empty the main system Trash, format the SD card, or eject it safely. Once deleted files are permanently deleted, you can only recover them using SD card recovery software.
FAQ
What are the most common reasons for SD card damage?
There are several common reasons for SD card damage, including:
1. Physical damage: Dropping or mishandling the SD card can cause physical damage to the card, resulting in data loss or corruption.
2. File system errors: If the file system on the SD card becomes corrupt, files may become inaccessible or get deleted. This can happen due to improper ejection of the SD card or virus/malware infections.
3. Electrical or magnetic interference: Exposure to strong electrical or magnetic fields can cause SD card damage or data loss.
4. Overuse or wear and tear: Frequent use or wear and tear can cause SD card failure or corruption, especially with lower-quality cards.
5. Excessive heat or cold: Extreme temperatures can cause SD card damage or data loss.
6. Incompatibility: Sometimes, using an SD card on an incompatible device can lead to damage or data loss.
It is important to handle and store SD cards carefully and avoid exposing them to extreme conditions to prevent damage or loss of data. Regular backups of important data can also help minimize the impact of SD card damage.
How can I recover data from corrupted SD card?
You can recover data from a corrupted SD card by following these steps:
1. Stop using the SD card immediately to prevent further damage or data loss.
2. Connect the SD card to your computer using a card reader.
3. Download and install reliable data recovery software such as Uneraser.
4. Launch the software and select the corrupted SD card as the target drive.
5. Start the scanning process to search for lost or deleted files.
6. Once the scan is complete, preview the recoverable files and select the ones you want to recover.
7. Choose a location to save the recovered files to avoid overwriting any existing data on the SD card.
8. After the recovery process is complete, safely eject the SD card and format it if necessary.
It is important to note that if the SD card is severely damaged, recovery may not be possible using data recovery software. In this case, it may be necessary to seek professional data recovery services. It is also recommended to regularly back up important data to minimize the impact of SD card corruption or failure.
Where do deleted files from an SD card go?
When files are deleted from an SD card, they are not immediately removed from the storage device. Instead, the operating system marks the space previously occupied by the deleted files as available for new data to be written. The deleted files are still present on the SD card until new data overwrites that space.
In the case of an SD card used in a mobile device or camera, deleted files are typically moved to a "trash" or "recycle bin" folder on the SD card. These files can often be restored from the folder if they have not been permanently deleted.
On a computer, deleted files from an SD card are typically moved to the system's trash or recycle bin folder. If the folder is not emptied, the deleted files can be restored from the folder. However, if the folder is emptied or the files are permanently deleted, they can only be recovered using data recovery software, assuming the space they occupied has not yet been overwritten.
Can I recover deleted files from a CF card?
Yes, it is possible to recover deleted files from a CF (CompactFlash) card using data recovery software. When files are deleted from a CF card, they are not immediately removed from the storage device. Instead, the operating system marks the space previously occupied by the deleted files as available for new data to be written. The deleted files are still present on the CF card until new data overwrites that space.
How to Recover Deleted Files from an SD Card With Uneraser?
1. Download and Install DiskInternals Uneraser
2. Choose the SD card and recovery method you need
3. Start scanning for lost data
4. Select the files which you want to recover on your SD Card
5. Recover the deleted data from your SD card
How do I fix an unreadable SD card?
1. Connect your SD card to your computer
2. Type cmd in the Windows search bar and click Command Prompt. If asked, click Run as Administrator
3. Type in chkdsk F: /f /r /x (replace F with the drive letter of the SD card) and hit Enter on your keyboard
4. Once the process is finished, type exit
What is the Best Free SD Card Recovery Software?
DiskInternals Uneraser is a professional data recovery solution that works to help you get back files from a corrupt SD card that still appears on File Explorer. It comes with different recovery modes and can recover multiple file formats. The Uneraser software also supports all known Windows file systems and features a built-in Recovery Wizard that guides you every step of the way to recover your files.
How much does SD card recovery cost?
DiskInternals Uneraser is only $39.95
