If the semaphore timeout period has expired error appears
Here you will find out:
- what the “semaphore timeout period has expired” error is
- how to fix this issue
- how DiskInternals can help you
Are you ready? Let's read!
What is the “semaphore timeout period has expired” error?
Usually, Windows users get an error code 0x80070079, which is accompanied by an error message “semaphore timeout period has expired”, when they are trying to transfer files between external drives or local networks. This is especially the case when you’re transferring large files. The code implies that Windows is unable to retry the network connection within a given timeframe. Possible reasons for this error include a faulty network adapter, poor signals, or slow connections.
How to fix this problem
Method 1: Try a clean boot
The first attempt at solving this issue should be to run a clean boot. This action will clean the file or program that's conflicting/interfering with the transfer.
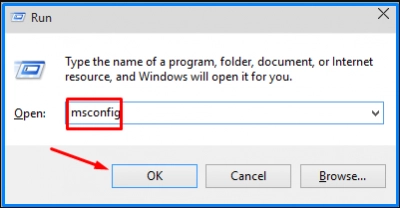
- Press Windows key + R and enter MSConfig in the "Run" dialogue box.

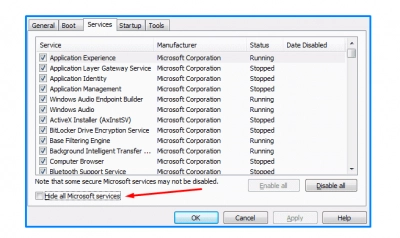
- Toggle to the "Services" tab and select "Hide all Microsoft services.”

- Click on "Apply," then "OK".
- Restart your PC and try transferring the files again.
Method 2: Disallow Antivirus and Firewall
You may have gotten this message as a result of your firewall or antivirus settings. You can resolve “The semaphore timeout period has expired” error message by disabling your firewall and antivirus settings.
Disabling firewall on Windows computers:
- Click the search icon on the Windows taskbar (usually at the bottom of the screen).
- Type “firewall.cpl” and search.
- Click “Turn Windows Firewall On or Off”.
- Select "Turn off Windows Firewall (Not Recommended)" under Private Network.
- Click “OK”.
Disabling antivirus on Windows
- Press Windows Key + I and click on “Update & Security”.
- Click “Windows Defender” or “Windows Security” on the left side.
- Under “Real-Time Protection”, toggle the switch to "Off".
Method 3: Break the file size limit converting FAT32 to NTFS
Some PC users have reported that this error can be fixed by converting your file system from FAT32 to NTFS. To do this, follow the steps below:
- Connect the external storage device or click on “This PC” on File Explorer to view all the hard disks on your PC.
- Right-click on the affected driver and select "Format".
- In the “Format” dialogue box, go to “File System,” click on the dropdown menu and select “NTFS”.
- Tick “Quick Format”, and then “OK”.
However, this process will erase all the data saved on the drive. Thus, it is advised to create a disk image file using DiskInternals Uneraser and save the image file on another external storage device. This will help safeguard your files even after formatting the drive.
But, if, unfortunately, you have already converted the drive and lost your important files due to formatting, you can also use DiskInternals Uneraser to undelete all those deleted files. As the name implies, DiskInternals Uneraser is a handy utility for getting back deleted files from virtually any type of storage device. It is very easy to use. It does not require any technical knowledge.
DiskInternals Uneraser supports a lot of file system types (FAT12, FAT16, FAT32, ExFAT, RomFS (reader), HFS+ (Mac), Ext2, 3, and 4 (Linux), ReFS, NTFS, NTFS5, UFS, XFS and ZFS) and is capable of recovering any type of file, including media files and documents. It works in four simple steps, and it is free to download.
