How to Fix 'USB Says/Shows No Media in Disk Management' Error
n today's digital age, USB drives have become an indispensable tool for storing and transferring data. However, sometimes, when you plug in a USB drive, you might encounter an error message that says "No media" in the Disk Management tool. This error can be frustrating as it prevents you from accessing your data stored on the USB drive. In this article, we will explore some possible causes for this error and provide solutions to help you fix the "No media" error on your USB drive. So, if you're experiencing this issue, keep reading to learn how to resolve it.
What Does No Media Device Mean?
The term "No media device" typically refers to an error message or notification that appears on a computer or other electronic device when it cannot find a connected media device, such as a USB drive, CD/DVD, or external hard drive.
This error message can occur for various reasons, such as:
1. The media device is not connected properly to the computer or device.
2. The media device is damaged or corrupted and cannot be read by the computer or device.
3. The drivers or software required to read the media device are missing or outdated.
To resolve this error, you may need to check the physical connection of the media device, update the drivers or software, or try connecting the device to a different port or computer.
USB Drive Says No Media in Disk Management
If your USB drive says "No Media" in Disk Management, it means that the operating system is unable to detect any valid file system on the USB drive, and therefore it cannot display any data stored on it.
There are several possible reasons for this issue, such as:
- The USB drive is damaged or corrupted.
- The file system on the USB drive is not recognized by the operating system.
- The USB drive has not been formatted properly.
- The USB driver is outdated or not working properly.
To troubleshoot this issue, you can try the following solutions:
- Try plugging the USB drive into another USB port on your computer or try it on another computer to see if the issue persists.
- Use a data recovery software program to recover the data from the USB drive.
- Format the USB drive using the correct file system.
- Install the latest USB driver for your computer.
- If the USB drive is physically damaged, it may be necessary to replace it.
Fix: USB Drive Says Disk No Media in Disk Management Windows 10
If your USB drive is not recognized by Windows 10 and displays "Disk No Media" in Disk Management, try the following solutions:
Change the Drive Letter: Sometimes changing the drive letter can fix the issue. Here's how:
- Open Disk Management in Windows 10.
- Find your USB drive, right-click on it, and select "Change Drive Letter and Paths".
- Choose a new drive letter for your USB drive and click "OK".
Update USB drivers: The USB drivers may be outdated or corrupted, which can cause the issue. Here's how to update USB drivers:
- Press "Windows + X" keys and select "Device Manager".
- Find your USB drive under the "Disk drives" category and right-click on it.
- Select "Update driver" and follow the instructions.
Format USB drive: If the USB drive is corrupted, you can try formatting it to fix the issue. Here's how:
- Open Disk Management in Windows 10.
- Find your USB drive, right-click on it, and select "Format".
- Choose a file system (e.g. NTFS or FAT32) and click "OK". Note that formatting will erase all data on the drive, so make sure you have a backup before formatting.
Check USB port and cable: Sometimes the issue may be with the USB port or cable. Here's what to check:
- Try plugging your USB drive into a different USB port on your computer.
- Try using a different USB cable.
- If possible, try using the USB drive on a different computer to see if the issue persists.
How to Recover Data from a “No Media” Device
DiskInternals Uneraser is a powerful data recovery tool that can help you retrieve lost or deleted files from various storage devices, including hard drives, USB drives, memory cards, and more. If you are getting a "No Media" error message while trying to access your device, it means that the device is not being recognized by your computer or has been damaged.
To recover data from a "No Media" device with DiskInternals Uneraser, follow these steps:
Step 1. Download and Install Uneraser
Connect your device to your computer and make sure that it is recognized by the system. If your device is not recognized, try connecting it to a different USB port or a different computer.

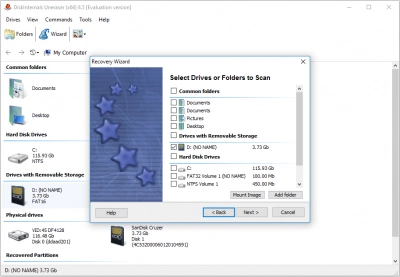
Download and install DiskInternals Uneraser on your computer. Launch the software and select the "Unerase Wizard" option.
Step 2. Scan the USB Drive
Select the storage device that you want to recover data from and click "Next."
Choose the file types that you want to recover and click "Next." If you are not sure which file types to select, you can choose "All Files."
Select the scanning mode that you want to use. The "Fast Scan" mode is recommended for quick scans, while the "Full Scan" mode is recommended for more thorough scans. Click "Next" to start the scanning process.
Step 3. Select Files to Recover
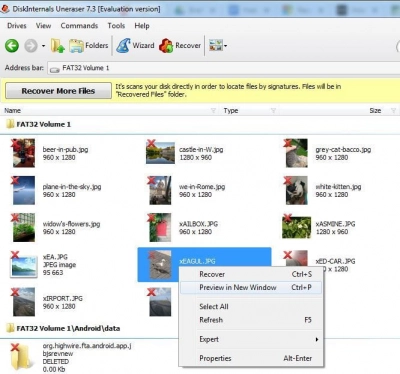
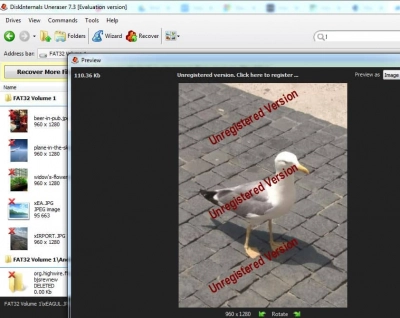
Once the scanning process is complete, you will be able to preview the recoverable files. Select the files that you want to recover and click "Next."

Choose the destination folder where you want to save the recovered files and click "Next." Make sure that you save the files to a different storage device than the one you are recovering from to avoid overwriting the lost data.

Click "Next" to start the recovery process. Once the process is complete, you will be able to access the recovered files in the destination folder.
How to Fix “No Media” Issue on a USB Drive?
Method 1: Check the Device in Another PC or Port
If you're experiencing a "No Media" issue on a USB drive, the first step you should take is to check the device in another PC or port. Here are the steps you can follow:
- Remove the USB drive from the current PC or port.
- Insert the USB drive into another PC or port.
- Check if the USB drive is recognized by the new PC or port. If the USB drive works fine on the other PC or port, then the problem may be with the original PC or port that you were using.
- If the USB drive is still not recognized on the new PC or port, try using a different USB port or a different USB cable.
- If none of these steps work, the problem may be with the USB drive itself. In that case, you may need to replace the USB drive.
Method 2: Enable/Reinstall USB in Device Manager
If checking the USB drive on another PC or port did not solve the "No Media" issue, you can try enabling or reinstalling the USB in Device Manager. Here are the steps you can follow:
- Connect the USB drive to the PC.
- Press Windows + X and select Device Manager from the menu.
- In the Device Manager window, locate the Universal Serial Bus controllers option and click on it to expand the list.
- Right-click on the USB device that is having issues and select Disable device.
- Wait a few seconds and then right-click on the same USB device and select Enable device.
- If the USB device is still not working, right-click on it again and select Uninstall device.
- Confirm the action by clicking Uninstall in the pop-up window.
- Once the device is uninstalled, restart your PC.
- After the PC has restarted, connect the USB drive to the PC again.
- Wait for Windows to install the USB device driver automatically.
Method 3: Antivirus Scan
Another possible solution for fixing the "No Media" issue on a USB drive is to perform an antivirus scan. Sometimes, malware or viruses can infect the USB drive, causing it to malfunction. Here are the steps you can follow:
- Connect the USB drive to the PC.
- Open your antivirus software and perform a full system scan, making sure to include the USB drive in the scan.
- If any malware or viruses are found, follow the instructions provided by the antivirus software to remove them.
- Once the scan and removal process is complete, try accessing the USB drive again.
Performing an antivirus scan can help identify and remove any malware or viruses that may be affecting the USB drive and causing the "No Media" issue. However, if this method does not work, you may need to try other solutions, such as checking the USB drive for errors or formatting it.
Method 4: Change Drive Letter
Changing the drive letter of your USB drive can also help fix the "No Media" issue. Sometimes, the drive letter assigned to the USB drive conflicts with another drive letter, causing the USB drive to malfunction. Here are the steps you can follow:
- Connect the USB drive to the PC.
- Press Windows + X and select Disk Management from the menu.
- In the Disk Management window, locate the USB drive and right-click on it.
- Select Change Drive Letter and Paths from the context menu.
- In the pop-up window, click on the Change button.
- Select a new drive letter from the drop-down menu.
- Click OK to save the changes.
- Once the drive letter has been changed, try accessing the USB drive again.
By changing the drive letter of the USB drive, you can avoid conflicts with other drive letters and resolve the "No Media" issue. If this method does not work, you may need to try other solutions, such as formatting the USB drive or checking it for errors.
Method 5: Rebuild MBR
Rebuilding the Master Boot Record (MBR) of your USB drive can also help fix the "No Media" issue. The MBR is a critical component of the disk that contains important information about the disk's partitions and boot loader. Here are the steps you can follow to rebuild the MBR:
- Connect the USB drive to the PC.
- Press Windows + X and select Command Prompt (Admin) from the menu.
- In the Command Prompt window, type "diskpart" and press Enter.
- Type "list disk" and press Enter to show a list of all the disks connected to the PC.
- Identify the disk number of the USB drive from the list.
- Type "select disk #" (replace "#" with the disk number of the USB drive) and press Enter.
- Type "clean" and press Enter to remove all partitions and data from the USB drive.
- Type "create partition primary" and press Enter to create a new primary partition on the USB drive.
- Type "active" and press Enter to mark the new partition as active.
- Type "format fs=fat32 quick" and press Enter to format the USB drive with the FAT32 file system.
- Type "assign" and press Enter to assign a drive letter to the USB drive.
Method 6: Format the USB Drive
Formatting the USB drive is another solution to fix the "No Media" issue, but it will delete all the data on the drive. So, it's recommended to backup the data before proceeding with the following steps:
- Connect the USB drive to the PC.
- Press Windows + E to open File Explorer.
- Right-click on the USB drive and select Format from the context menu.
- In the Format window, select the File system that you want to use (such as FAT32 or NTFS).
- Make sure the Quick Format option is selected.
- Click the Start button to begin the formatting process.
- Wait for the process to complete and click OK when prompted.
Method 7: Check the Power Source
The "No Media" issue on a USB drive can also be caused by inadequate power supply. If the USB drive is not getting enough power, it may not function correctly. Here are the steps you can follow to check the power source:
- Disconnect the USB drive from the PC.
- Connect the USB drive to a different USB port on the PC, or connect it to another PC.
- If the USB drive has an external power source, make sure it's properly connected and working.
- If the USB drive is connected to a USB hub, try connecting it directly to the PC's USB port.
- Try using a different USB cable to connect the USB drive.
