How to Extract Files from VMDK Files: VMDK Extractor Guide for VMware Virtual Machines
Are you looking for a way to extract files from a VMDK? This article explores the best VMDK extractor methods, providing a step-by-step guide on how to extract files from VMDK images. Whether you need a VMDK extractor tool or are seeking alternative solutions, we'll cover various techniques to help you access your data.
Introduction to VMDK Files and VMware Environments
Before diving into extraction methods, it's crucial to understand VMDK files and their role within VMware Broadcom environments. A VMDK (Virtual Machine Disk) file is a container format that stores the entire contents of a VMware virtual machine's hard disk. Think of it as the virtual equivalent of a physical hard drive in a traditional computer. Inside a VMDK file, you'll find everything from the virtual machine's operating system and installed applications to user data and configuration files.
VMDK files are specifically designed to work seamlessly with VMware's virtualization platform. They are typically stored on VMFS (Virtual Machine File System) datastores, which are specialized file systems optimized for storing and managing virtual machine files. VMFS provides features like efficient disk space allocation, snapshotting capabilities, and support for vMotion (live migration of virtual machines between physical hosts). This tight integration between VMDK files and VMFS ensures optimal performance and manageability within a VMware environment.
Several variations of the VMDK format exist, each with its own characteristics and use cases:
- Monolithic Flat: A single, large file representing the entire virtual disk. Simple to manage but can be less efficient for operations like snapshots.
- Monolithic Sparse: Initially small, this file grows dynamically as data is written to the virtual disk. More efficient in terms of storage space but can be more complex to manage.
- Two-GB Max Extensible: Consists of multiple files, each limited to 2GB in size. Offers flexibility and portability but can be less performant than monolithic formats.
Reasons to Extract Files from VMDK Files
Extracting files from a VMDK can be necessary in various situations, ranging from simple file retrieval to complex data recovery scenarios. Here are some common reasons why you might need to extract files from a VMDK:
- VM Migration: When migrating a virtual machine to a different platform or hypervisor, extracting specific files or the entire virtual disk contents might be required for compatibility.
- Data Corruption: If a virtual machine's file system becomes corrupted, extracting individual files from the VMDK can be a crucial step in recovering valuable data.
- Backup Recovery: VMDK files are often used as part of a virtual machine backup strategy. In the event of data loss, extracting files from a backup VMDK can restore the necessary data.
- Forensic Analysis: In digital forensics, extracting files from a VMDK can be essential for investigating security incidents or retrieving evidence.
- File Access: Sometimes, you may simply need to access a specific file within a VMDK without powering on the entire virtual machine. Extraction provides a direct way to retrieve the required data.
Step-by-Step Guide to Extract Files from VMDK Files
Preparing for VMDK File Extraction
When preparing for VMDK file extraction, it’s important to ensure that the process is smooth and secure. Here's how you can prepare:
- 1. Integrity Checks:
- Use VMware tools like
vmkfstoolsor third-party utilities to verify the integrity of the VMDK file. This check helps ensure no corruption or errors that might affect file extraction. - You can execute the command
vmkfstools -x checkin environments that support VMware commands.
- 2. Backups:
- Before making any changes, back up the VMDK file and any associated configuration files. This step is crucial to prevent data loss if anything goes wrong during the extraction process.
- Consider using disk cloning tools to create an identical copy of your disk, which can be useful for recovery purposes.
- 3. Necessary Tools Installation:
Depending on the chosen method for extraction, ensure that you have installed relevant software. Below are some tools often used:
- VMware Workstation Player: For direct VM management.
- 7-Zip: An open-source file archiver that supports VMDK file browsing.
- Linux Reader: A tool for accessing Linux partitions on Windows, useful for accessing VMDK files without VMware.
Methods to Extract Files from a VMDK File
Method 1 – Attaching a VMDK to an Existing VM
This method leverages the capabilities of an existing virtual machine environment:
- Step 1: Launch your virtualization software (e.g., VMware Workstation or VirtualBox).
- Step 2: Select the virtual machine you wish to attach the VMDK file to, ensuring it’s powered off to avoid any potential issues.
- Step 3: In the VM settings, select the option to add a new virtual hard disk, choose an existing disk, and then browse to select your VMDK file.
- Step 4: Power on the virtual machine. The system will recognize the new disk, allowing you to access and extract files using the guest operating system’s file management tools.
- Considerations: Ensure that your guest OS has the necessary drivers installed to access the file system used within the VMDK.
Method 2 – Using 7-Zip for VMDK File Extraction
7-Zip provides a platform-independent way to open and extract VMDK files:
Using 7-Zip on Linux
- 1. Installation: Execute
sudo apt install p7zip-fullto install 7-Zip if not already installed. - 2. Extraction:
- Open a terminal window and navigate to the directory containing your VMDK file.
- Run
7z x yourfile.vmdkto start the extraction process. This will unpack the file's contents into the current directory or a specified path.
Advantages: No need for a full VMware environment; however, the ability to handle multiple partitions or complex configurations may be limited.
Using 7-Zip on Windows
- 1. Installation: Download and install the Windows version of 7-Zip from the official website.
- 2. Extraction:
- Right-click the VMDK file you want to access.
- Choose "Open with" and select "7-Zip File Manager."
- Navigate through the file structure displayed, selecting the files or folders you wish to extract. Click "Extract" to save them to your chosen location.
Advantages: Simple and straightforward extraction on Windows, with the ability to read without full virtualization.
Method 3 – Using VMware Workstation Player
VMware Workstation Player allows comprehensive file management within a VM:
- Step 1: Open VMware Workstation Player and create a new virtual machine setup or modify an existing one.
- Step 2: During the setup process, select the option to use an existing virtual disk. Browse and select your VMDK as the disk to be used.
- Step 3: Finalize the setup and boot the virtual machine. Once the OS is running, navigate to the disk to extract the needed files.
- Considerations: This method requires system resources to run an actual OS instance, which might be resource-intensive.
Method 4 – Linux Reader for VMDK Access
Linux Reader can be especially useful for Windows users needing to access VMDK files:
- 1. Installation: Download and install DiskInternals Linux Reader.
- 2. Usage:
- Launch Linux Reader. You will see a list of drives and partitions, including any detected VMDK files.
- Use the "Open" option to access the contents of your VMDK file.
- Browse the file structure, selecting the items you wish to export or extract to your Windows file system.
Advantages: This software provides a quick, read-only method to access and recover files from VMDK files on a Windows machine without virtualization.
How to Extract Data from a VMDK File without Powering on a VM
Extracting data from a VMDK file without starting a virtual machine can be useful for accessing files directly from the disk image. Here are two effective methods:
Method 1 – Mounting VMDK Files in a Host OS with VMware Workstation
This method involves mounting VMDK files directly on the host operating system using VMware Workstation, allowing you to access the files without starting the virtual environment.
Example 1 – Mounting VMDK on a Linux Host
To mount a VMDK file on a Linux host, follow these steps:
- 1. Install Required Packages: Ensure VMware Workstation is installed on your system.
- 2. Locate the VMDK File:Identify the path to your VMDK file. It should be accessible from your Linux file system.
- 3. Use vmware-mount Utility:
- Open a terminal and use the
vmware-mountcommand to mount the VMDK. - Run a command like the following, tailoring it to your specific file paths and mount points:
vmware-mount /path/to/your.vmdk /mnt/vmdk_mount -t 1
- Replace
/path/to/your.vmdkwith the full path to your VMDK file and/mnt/vmdk_mountwith your desired mount point. - The
-t 1option specifies the partition on the VMDK to mount if there are multiple partitions.
- 4. Access the Files: Navigate to the mount directory (e.g.,
/mnt/vmdk_mount) to access and manage the files. - 5. Unmount the VMDK: Once you have finished your tasks, unmount the VMDK with:
vmware-mount -d /mnt/vmdk_mount
Example 2 – Mounting VMDK on a Windows Host
On Windows, VMware Workstation allows direct mounting of VMDK files. Here's how:
- 1. Install VMware Workstation: Ensure VMware Workstation or VMware Player is installed on your Windows system.
- 2. Access VMware Disk Mount Utility: Navigate to the VMware Workstation installation directory to find the
vmware-mount.exetool. - 3. Mount the VMDK File:
- Open Command Prompt as Administrator.
- Use the following command format to mount the VMDK:
"C:\Program Files (x86)\VMware\VMware Workstation\vmware-mount.exe" X: "C:\Path\to\your.vmdk"
- Replace
X:with an available drive letter and"C:\Path\to\your.vmdk"with the path to your VMDK file.
- 4. Explore the Drive: The contents of the VMDK file will appear as a new drive in Windows Explorer where you can view and manage the files.
- 5. Unmount the VMDK: To unmount, use the following command:
"C:\Program Files (x86)\VMware\VMware Workstation\vmware-mount.exe" /d X:
- Replace
X:with the drive letter you used for mounting.
Method 2 – Using 7-Zip to Extract Content from VMDK Files
7-Zip offers a simple method to extract files from a VMDK without starting any virtual machine.
Opening VMDK Files with 7-Zip on Linux
To extract files from a VMDK using 7-Zip on Linux:
- 1. Install 7-Zip: Use the package manager to install 7-Zip, e.g.,
sudo apt install p7zip-full. - 2. Navigate to VMDK Location: Open a terminal and navigate to the directory that contains the VMDK file.
- 3. Extract Files: Use the command to extract contents:
7z x yourfile.vmdk -o/extracted/files/path
- Replace
yourfile.vmdkwith your VMDK file name and/extracted/files/pathwith your desired output directory.
- 4. Access Extracted Files: Navigate to the output directory to view and manage the extracted content.
Opening VMDK Files with 7-Zip on Windows
Follow these steps to extract files using 7-Zip on Windows:
- 1. Install 7-Zip: Download and install 7-Zip from its official site.
- 2. Locate the VMDK File: Right-click on the VMDK file in Windows Explorer.
- 3. Open Using 7-Zip: Select "7-Zip" > "Open archive" from the context menu.
- 4. Extract Required Files:
- Browse the contents displayed in the 7-Zip interface and select the files to extract.
- Click on "Extract" and specify the target directory for the extracted files.
- 5. Manage Extracted Files: Access the files from the specified directory to use or copy them as needed.
Handling Corrupt or Damaged VMDK Files for Data Recovery
When dealing with corrupted VMDK files, specialized techniques are necessary to recover your valuable data. DiskInternals VMFS Recovery is one such tool designed to help in these scenarios.
DiskInternals VMFS Recovery: How to Recover VMDK
Overview of DiskInternals VMFS Recovery
DiskInternals VMFS Recovery is a powerful software tool specifically tailored for recovering data from VMFS-formatted disks and corrupted VMDK files. It provides a user-friendly interface with advanced recovery algorithms to retrieve lost or inaccessible data without requiring in-depth technical expertise.
Key Features of DiskInternals VMFS Recovery
- Support for VMFS: Capable of recovering files from virtual machines stored on VMFS systems, commonly used in VMware ESXi environments.
- Corruption Handling: Efficiently handles corrupted VMDK files, providing detailed scanning and recovery options.
- Snapshot Support: Allows recovery from virtual machines with snapshots, ensuring data consistency even if the disk state changes.
- Comprehensive File System Support: Supports various file systems within the VMDK, enabling recovery across different virtual disk configurations.
- Intuitive Interface: Provides a straightforward user experience with easy navigation and guided recovery processes.
How to Use DiskInternals VMFS Recovery for Corrupt VMDK Recovery
- 1. Download and Install: Obtain DiskInternals VMFS Recovery and install it on your system.
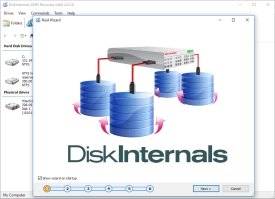
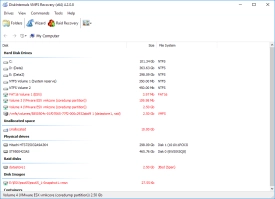
- 2. Launch the Software: Open DiskInternals VMFS Recovery and let it scan for physical and virtual disks, including VMDK files.
- 3. Select the VMDK File: Choose the problematic VMDK file from the list of detected disks and partitions displayed by the software.
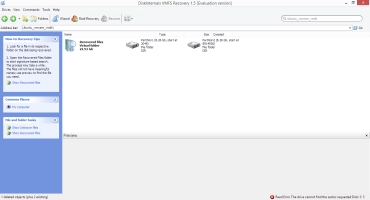
- 4. Initiate Scanning: Begin the recovery process by clicking on the "Recover" button. The software will perform an in-depth analysis of the file structure within the VMDK.
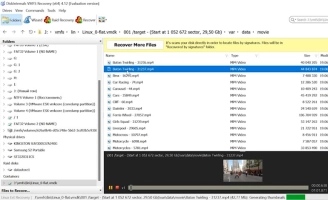
- 5. Preview and Select Files: Once scanning is complete, preview the recoverable files. DiskInternals VMFS Recovery allows you to view the structure and contents of the recovered files before saving them.
- 6. Recover Data: Select the files or directories you wish to recover and specify the destination path where recovered data should be saved.
- 7. Complete the Recovery: Review the recovery process to ensure all necessary files have been restored successfully.
Troubleshooting Tips for Corrupted Files
- Ensure Proper Backups: Regularly back up your VMDK files to prevent data loss due to corruption.
- Validate Storage Media: Check the integrity of storage hardware and connections to rule out physical damage or disconnections as the source of corruption.
- Use Up-to-date Software: Ensure DiskInternals VMFS Recovery and any associated VMware software are updated to support the latest disk and partition formats.
- Consider Professional Help: If self-recovery attempts fail, consulting data recovery professionals might be necessary to avoid further data loss.
The combination of these approaches with DiskInternals VMFS Recovery should offer effective solutions to recovering data from corrupt or damaged VMDK files, minimizing downtime and maintaining data integrity.
Tip: restore VM from VMDKDiskInternals VMFS Recovery: How to Recover Deleted VMDK File
DiskInternals VMFS Recovery is a professional software program that allows you to read and access data stored on VMFS-formatted partitions; so the software can read VMDK files. VMFS Recovery is basically a data recovery tool for recovering virtual machine files; however, it integrates many other handy utility functions, including rebuilding RAID drives.
DiskInternals VMFS Recovery can repair corrupt VMware boot images, ESX Server datastores, non-mounting VMFS volumes, unrecognized VMDK files, and repair ESXi VMDK volume headers. It is a comprehensive software tool for virtual machine users – especially if your VM is hosted on Windows OS.
Using the DiskInternals VMFS Recovery, you can recover the previous (good) version of your corrupt VMDK file and extract the content to another storage drive.
How to Open VMDK Files with DiskInternals VMFS Recovery on Windows
To open VMDK files on Windows, you can use the “Reader Mode” on DiskInternals VMFS Recovery. Below are the steps to open VMDK files using DiskInternals’ professional VMFS Recovery tool.
- First Step: Download and install the software on your Windows PC, then launch it, and proceed with the next step. This software works on Windows Vista, 7, 8, 10, 11, or Windows Server 2003-2019.
- Second Step: Select the drive with the VMFS partition and choose a recovery mode. You can try “Reader Mode” to open the VMFS partition and access the VMDK file.
- Third Step: If the VMDK file is missing, you can recover it by choosing Full Recovery mode and wait for the scan to complete, and you’d be able to view the VMDK files again.
How to Open VMDK Files with DiskInternals VMFS Recovery on Linux
You can also open the VMDK files even if they are saved on a Linux drive, e.g., EXT-formatted drives. However, you will have to connect the Linux drives to a Windows OS computer to proceed. DiskInternals VMFS Recovery can open all kinds of file systems, including macOS and Linux OS file systems. Below are the steps:
- First Step: Connect or mount the Linux drive on the system running Windows OS. Proceed with downloading and installing DiskInternals VMFS Recovery on the Windows OS system. Then launch it, and proceed with the next step. This software works on Windows Vista, 7, 8, 10, 11, or Windows Server 2003-2019.
- Second Step: Select the Linux drive with the VMFS partition and choose a recovery mode. Select “Reader Mode” to open the VMFS partition and access the VMDK file.
- Third Step: If the VMDK file is missing, you can recover it by choosing Full Recovery mode and wait for the scan to complete, and you’d be able to view the VMDK files again.
Summary: Key Takeaways on Extracting Files from VMDK Files
Extracting data from VMDK files, whether they are intact or corrupted, involves several essential steps, best practices, and the use of specialized tools. Here’s a recap to guide you:
Essential Steps for VMDK Data Extraction
- 1. Preparation:
- Always verify the integrity of your VMDK file and create backups to safeguard against data loss.
- Install necessary tools such as VMware Workstation Player or file archivers like 7-Zip.
- 2. Extraction Methods:
- Mounting VMDK Files: Use VMware Workstation to directly mount VMDK files on the host OS, accessing the data without booting a virtual machine.
- Using 7-Zip: Open and extract VMDK files using 7-Zip, allowing direct access to file contents on Windows or Linux platforms.
- DiskInternals VMFS Recovery: For corrupt VMDK files, use DiskInternals VMFS Recovery to recover data efficiently, even in challenging scenarios.
Best Practices
- Regular Backups: Ensure regular and consistent backups of your virtual machine data to prevent permanent data loss.
- Validate Tools and Environment: Keep VMware and recovery software up to date to handle the latest file formats and to ensure compatibility.
- Test Recovery Process: If possible, simulate recoveries periodically to ensure that your chosen tools and processes are effective.
Recommended Tools
- VMware Workstation/Player: Essential for direct VMDK mounting and exploration on both Windows and Linux systems.
- 7-Zip: A versatile and lightweight tool perfect for extracting content from VMDK files without booting into a VM environment.
- DiskInternals VMFS Recovery: Highly effective to repair corrupt ESXi VMDK file, offering a robust feature set for VMware environments.
FAQ
How do I extract files from a VMDK file?
1. Use another ESXi Virtual Machine
2. Use DiskInternals VMFS Recovery
3. Use VMware Workstation (Mounting VMDK Files on a Host OS with VMware Workstation)
How do I recover files from VMDK?
DiskInternals VMFS Recovery can repair corrupt VMware boot images, ESX Server datastores, non-mounting VMFS volumes, unrecognized VMDK files, and unreadable ESXi volume headers. It is a comprehensive software tool for virtual machine users – especially if your VM is hosted on Windows OS.
How to extract VMDK in Linux?
You can also open the VMDK files even if they are saved on a Linux drive, e.g., EXT-formatted drives. However, you will have to connect the Linux drives to a Windows OS computer to proceed. DiskInternals VMFS Recovery can open all kinds of file systems, including macOS and Linux OS file systems. Below are the steps:
- First Step: Connect or mount the Linux drive on the system running Windows OS. Proceed with downloading and installing DiskInternals VMFS Recovery on the Windows OS system. Then launch it, and proceed with the next step. This software works on Windows Vista, 7, 8, 10, 11, or Windows Server 2003-2019.
- Second Step: Select the Linux drive with the VMFS partition and choose a recovery mode. Select “Reader Mode” to open the VMFS partition and access the VMDK file.
- Third Step: If the VMDK file is missing, you can recover it by choosing Full Recovery mode and wait for the scan to complete, and you’d be able to view the VMDK files again.


