How to Open VMDK Files: A Comprehensive Guide for Windows, macOS, and Linux
Opening VMDK files, the virtual disk format used by VMware and other virtualization platforms, can be essential for accessing data stored in virtual machines. Whether you're looking to recover files, analyze a virtual environment, or migrate data, knowing how to work with VMDK files across different operating systems is a valuable skill. This comprehensive guide will walk you through the process of opening VMDK files on Windows, macOS, and Linux, offering detailed steps and the best tools for each platform to ensure smooth access to your virtual disks.
Introduction
VMDK files represent VMware VMs – that’s in the real sense. VMDK is VMware’s disk image format; it is the virtual storage file that stores all the data you put out on a virtual machine hosted in a VMware virtualized environment. These files act as the physical storage drives for VMware VMs; it is important not to delete or remove a VMDK file from its directory, else, the corresponding VM won’t launch.
VMDK files are opened using VMware’s Workstation Player, Linux Reader, or archive software programs like WinZip. You can’t basically read the content manually unless you deploy a new VMware VM using the VMDK file, then you can fully access what’s stored on it.
Furthermore, it is worth noting that there are several scenarios where you might need to open or extract data from a VMDK file. For example, you might need to recover data from a corrupted virtual machine, migrate virtual disks between different hypervisors, or extract specific files from a VMDK without booting the VM.
Understanding how to open VMDK files on any computer system can save you time and effort, especially when dealing with critical data or complex virtualized environments. This article explains how to open VMDK files on Windows, macOS, and Linux systems, with clear attention to every detail.
Understanding VMDK Files
What Are VMDK Files?
A Virtual Machine Disk (VMDK) file is a disk image file format developed by VMware to serve as the container file format for the VMs created and hosted in its products’ environment – ESXi and Workstation. A VMDK file stores the entire content of a virtual machine; it is simply the VM’s hard disk but in virtual form. You have to think of it as a virtual representation of a physical hard drive.
VMDK files are essential components in VMware’s virtualized environments; you need a VMDK file to create a VMware VM or deploy an existing one. Yes, VMDK enables the creation and management of virtual disks – mimicking the behavior and attributes of physical disks. However, just like other regular files, VMDK files can get corrupted too; hence, you should always make sure your physical hard drive (where the VMDK file resides) is protected from file corruption triggers.
Components of VMDK Files
Although a VMDK file contains everything that a physical disk would, including the operating system, applications, and individual files, it does have sub-components that play individual roles. This ensures the VMDK file powers the connected VM to operate as though it were running on a physical machine.
1. Raw Data File. This VMDK subcomponent is represented as flat.vmdk: this file stores the main data of the virtual drive; it contains the raw disk file for the virtual hard disk. The VMDK raw data file is usually the same size as the virtual hard drive.
2. Descriptor File. Represented as .vmdk file, VMDK descriptor files do not contain any raw data, they simply store the disk descriptor information, which is basically the disk size and geometry info. Descriptor files appear as text files, and you can easily open them to read the descriptions they contain.
3. Delta File. This VMDK sub-file is always dormant until a snapshot is taken. Represented as delta.vmdk file, the Delta VMDK file is created/updated each time the VM is snapshotted. Currently a snapshot is taken; the VM stops writing to the base VMDK and starts writing changes to a snapshot delta file; so, if you want to recover the VM to an older state, you’re simply going back to the previous delta file the VM was writing to before the most recent snapshot.
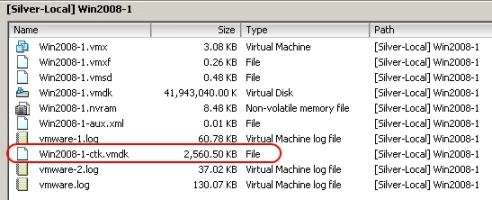
4. Change Block File. A CBT VMDK file is a special file that is only created if you enable the new vSphere feature, Change Block Tracking (CBT), for your virtual hard disk. This file is saved as -ctk.vmdk. Well, you will only see this file if you’re running vSphere version 7 or later; also, this VMDK file has a fixed size; it only increases in size when you extend the capacity of your virtual disk.
Tip: Learn more about VMDK file format here!
Types of VMDK Files
There are two main types of virtual machine disk files: thick provisioned and thin provisioned.
- 1. Thick Provisioned VMDK: This type of VMDK file allocates the entire space required for the virtual disk at the time of creation. It is best for environments where performance is a priority because it avoids the need for the hypervisor to expand the disk as data is added.
- 2. Thin Provisioned VMDK: On the flip side, a thin provisioned VMDK file allocates disk space only as data is written to the disk. This is more space-efficient but can lead to slower performance in scenarios where the disk needs to grow dynamically. In this scenario, the virtual disk space increases as new data is stored.
Common Scenarios for Opening VMDK Files
There could be different reasons why one may want to open a VMDK file; it could be to check and access one of the sub-files, and recover data from a corrupted/inaccessible VM that was previously linked to the file. Here are common scenarios one may want to open a VMDK file.
- Data Recovery from Corrupted VMs: If a virtual machine gets corrupted, accessing the VMDK file can allow you to recover critical data without needing to repair the entire VM.
- Migrating Virtual Disks Between Hypervisors: If you want to move from VMware to another hypervisor provider such as Oracle VirtualBox, Microsoft Hyper-V, or Proxmox VE, you will need to extract the VMDK file of the VM to be migrated.
- Extracting Files from VMDK Without Booting the VM: In some cases, you may want to open a VMDK file to retrieve specific files from a VMDK without starting the virtual machine. This is particularly useful when the VM is unable to boot.
Methods to Open VMDK Files in Windows
If you use a Windows OS computer, there are a couple of ways to open VMDK files on such systems. Ensure you follow the procedures carefully to avoid losing your critical VM files.
1. Using VMware Workstation Player
VMware Workstation Player is a free utility tool included in the VMware suite – available to all VMware users. The tool lets you open, create, or run VMDK files on Windows OS. However, currently, the VMware Workstation Player utility has been discontinued – you still get it from file-hosting websites.
Steps:
- Download and install VMware Workstation Player on your Windows OS computer system – launch the tool when the installation is complete.
- On the home screen interface, click on the “Player” dropdown and select “Open” or simply press CTRL + O.
- Browse the VMDK file you want to open, when you find the file, select it, and click “Open.”
- When the VMDK is loaded into VMware Player, you can power on the virtual machine and access the data saved on the virtual disk.
Attaching a VMDK as a Secondary Disk
Alternatively, you can attach a VMDK file as a secondary virtual disk to a running VM on VMware Workstation Player. To achieve this, follow the steps below:
- On the VMware Player home screen, select the VM to add the VMDK file to, then click on Edit the VM Settings.
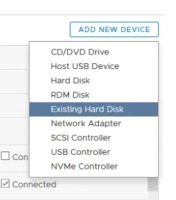
- Go to Add 🡺 Hard Disk 🡺 Use an existing virtual disk
- Browse and import the VMDK file and attach it.
Click on Finish to complete the process.
2. Using VirtualBox
Oracle's VirtualBox is another popular virtualization tool that supports the VMware VMDK format. This means you can run VMDK files on VirtualBox to access the file content. VirtualBox is free and open-source, although it has paid license versions with additional features and extensive support. To open VMDK on VirtualBox, you literally have to create a new VirtualBox VM and use your VMDK file as the virtual disk.
Steps:
- Download and install VirtualBox on your Windows system
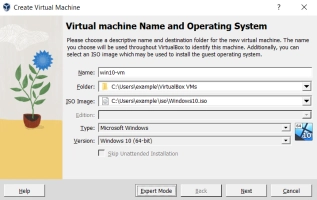
- Launch VirtualBox and click on New to launch the Create Virtual Machine wizard.
- Enter all required details for your new VM, but leave the “ISO Image” row blank. Complete all other steps, including allocating hardware resources, and click Finish when you’re done.
- Go to VirtualBox Manager, select the newly created VM, click on Settings, and navigate to Storage 🡺 Controller: SATA.
- On the next window, click the “Add Hard Disk” icon and follow the prompts to import your VMDK file.
- Select the VMDK file after it is imported and click Choose to mount it as your VM’s virtual disk.
- Now, your VirtualBox VM will have two virtual hard disks: an automatic one that was created during the initial setup process and the one you just mounted (although you left the ISO row blank, a VM must be created with a virtual disk).
- On the Storage 🡺 Controller: SATA page, select the automatic virtual disk and delete it – leaving only your VMDK file as the default virtual disk for your new VM.
- Reboot the VM.
Third-Party Tools You May Need
If you made a mistake during the VMDK file access procedures and ended up losing your files, you can recover those files using DiskInternals VMFS Recovery. The DiskInternals VMFS Recovery software is a user-friendly, powerful tool that helps you to recover VMware VMDK files on Windows computers. The software features a built-in Wizard and supports virtually all known file systems and hard disk types. You can run the DiskInternals VMFS Recovery software on any Windows computer.
Steps to Mount and Browse VMDK Files Directly in Windows Explorer
Windows Explorer doesn’t natively support VMDK files, but with the right tools, you can easily mount and browse them like any other drive. Here’s a step-by-step guide:
1. Download and Install a VMDK Mounting Tool
- Download a reliable VMDK mounting tool such as 7-Zip, WinMount, or VMware Workstation Player.
- Install the software on your system by following the on-screen instructions.
2. Open the VMDK File Using the Mounting Tool
If using VMware Workstation Player:
- Open VMware Workstation Player.
- Go to File > Map Virtual Disks.
- Browse to the location of your VMDK file and select it.
- Click Mount to assign the VMDK to a drive letter in Windows Explorer.
If using 7-Zip:
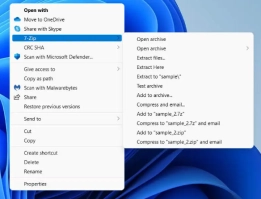
- Right-click on the VMDK file.
- Select 7-Zip > Open Archive.
- You can now browse the file’s contents in a separate 7-Zip window.
3. Browse the VMDK in Windows Explorer
- Once mounted, the VMDK file will appear in Windows Explorer under a new drive letter.
- You can now browse the virtual disk, copy files, or perform other file operations just as you would with any other drive.
4. Unmount the VMDK File
- After you’ve finished working with the VMDK file, it’s important to unmount it to prevent data corruption.
- If using VMware Workstation Player, return to Map Virtual Disks and select Unmount.
- For 7-Zip, simply close the 7-Zip window.
How to Open VMDK Files in macOS
Yes, you can also open VMDK files on your MacBook using VMware’s Fusion program or the macOS terminal. Of course, you have to follow these processes carefully to avoid data loss.
1. Using VMware Fusion
VMware Fusion is the macOS equivalent of VMware Workstation, allowing you to run VMware virtual machines on macOS. The tool comes with a built-in utility called VMDK mounter, and with that, you can mount your VMDK files on macOS computers.
Steps:
- First, make an additional copy of the VMDK file before proceeding. This guide assumes you’re trying to extract an OS from a VMDK file and run it on your MacBook.
- Launch Fusion and select “More Options…” from the lower-right corner, then choose “Create Custom Virtual Machine.”
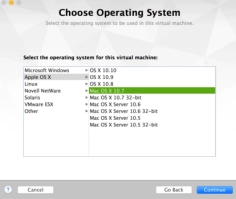
- Choose your OS version and select the option to “Use an existing virtual disk.”
- On the “Choose Virtual disk…” box, find and import your VMDK file.
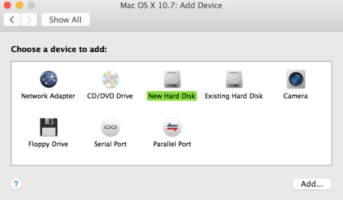
- On your new VM’s window, select the wrench icon on the far left to open the configurations page, then go to Add Device 🡺 New Hard Drive.
- Here you can configure your new disk and boot a virtual machine.
If this doesn’t work, try using the terminal and running some command line codes to mount the VMDK file.
2. Mounting VMDK Files Using macOS Command Line Tools
For advanced users, macOS provides built-in command-line tools to mount and explore VMDK files.
Open the macOS Terminal and run these commands:
- Use “hdiutil” to mount the file: hdiutil attach /path/to/your/file.vmdk (remember to replace “/path/to/your/file.vmdk” with the actual path to your VMDK file).
- The mounted VMDK file will appear as a new volume on your desktop.
Exploring Alternatives for macOS
Opening VMDK files on macOS is quite stressful, hence, many IT admins prefer they use Linux or Windows OS for these operations. Nevertheless, the Paragon VMDK Mounter utility for macOS lets you mount VMDK files as read-only volumes on macOS.
How to Open VMDK Files in Linux
Linux OS is one of the most flexible operating systems in the world; hence, there are quite many ways and several tools to use when trying to read or open a VMDK file on a Linux-based system. More so, the VMware Workstation utility works for Linux.
1. Using VMware Workstation for Linux
Firstly, you have to download and install Workstation on your Linux OS; Workstation can be installed on both RHEL-based distributions and Debian-based distributions. Once the installation is complete, launch Workstation and complete the initialization processes, which include validating your license key – then you can proceed below:
Note: This guide will mount VMDK on a Linux system using VMware Workstation.
- Launch VMware Workstation on the Linux system
- On the home screen, go to File 🡺 Mount Virtual Disks.
- Click Mount Disk 🡺 Virtual Disk File 🡺 Browse 🡺 search and import the VMDK file.
- You will be required to identify a directory for mounting the VMDK; you can create a new directory for mounting VMDKs (e.g., /mnt/vmdk/) and enable the required user permissions.
- Choose the directory you created and continue to complete the VMDK mounting process.
- You may want to check the “Mount in read-only mode” checkbox, and then click Mount.
- Once the mounting is done, you can mount the VMDK file content by opening the virtual disk file in the specified directory.
- Unmount the VMDK file after you’re done accessing its files.
2. Mounting VMDK Files with QEMU/KVM
KVM/QEMU natively supports VMWare VMDK files; you have to first install the KVM/QEMU package on your Linux system. Alternatively, you can run the VMDK file “libvert” and “vert-manager,” but the image must be first converted to a qcow2 disk. Let’s get on with the steps:
- Create a loop device: $ sudo losetup -fP /path/to/file.vmdk
- Find the loop device assigned to your VMDK file: $ sudo losetup –a
- Now, mount the partition: $ sudo mount /dev/loopX /mnt/vmdk
- (Remember to replace “/dev/loopX” with the actual loop device name and “/mnt/vmdk” with your desired mount point).
If you need to convert the VMDK file to QCOW2, you can use the “qemu-img” command:
$ qemu-img convert -O qcow2 /path/to/file.vmdk /path/to/output.qcow2
(Remember to replace “/path/to/file.vmdk” and “/path/to/output.qcow2” with your actual file paths).
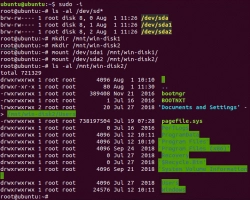
3. Legacy method: using a Live DVD even if OS on a VM is dead
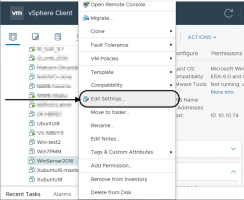
As a DVD, you can use an ISO image and insert it into the virtual DVD drive of the virtual machine. Once you boot from the DVD, you can mount the virtual disk partitions and then copy the files from the virtual disk to your USB hard drive. The latter must be connected to the virtual machine via a network. This method can be used on virtual machines running on VMware ESXi and VMware Player / Workstation.You can parse this method using an example of a Windows Server 2016 virtual machine on an ESXi host. Let's download the Ubuntu 18 ISO installation image. Next, open the VMware vSphere client, and in the "Hosts and Clusters" section, find and select your virtual machine. Now select the “Change Settings” tab and in the CD/DVD drive options, click on “Data Warehouse ISO File”.
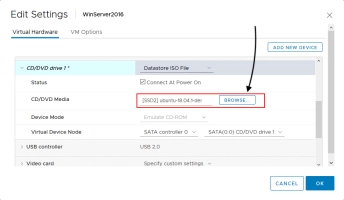
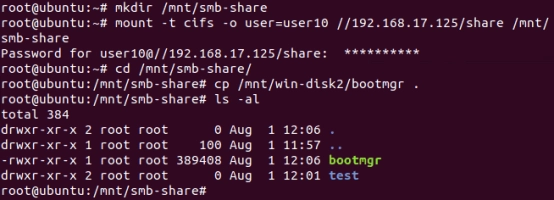
Next, go to CD/DVD Media, click “Browse”, and select the desired ISO file in the datastore. Now boot from the ISO and select the “Try Ubuntu Without Install” option. After booting Ubuntu from the Live DVD, open Terminal. Next, you will need to enter the following:
To gain root privilege:
sudo -i
To determine the list of available hard drives:
ls -al / dev / sd *
Next, make the directories to be used as mount points for each partition.
mkdir / mnt / win-disk1
mkdir / mnt / win-disk2
Mount partitions:
mount / dev / sda1 / mnt / win-disk1 /
mount / dev / sda2 / mnt / win-disk2 /
List files and directories of mounted partitions:
ls -al / mnt / win-disk2 /
ls -al / mnt / win-disk1 /
Other Command-Line Tools for Accessing VMDK on Linux
One of the advantages of Linux is that it is limitless, thanks to its open-source nature. Here are other ways to access VMDK files on Linux.
“qemu-img” is a versatile tool that allows you to manipulate disk images. It can convert, resize, and check VMDK files. For example, to convert a VMDK to a RAW image: $ qemu-img convert -f vmdk -O raw /path/to/file.vmdk /path/to/output.img
Using `libguestfs`
The `libguestfs` tool is generally used to manage and edit virtual machine disk images. It integrates `guestmount`, which can mount file systems from VMDK files: sudo guestmount -a /path/to/file.vmdk -i --ro /mnt/vmdk
This command above will mount your VMDK file in read-only mode at the specified mount point.
Using `losetup`
As explained earlier, `losetup` is used to create a loop device for your VMDK file, allowing it to be mounted and accessed like any other disk image. After setting up the loop device, you can mount the file system as usual: sudo mount /dev/loopX /mnt/vmdk
Advanced Techniques for Extracting Data from VMDK Files
Using DiskInternals VMFS Recovery
DiskInternals VMFS Recovery is a powerful tool designed to recover data from virtual machines, particularly from VMware’s VMFS and VMDK files. Here's how you can recover and extract specific files from a VMDK using DiskInternals:
- 1. Download and Install DiskInternals VMFS Recovery
Start by downloading and installing the DiskInternals VMFS Recovery tool on your system. - 2. Open the VMDK File
Launch the application and select the option to open a virtual disk. Browse for the VMDK file you want to recover data from. - 3. Scan the Virtual Disk
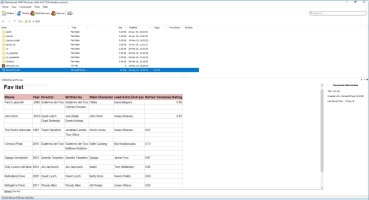
DiskInternals will scan the VMDK for any recoverable files or data. The tool is equipped with deep scan capabilities to recover lost or deleted files. - 4. Preview and Select Files for Recovery
Once the scan is complete, you will see a list of recoverable files. You can preview files before recovery to ensure they are intact. - 5. Recover and Extract Files
Select the files you want to recover, choose a location on your physical drive, and click the Recover button. DiskInternals will extract the selected data from the VMDK, allowing you to save it locally.
FREE DOWNLOAD Latest version, Win GET PRICES Check now!
This method is particularly useful for recovering specific files from a corrupted or damaged VMDK file without needing to mount or load the entire virtual machine.
This VMFS recovery guide is designed to get you started quickly. After installing VHD recovery tool on your computer or other device, open the Recovery Wizard and select an item to check. Then select the check mode:
Accessing VMDK Files Without a Virtual Machine
In certain situations, you may need to access and extract data from a VMDK file without having to boot up a virtual machine. Here are some methods for browsing and extracting data directly from a VMDK:
- 1. Using 7-Zip or WinRAR. 7-Zip and WinRAR are free tools that can open and extract data from VMDK files. Simply right-click the VMDK file, select Open with 7-Zip or Open with WinRAR, and browse the contents. You can then extract the files directly to your local storage.
- 2. Mounting the VMDK as a Virtual Disk. Tools like OSFMount or StarWind V2V Converter allow you to mount a VMDK file as a virtual disk. Once mounted, the VMDK appears as a drive in your operating system, enabling you to browse and extract files just like you would with a physical drive.
- 3. Using QEMU-Img Tool (Linux & macOS). For advanced users on Linux or macOS, you can use QEMU-img to convert a VMDK file into a RAW disk image. Once converted, you can mount the RAW image and extract the data. Use the following commands:
- Convert VMDK to RAW:
qemu-img convert -f vmdk -O raw input.vmdk output.raw - Mount the RAW file:
sudo mount -o loop,ro output.raw /mnt/vmdk/ - This method is highly efficient for advanced users who need to access data without launching a full virtual machine.
Common Issues and Troubleshooting
VMDK File Corruption and Recovery
VMDK file corruption can occur due to various factors such as power failures, software crashes, or improper shutdown of virtual machines. Detecting and recovering from a corrupted VMDK file is critical to avoiding data loss. Here’s how to handle VMDK file corruption:
1. Detecting VMDK Corruption
Signs of VMDK corruption include errors when attempting to open the file, virtual machines failing to boot, or missing data within the virtual disk. Some tools may also flag the VMDK as unreadable or report I/O errors.
2. Recovering from Corruption
- Use VMware's Built-In Tools: VMware offers tools like
vmkfstools(for ESXi) to attempt repairs on corrupted VMDK files. Use the command:
- This command repairs the VMDK header and other metadata.
- Third-Party Recovery Software: If VMware’s native tools are insufficient, third-party solutions like DiskInternals VMFS Recovery can scan the VMDK and recover damaged or lost data.
- Restoring from Backups: If a recent backup exists, restoring the VMDK from the backup may be the quickest solution to recovering from corruption.
Compatibility Issues Between Different Hypervisors
When migrating VMDK files between different hypervisors, compatibility issues can arise, causing the virtual machines to fail to start or behave unexpectedly. Here’s how to address these issues:
- 1. Converting VMDK Formats
Different hypervisors such as VMware, VirtualBox, and Proxmox may use slightly different formats for VMDK files. Using tools like StarWind V2V Converter or VBoxManage can help convert the VMDK file to the correct format for the target hypervisor. For example, to convert a VMDK to a VirtualBox-compatible format, use the command:VBoxManage clonehd input.vmdk outpu.vdi --format vdi - 2. Adjusting Virtual Hardware Settings
Hypervisors may have different virtual hardware configurations, so adjusting settings like the virtual network interface card (NIC), CPU, and storage controller is often necessary. After migrating the VMDK, make sure to update the VM’s configuration in the target hypervisor. - 3. Install Guest Additions/Drivers
To ensure the VM runs smoothly on the new hypervisor, install the corresponding guest additions or tools (such as VMware Tools or VirtualBox Guest Additions) to ensure compatibility with features like shared folders and clipboard.
Handling Large VMDK Files
VMDK files can grow significantly in size, sometimes reaching hundreds of gigabytes or even terabytes, which can strain system resources. Here are some tips for managing and opening large VMDK files:
- 1. Increase System Resources
Ensure that the host system has sufficient CPU, RAM, and storage to handle large VMDK files. Using SSDs instead of traditional hard drives can also improve performance when accessing large virtual disks. - 2. Use Split VMDK Files
When creating or converting large VMDK files, consider using split disk options, where the VMDK is broken into smaller parts. This is especially useful for systems with limited resources and can help improve performance. VMware provides this option when creating or modifying virtual disks. - 3. Use Specialized Software for Large Files
Tools like VMware Workstation, VirtualBox, or QEMU-img are optimized to handle large VMDK files. These tools can efficiently mount and work with large virtual disks without crashing or slowing down your system. - 4. Compress and Shrink VMDK Files
VMware offers the option to compress and shrink VMDK files, reducing their size by removing unused space. This can be done using thevmware-vdiskmanagertool:
This process compacts the virtual disk and can make it more manageable on systems with limited resources.
Conclusion
This article provides a detailed guide on how you can open, access, and read VMware’s virtual disk images (VMDK Files) across the three popular operating systems used by IT professionals and regular PC owners. It is important to reiterate that you should make copies of a VMDK file before putting the file through any of the explained processes in this guide. This is to ensure you will have a good copy to fall back on if things don’t go as planned.
Nevertheless, DiskInternals VMFS Recovery is there to assist with recovering your VMware files if they go missing; more so, you can request Guided Repair and have DiskInternals expert data team attempt your recovery professionally.
FAQ
- What program will open a VMDK file?
WinZip opens and extracts VMDK Compressed Archive Files—and many more formats.
- How to open VMDK files on Windows?
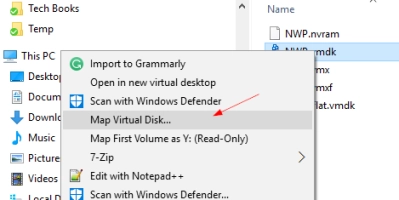
- Right-click the VMDK file in Windows Explorer and click Map Virtual Disk.
- Select the parameters to mount a VMDK file.
- Now the virtual disk is mounted as disk Z: in Windows, and you can read vmdk file contents.
- How do I unzip a VMDK file?
Right-click on the VMDK file and select 7-Zip > Extract to
- How to open a virtual disk file in VMware?
In VMware Workstation, go to File > Mount Virtual Disks > Browse. Select the VMDK file. 2. In the Linux file system, create a directory to mount the VMDK virtual disk.


