Understanding VMware EVC Mode: Enhancing vMotion Compatibility
Ensuring compatibility and seamless operation across diverse hardware configurations is a pivotal concern for IT administrators. VMware Enhanced vMotion Compatibility (EVC) Mode emerges as a powerful solution in this context, acting as a bridge that harmonizes CPU features across disparate host systems within a cluster. This functionality plays a crucial role in facilitating live migrations of virtual machines (VMs) between hosts with different generations of processors, without disrupting the services they offer.
EVC Mode simplifies the management of mixed hardware environments by standardizing the CPU instruction sets visible to VMs, thereby allowing smooth vMotion and DRS operations across a heterogeneous cluster. This feature is particularly advantageous for organizations that seek to extend the lifecycle of their hardware or gradually phase in newer server models without compromising the performance and reliability of their virtual infrastructure.
In this comprehensive guide, we'll delve into the intricacies of VMware EVC Mode—exploring what it is, unraveling how it works under the hood, and providing a step-by-step walkthrough on enabling it in a vSphere environment. Whether you are a seasoned vSphere administrator or a newcomer looking to optimize your virtual infrastructure, understanding EVC Mode is key to achieving operational efficiency and adaptability in today’s dynamic IT ecosystems.
Introduction to VMware EVC
What is Enhanced vMotion Compatibility (EVC)
VMware Enhanced vMotion Compatibility (EVC) allows virtual machines (VMs) to move between different types of processors without powering them down. This can be extremely useful when performing maintenance on your host servers or migrating your VMs to new hardware.
Purpose and Significance in Virtualized Environments
In virtualized environments, especially those that incorporate a mix of older and newer hardware, maintaining operational flexibility and efficiency is a significant challenge. EVC addresses this by enabling the migration of VMs across hosts without being constrained by the physical differences in CPU architecture. This capability is instrumental for several reasons:
- Operational Flexibility: EVC allows IT administrators to move VMs freely between hosts, facilitating load balancing and maintenance without downtime.
- Extended Hardware Lifecycle: Organizations can continue to utilize older hardware alongside newer systems, gradually phasing in new technology without immediate large-scale investments.
- Improved Resource Utilization: By allowing VMs to migrate without CPU compatibility concerns, resources can be dynamically allocated according to real-time demands, optimizing overall system performance.
How VMware EVC Works
Standardizing CPU Features Across ESXi Hosts
At the heart of VMware EVC is its ability to standardize the CPU features presented to virtual machines across a cluster of ESXi hosts. When EVC is enabled for a cluster, it enforces a common baseline of CPU capabilities by masking certain features that newer processors might possess but older processors lack. This baseline is chosen based on the feature set of the oldest processor in the cluster, ensuring all hosts appear uniform to VMs.
The EVC mode ensures that each VM is only aware of the CPU features guaranteed to be present on all hosts within the cluster. This is achieved through a series of compatibility masks applied at the hypervisor level, hiding non-essential advanced features of the CPUs that exceed the common baseline. Consequently, any VM running in an EVC-enabled cluster can move between hosts without encountering compatibility issues, as it will only utilize CPU features that are universally supported.
Facilitating Seamless vMotion Between Different CPU Generations
One of the primary benefits of EVC is its ability to facilitate seamless vMotion migrations between hosts equipped with different generations of CPUs. Typically, vMotion requires that both the source and target hosts support the same CPU features to maintain VM stability and performance during migration. This requirement can be a significant barrier when managing clusters with mixed hardware.
EVC removes this barrier by allowing VMs to migrate across hosts with varying CPU architectures without encountering errors or needing downtime for compatibility adjustments. By presenting a uniform CPU feature set, vMotion can transfer the state of a VM from one host to another with confidence that the CPU capabilities will remain consistent.
This functionality is particularly beneficial for:
- Maintenance Operations: VMs can be freely migrated off a host requiring maintenance, ensuring continuous availability.
- Dynamic Resource Allocation: Hosts can dynamically balance workloads without compatibility constraints, optimizing performance across the cluster.
- Gradual Hardware Upgrades: Organizations can integrate new server models over time, preserving investment in existing hardware while adopting new technology.
Benefits of Enabling EVC Mode
Increased Flexibility in VM Migrations
One of the standout advantages of enabling EVC Mode is the enhanced flexibility it provides for virtual machine (VM) migrations. In environments with diverse CPU architectures, moving VMs between hosts can be fraught with compatibility issues. EVC alleviates these concerns by creating a consistent CPU feature baseline across all hosts in the cluster, thereby simplifying the migration process. This ensures that VMs can be migrated freely, enabling dynamic load balancing, improved resource utilization, and uninterrupted service availability during maintenance operations.
Simplified Cluster Management
EVC significantly simplifies cluster management by providing a homogeneous CPU environment across a heterogeneous cluster. Administrators no longer need to meticulously match CPU models or manually configure compatibility masks when adding new hosts. Instead, they can focus on other critical aspects of infrastructure management. EVC abstracts the complexity of CPU discrepancies, allowing administrators to maintain clusters with varying hardware seamlessly. This uniformity reduces the risk of human error and enhances the overall stability and performance of the virtual environment.
Extended Hardware Lifecycle
By masking advanced CPU features not uniformly present across all hosts, EVC enables organizations to make full use of their existing hardware for extended periods, even when introducing newer processors into the cluster. This capability allows businesses to phase in hardware upgrades gradually rather than conducting costly, large-scale overhauls. Consequently, EVC helps maximize return on investment (ROI) from existing server resources while facilitating the adoption of modern technologies, supporting a strategic and cost-effective approach to infrastructure management.
VMware EVC Modes and Compatibility
Overview of Available EVC Modes
VMware EVC provides several modes, each corresponding to a different CPU generation from Intel and AMD, allowing for standardization within a cluster. These modes are tailored to various CPU architectures and capabilities, offering baseline compatibility that aligns with different families and models of processors. EVC modes are typically named after specific CPU generations, such as Intel "Nehalem" or AMD "Opteron", representing the specific set of CPU instructions supported. By choosing an EVC mode, administrators can ensure that the cluster presents a uniform feature set compatible with older processors while hiding newer or advanced features that might disrupt migrations.
Determining the Appropriate EVC Mode for Your Cluster
Selecting the appropriate EVC mode is crucial to effectively utilizing this feature. To determine the right mode, administrators should consider the oldest processor's capabilities in the cluster, as the EVC mode sets the baseline that must be supported by all hosts. The chosen mode should correspond to or precede the feature set of the oldest CPU to ensure compatibility across the board. VMware's compatibility guide can assist in identifying which EVC mode aligns with the specific processor families present in the cluster.
Factors such as the specific workloads being run, future upgrade plans, and performance requirements should also be considered when determining the EVC mode. Setting the mode too conservatively might limit available features, whereas setting it too liberally could risk compatibility issues.
Ensuring Compatibility Between Different CPU Architectures
Ensuring compatibility between different CPU architectures is at the core of EVC's functionality. By selecting an appropriate EVC mode, administrators effectively mitigate compatibility issues that can arise during VM migrations between hosts with varying CPU capabilities. The key is to ensure that all features presented in the chosen mode are available on every host's CPU in the cluster.
Before adding a new host to an EVC-enabled cluster, administrators should verify that its CPU supports the EVC baseline set for that cluster. This step involves confirming that the CPU's feature set is compliant with the selected EVC mode, preventing potential migration disruptions. Tools within vSphere can assist in this verification process, helping maintain a stable and compatible environment.
Enhanced vMotion Capability compatibility guide
Compatibility functions for EVC are determined by the model of the old ESXi server processor in the cluster. Typically, older ESXi and vSphere releases support newer processors. However, the maximum EVC baseline remains at the level of older processors that were functional when the particular version of vSphere was released and was then considered the newest.
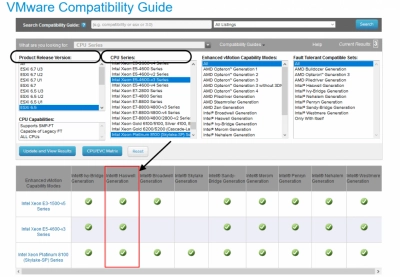
To check the compatibility of your processors and determine the highest possible EVC mode, go to the VMware website and open the VMware Compatibility Guide page. Select the required CPU series and your ESXi version, Next, click the CPU / EVC Matrix button and you will see a table of available EVC modes for your ESXi servers.
Configuring EVC in VMware
So, if you decide to use the mode, then make sure that the following requirements have been met:
- Processors for all ESXi hosts must be Intel or AMD.
- Intel VT-x or AMD-V must be enabled in the UEFI / BIOS of ESXi hosts.
- ESXi hosts must be managed by the same vCenter Server and vMotion must be configured.
Now let's proceed with step-by-step configuration of VMware EVC mode.
- Open VMware vSphere Web Client and go to vCenter.
- Next, select the Hosts and Clusters section and select each ESXi host to check the CPU configuration.
- Once the hosts are added to the cluster, select your cluster and click the Manage tab.
- In the "Settings" tab, select "Configuration".
- Click on "VMware EVC" and select "Change".
- Click on the button “Enable EVC for Intel Hostsand”, and select “Intel Penryn Generation”. Then save the EVC mode settings.
- To see details about registers and mask values, click “Current CPUID Details”.
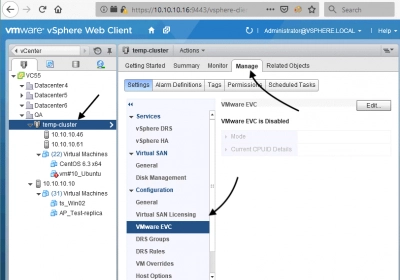
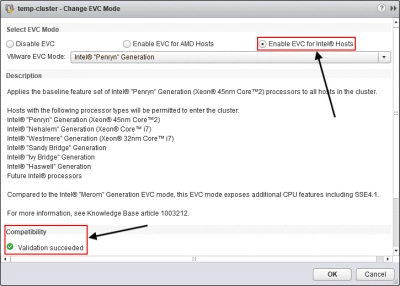
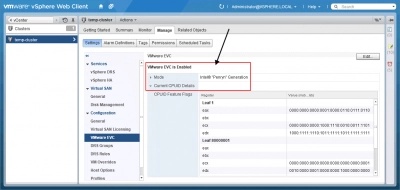
The easiest way to enable EVC mode is when creating a new cluster. This will reduce the occurrence of problems associated with shutdown and migration of virtual machines that are included in the cluster.
VMware EVC Mode features
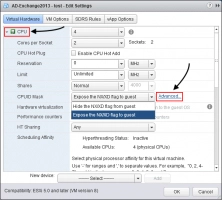
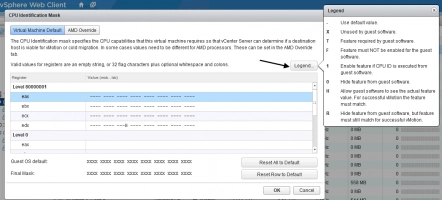
CPUID Masking
The CPUID masking feature was created even before EVC. Typically, vCenter compares the CPUID parameters on the virtual machine with the CPUID parameters on the target ESXi host and, if these parameters match, virtual machine migration will be available.
However, be careful with manually editing masks, as this can cause unsupported virtual machine configuration.
Per-VM EVC Mode
Starting with VMware vSphere 6.7, you have the ability to set the EVC mode for each virtual machine. This is quite useful for migrating virtual machines between different clusters or vCenter servers. It also offers a great degree of granularity. In order to use the changed EVC mode settings for each virtual machine, you must turn off and on the virtual machine.
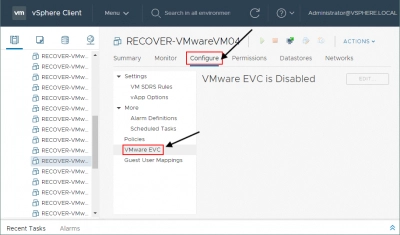
Enabling the EVC Mode in the Cluster without downtime
First, again turn off and then turn on the VM. Without doing this, this procedure will not work.
Also, you must follow certain guidelines:
- Active virtual machines must be on the ESXi host with the oldest processor.
- The EVC mode in the cluster must be configured to use the oldest generation CPU instruction sets.
How to enable Enhanced vMotion Capability Mode
It is recommended to use standard vSwitch (rather than distributed vSwitch). If you do, you will not have any problems connecting the virtual machine with vCenter to the network.
Potential Challenges and Best Practices
Addressing Common Issues When Enabling EVC
While EVC provides numerous benefits in managing mixed hardware environments, enabling it can present certain challenges that need careful attention:
- 1. Incompatible CPU Features: A common issue arises when existing hosts have CPUs that lack some features required by the chosen EVC mode. This can prevent the enabling of EVC until all hosts conform to the selected baseline. To address this, ensure that the EVC mode selected aligns with the capabilities of the oldest host in your cluster.
- 2. Configuration Errors: Configuration mistakes, such as selecting an incorrect EVC mode, can lead to VM startup issues or migration failures. Double-check compatibility with VMware’s documentation and use the compatibility checks within vSphere.
- 3. Performance Degradation: If EVC is set to a mode lower than necessary, it may mask beneficial CPU features, potentially impacting VM performance. Evaluate your cluster’s workloads to ensure the chosen EVC mode meets performance requirements.
- 4. Upgrading CPU Architectures: Introducing new hosts with CPUs that exceed the existing EVC baseline requires careful planning. Evaluate if upgrading the EVC mode might be necessary to incorporate new hardware without compatibility issues.
Recommendations for Maintaining Optimal Performance
To maintain optimal performance while leveraging EVC in your virtual infrastructure, consider the following best practices:
- 1. Thorough Planning and Testing: Before enabling or changing EVC modes, conduct a thorough assessment of your current infrastructure. Use staging environments to test EVC settings and their impact on VMs to avoid disruptions.
- 2. Regularly Review and Update EVC Settings: As hardware in the cluster evolves, periodically reassess the EVC baseline to ensure it continues to meet the needs of your infrastructure. If new hardware is added, evaluate if an EVC mode update is appropriate.
- 3. Monitoring and Performance Analysis: Continuously monitor VM performance post-migration to detect any degradation that might result from EVC masking. Utilize vSphere’s performance monitoring tools to ensure resource allocation remains optimal.
- 4. Documentation and Communication: Maintain clear documentation of the EVC modes and their rationale for all cluster environments. This ensures seamless knowledge transfer and effective communication among team members managing the infrastructure.
- 5. Leverage VMware Support and Resources: Utilize VMware’s support services and online resources for guidance on compatibility and troubleshooting. Engaging with the community can provide insights into best practices and common challenges.
Protecting your data is possible with VMFS Recovery
VMFS Recovery helps protect your data, as it is designed to quickly and correctly read the VMware VMFS file system. This utility returns any files from damaged or healthy disks in VMFS format. This all happens online.
Recovery of VMDK images on ESXi and VMware vSphere servers is also available. The program has a unique VMware Data Recovery Wizard, which, if you need assistance, will ensure uninterrupted operation and extremely positive results. The recovered folders and files can be exported to local or remote locations, including via FTP.
Follow the step-by-step instructions for DiskInternals VMFS Recovery and soon your data will be safe:
- If necessary, make sure that the SSH connection is set up.
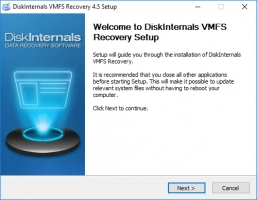
- Download the application and, after installation on a computer with Windows Vista, 7, 8, 10 or Windows Server from 2003 to 2019, run the Recovery Wizard if it does not happen automatically.
- Open a remote or local drive that will be subjected to a full or quick scan.
- After you've found the VMDK files, mount them and you can open them right away (for free).
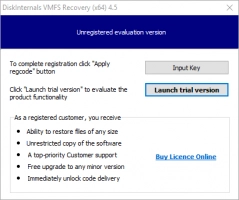
- Now that you are convinced of the results, it's time to click the Buy License button; after that you will receive a unique key with uninterrupted access to the exported data. Learn about vSphere 8.0 recovery here!
Ready to get your data back?
To recover VMware virtual machine (start recovering your data, documents, databases, images, videos, and other files), press the FREE DOWNLOAD button below to get the latest version of DiskInternals VMFS Recovery® and begin the step-by-step recovery process. You can preview all recovered files absolutely for FREE. To check the current prices, please press the Get Prices button. If you need any assistance, please feel free to contact Technical Support. The team is here to help you to open VMDK file and repair VMDK file if required!
Conclusion
In the dynamic realm of virtualized environments, VMware Enhanced vMotion Compatibility (EVC) stands out as a pivotal feature that addresses the intricate challenges of CPU compatibility across mixed hardware clusters. By establishing a uniform CPU feature set, EVC empowers organizations to execute seamless live migrations, thereby enhancing operational flexibility and ensuring uninterrupted service delivery. Its ability to simplify cluster management and extend the lifecycle of existing hardware adds considerable value, facilitating strategic growth and resource optimization.
In recapping the importance of VMware EVC, it becomes evident that its integration is more than a mere technical enhancement—it's a strategic enabler of efficiency and adaptability. With EVC, organizations are better equipped to navigate the complexities of modern IT infrastructure, balancing the benefits of innovation with the practicalities of existing investments.
Therefore, IT administrators and decision-makers are encouraged to implement EVC within their vSphere environments to maximize vMotion compatibility. By doing so, they not only fortify the stability and resilience of their virtual infrastructures but also set the stage for future expansions and upgrades that can be managed with confidence and ease. Embracing EVC is a proactive step toward a more agile and responsive virtualized landscape, ensuring that organizations remain at the forefront of technological advancement while maintaining robust operational capabilities.
FAQ
How does EVC work?
Enhanced vMotion Compatibility (EVC) works by creating a consistent virtual CPU feature set across all hosts within a cluster. It masks the differences between CPU generations, ensuring that all CPUs present the same set of features to the virtual machines. Before allowing vMotion, EVC verifies that the destination host supports all the features exposed by the source host's CPU. Consequently, VMs experience seamless migration without encountering compatibility issues related to processor differences. This provides flexibility in managing and upgrading hardware without interrupting ongoing workloads.Is VMware EVC between Intel and AMD?
VMware's Enhanced vMotion Compatibility (EVC) is confined to working within the same processor architecture, meaning it does not support cross-vendor migrations between Intel and AMD CPUs. Each CPU vendor has distinct feature sets and architectures, making such a transition challenging without causing compatibility issues. EVC is specifically designed to mask differences within the same vendor's CPU generations to maintain a consistent environment for VMs. Therefore, if you need to migrate VMs between Intel and AMD processors, you must consider other strategies beyond EVC. This limitation emphasizes the importance of planning hardware upgrades carefully to maintain compatibility within your environment.How do I enable EVC in VMware?
To enable EVC in VMware, first ensure all hosts in your cluster are powered down or in maintenance mode. Then, open the vSphere Client, navigate to the cluster settings, and find the "VMware EVC" option. Select "Edit" to configure EVC, choose the appropriate EVC mode for your hosts' CPU vendor (Intel or AMD), and set the required CPU baseline. Once configured, power on your hosts and verify that EVC is active and operational. It's essential to migrate or save VM states before powering down if you plan to enable EVC on an existing cluster.How to check EVC mode of VM?
To check the EVC mode of a virtual machine, access the vSphere Client and select the cluster that contains the VM. Navigate to the "VMware EVC" tab within the cluster settings to view the current EVC mode and CPU baseline compatibility level. Additionally, you can examine the VM's summary to confirm its compatibility with the cluster's EVC mode. If needed, you can review the individual VM's settings for further details on its CPU feature set and any specific mode requirements. This process ensures that the VM adheres to the EVC standards set for the cluster.

