Guide: how to create and configure VMware vSwitches
Here you will find out:
- what is VMware vSwitch?
- types and configurations for VMware vSwitch
- how DiskInternals VMFS Recovery can help you
Are you ready? Let's read!
What is VMware vSwitch?
Virtual computers use the same type of network connection as actual machines. Virtual machines require virtual switches (vSwitches) and virtual network adapters to connect to actual networks, though. As a result, three virtual networks are used by virtual machines based on VMware Workstation, and each of them has a separate virtual switch:

- VMnet0 Bridged Network — connects the virtual network adapter of a virtual machine to the network adapter of a physical host.
- VMnet8 NAT — uses a separate subnet behind NAT and connects through it to the same network as the physical host adapter.
- VMnet1 Host Only —- connects only to a host using a different network.
ESXi host-based virtual machines also have virtual switches, but with different settings.
Understanding the vSwitch
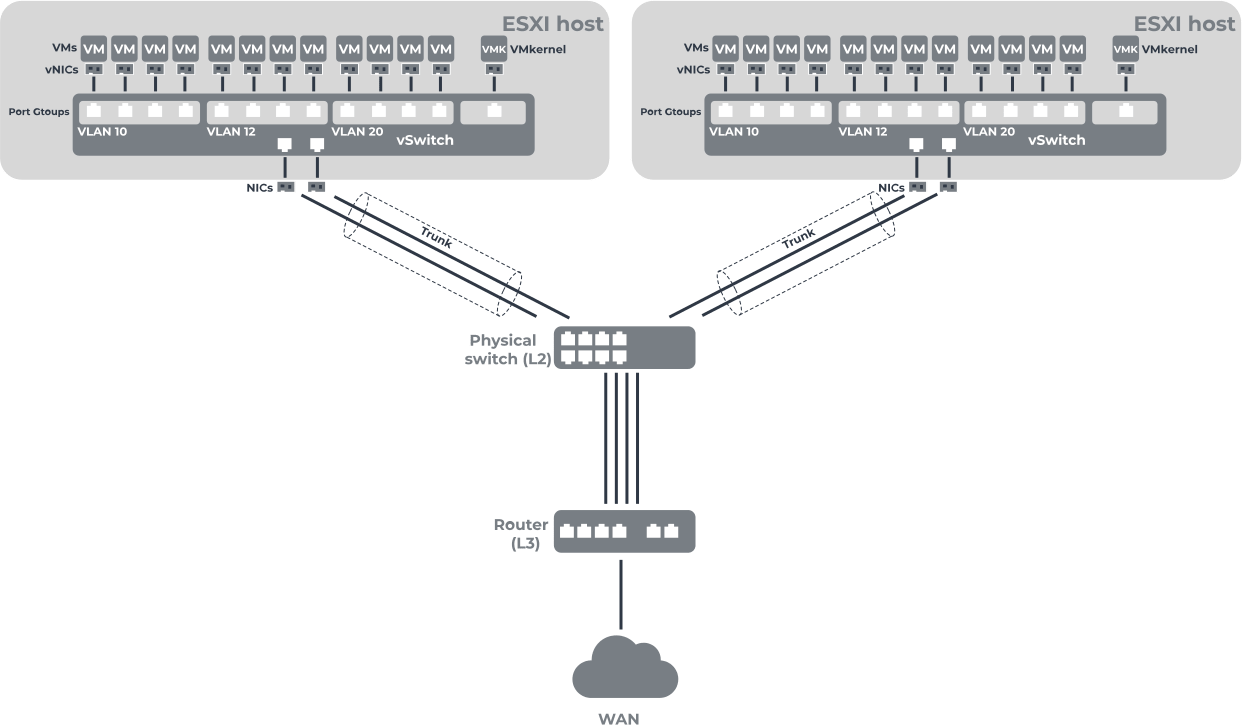
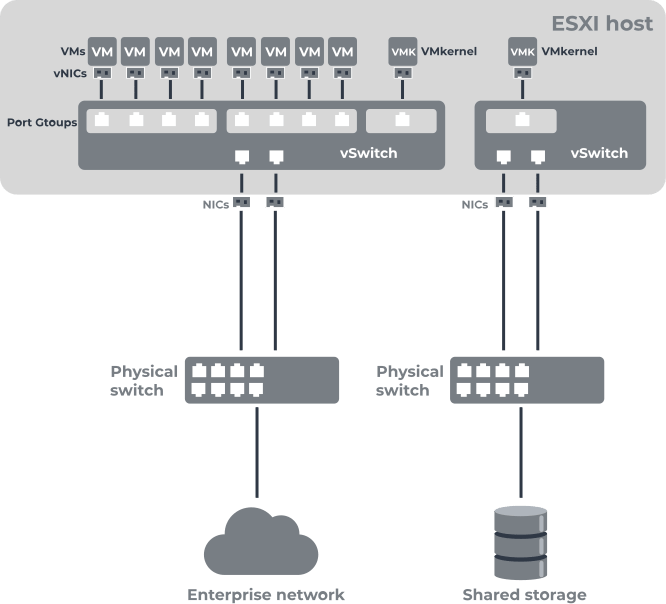
VMware virtual switches (or vSwitches) are designed to provide connectivity between virtual machines and to connect virtual and physical networks. The vSwitch uses the ESXi host's physical NIC to connect to the physical network.
A virtual switch has the same functions as a regular switch, but at the same time:
- It does not learn the transit traffic MAC addresses from the external network.
- It is not related to Spanning Tree protocols.
- There is no way to create a network loop for a backup network connection.
Virtual Switches: types and advantages
There are two main types of virtual switches:
- 1. Standard virtual switches
- 2. Distributed virtual switches
1. Standard vNetwork switches can be configured on one ESXi host; by default, this vSwitch has 120 ports.
The following are the main features of this communicator:
- Channel Detection is a feature that can be used to troubleshoot network problems.
- The security protocol includes the Promiscuous Mode option, which provides the ability to change the MAC address of the virtual network adapter of a virtual machine; the ability to allow or block the sending of outgoing frames with MAC addresses; and the ability to combine multiple network adapters and link to a virtual switch, resulting in increased bandwidth and providing passive failover in the event of a failure of one of the pooled adapters.
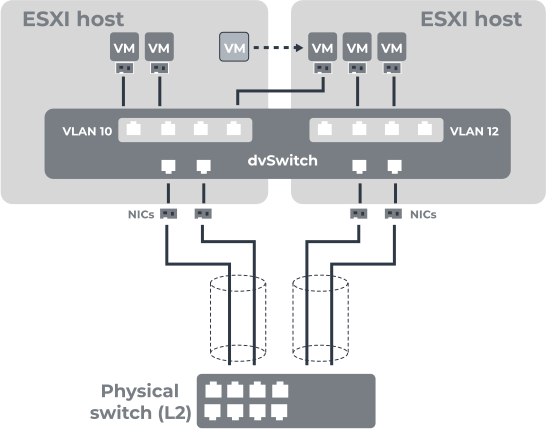
2. Distributed vSwitch vNetworks are more advanced virtual switches (configurable only on vCenter Server), which, along with the basic functions, enable centralized administration. You do not need to manually configure standard vSwitches on each ESXi host, but just configure the vCenter dvSwitch to be centrally managed. The number of ports that can be installed on a dvSwitch is 60,000. However, an Enterprise Plus license is required to use the dvSwitch function.

Additional Features dvSwitch that you can take advantage of are:
- Centralized management.
- Shaping of outgoing and incoming traffic.
- Disable sending and/or receiving data for port groups.
- Port mirroring to monitor traffic and perform network diagnostics.
- Set specific policies for each port.
- LLDP, Netflow support.
The main advantages of using vSwitches are:
- Separation of networks that are using VLANs and routers. This allows you to restrict access from one network to another.
- Improved privacy policy and flexible network management.
- Easier VM migration and deployment.

Creating and configuring VMware vSwitches
To create a new vSwitch, connect to the ESXi host using the vSphere web client. Then follow these steps:
1) go to the Network section and select Virtual Switches; 2) click “Add Standard Virtual Switch”; 3) then come up with a vSwitch name and other parameters as needed and click the Add button.
- To add an uplink, in the section “Networking”, select “Actions” and then click “Add uplink”. You will need to select two network adapters, set their parameters, then click the Save button.
- Create a port group, in the section "Network", select the Port groups link. Next, click "Add port group" and set the port group name and VLAN ID (if necessary). Then click "Add".
- Create a NIC to use a dedicated VM network, vMotion network, SAN, Failover logging network, etc. In the section, Networking select VMkernel NIC and click “Add VMkernel NIC”. Next, select the port group where the VMkernel will be created. After configuring the main parameters, click the Save button.
Protect your data: it is possible with VMFS Recovery
VMFS Recovery can help you to complete a VMware disk recovery quickly and cost-effectively, without the need to visit data recovery companies. VMFS Recovery has the maximum functionality, along with the standard options; you can take advantage of additional features for a small fee. Scanning the file system and finding all lost, damaged and deleted pieces of data will take little time and will allow the program to fully recover data.
How to use VMFS Recovery:
- Download and install VMFS Recovery.
- Connect via SSH if necessary.
- Select the target (it can be a local disk or SSH).
- Scan the target and find the necessary VMDK files.
- Mount the VMDK files to preview for free.
- Purchase a license to complete data export.
